Import Adoption Headers – (TX 1.23.1)
Import Adoption Headers – (TX 1.23.1)
You must have a file from your administration to proceed with this import. If not, please proceed to the next section. For more information on this import process, please contact the TCS Service Center.
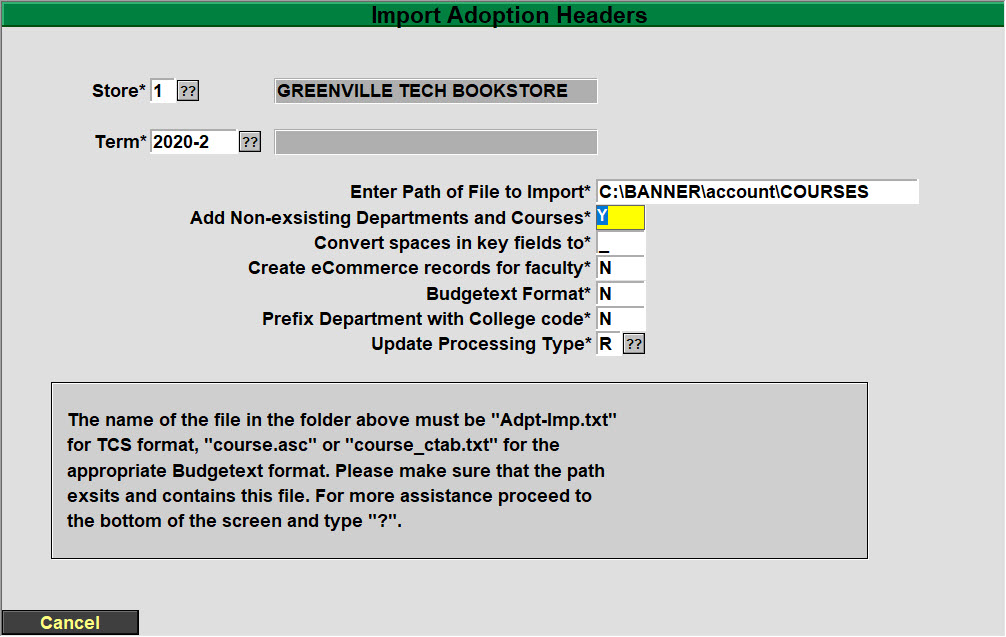
Enter the Adoption term you will be importing. – The term will already have to exist in Term Maintenance (TX.SU.1.2.1).
Enter the path of file to import * – The name of the file must be “Adpt-Imp.txt” or “course.asc” for the Budgetext format. Please ensure that the path exists and the file is named correctly for the import to be successful.
Add Non-existing Departments and Courses * – Enter a ‘Y’ if you wish the program to automatically add Departments and Courses that are not currently on file, but are contained within the import file. If you enter ‘N’, then the program will warn you each time it finds a Department or Course that is not on file and will not add the adoption record.
Convert spaces in key fields to: Spaces are not allowed in the key fields of a store, term, department, course and/or section number. If your import file contains spaces enter the character you would like it converted to. If you leave it blank the spaces will be stripped out. Asterisks (*) are not allowed.
Create eCommerce records for faculty* – Enter a ‘Y’ so the system will automatically create the eCommerce records (Pref Customer record) so faculty can log into the faculty adoptions.
Budgetext Format* – Enter ‘N’ if the file name is “Adpt-Imp.txt”, enter a ‘Y’ if the file name is “course.asc” or “course.ctab.txt”
Prefix Course with College Code* – Normally you will enter an ‘N’, if your school has multiple college codes and you need them to distinguish which college the course is associated with then enter a ‘Y’.
Update Processing Type* – Options are ‘R’ Report only, ‘I’ Import only and ‘B’ Import and Report
Once you are satisfied with your entries you MUST choose ‘R’ Run Procedure. If you need assistance with this process please contact the TCS Service Center.
*** Important ***
If you are doing multiple imports throughout the term, after the first import, choose ‘R’ report ONLY to see any changes that need to be MANUALLY input in the adoption system.
Upgrading to Windows 10
This article covers how to determine what version of Windows is running on a register, if that register is a valid Windows 10 upgrade candidate and what the upgrade process will entail.
We have seen some units with the D2550 processor upgrade to Windows 10 even though they are flagged as incompatible by Touch Dynamic. Upgrading those units may work, but it is risky.
This is a work in progress and information will be updated as it becomes available.
Determine the Windows Version and CPU Model
-
- Click on Start
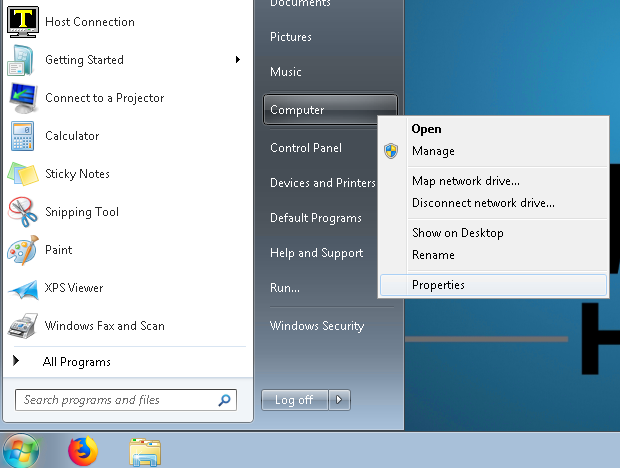
- Right click on Computer and select Properties
- This will bring up the System window with the needed information
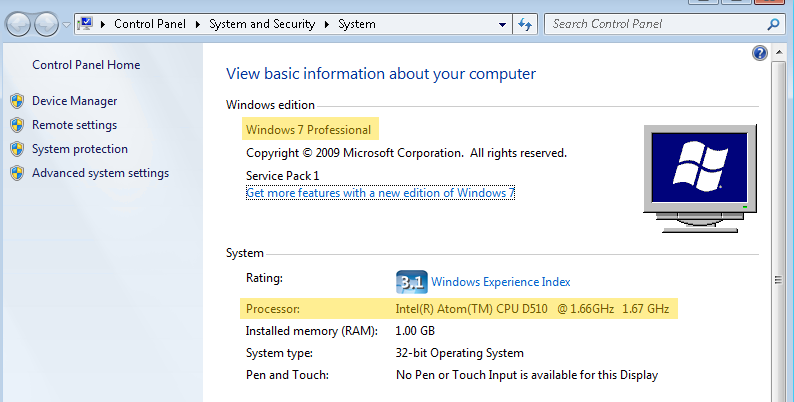
- In the top section we can see that the machine is running Windows 7 Professional and needs to be upgraded.
- If this shows as Windows 8 or Windows 10 then Windows does not require updating.
- In the second section we can see that the Processor is an Intel Atom D510 CPU
- The CPU model can be compared against the following table to determine if it’s a valid candidate for Windows 10.
-
Celeron 1.0-1.5 N/A Celeron M1.86/C2D 1.66 N/A Atom N270 1.6 N/A Atom D525 1.8 N/A Atom D2550 1.86 N/A Celeron J1900 2.0 OK Ivybridge 1037u 1.8 and i3-3217u 1.8 OK SandyBridge G540, G850, i3-2120, i5-2400, i7-2600 OK Haswell G1820, G3440, i3-4330, i5-4570S, i7-4770S OK Skylake 3955U, i3-6100u, i5-6300u OK Celeron J3455 2.3 OK Kaby LakeG3930TE, i3-101TE, i5-7500T, i7-7700T OK BayTrail Atom Z3745 1.86 N/A Cherry Trail Atom X7-Z8750 2.56 OK
-
-
-
- Since the D510 is not listed with a green OK (it’s too old to even show on the list) it is NOT a valid candidate for Windows 10 and will ultimately need to be replaced.
- If the CPU was a valid option then one of the upgrade paths below would be the next step.
-
Upgrading to Windows 10
There are two different options that IT can follow to upgrade to Windows 10. Either an “over the top” upgrade or a fresh install. There are certain steps that should be followed before either option is performed. Our support group is happy to answer any questions or assist your IT in going through these steps the first time.
-
-
- Backup the following directories to a thumb drive. Create a directory for each register’s files. E.g. reg 101, reg 102, etc. with the contents from that register.
- C:\TCS
- C:\TCSDB
- If this directory doesn’t exist then backup C:\IBM\UV
- C:\TCS Host or C:\TCS
- C:\Program Files (x86)\Vantiv\triPOS Service\tripos.cfg
- This will only appear on registers where Chip and Pin (EMV) credit card devices are used.
- Backup the following directories to a thumb drive. Create a directory for each register’s files. E.g. reg 101, reg 102, etc. with the contents from that register.
-
The register can then be upgraded to Windows 10 through the upgrade or fresh install options. After it has been completed TCS will need remote access via ShowMyPC to reinstall the software, restore the data from the backup and setup the peripherals.
The ShowMyPC session will need to be started while a local administrative account is logged in. Machines where the upgrade option was used will still have their original user which should be fine. Fresh installs will require a new user to be created. This user can be temporary as TCS will need to setup a specific user with local administrative rights.
The time spent by TCS setting everything back up is billable and typically takes around 1 – 1.5 hours to complete on a fresh install and as few as 30 minutes on an over the top upgrade.
Adopt GM Items
Adopting GM Items
Enter or Modify your adoption TX.1.1, select the DEPT/CRS/SECT in Adoption Maintenance you wish to add your GM item (s) to.
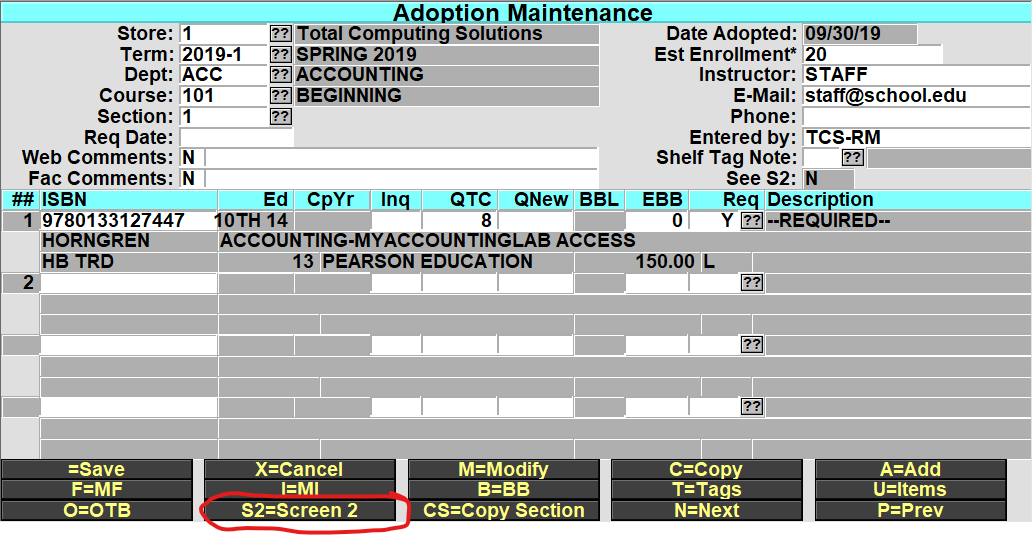
At the bottom-line prompt select S2=Screen 2.
In the new S2=Screen, if your campus is using a specific CRN number that identifies the DEPT/COURSE/SECT . then you can enter that here, once entered you can enter the Campus Class#, preceded by a semi colon (;) in the Dept, Course or Section fields to look up the section (i.e. ;01234567). *Campus Class is not a required field not all users use this feature. You can navigate past this field by pressing enter or click on the SKU field.
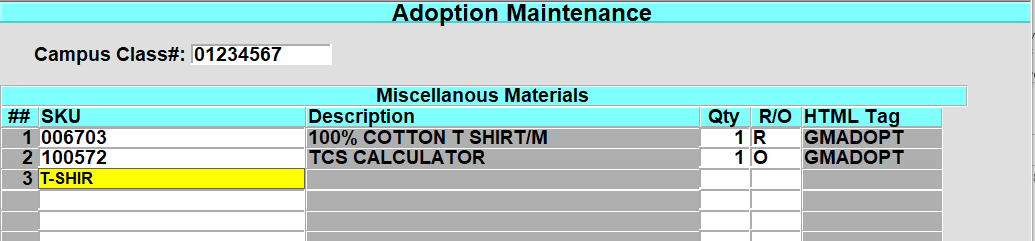
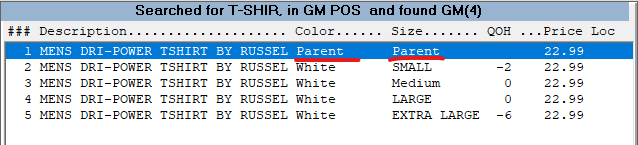
In the SKU field, enter the SKU or you may do the normal GM item lookup to find the item. If you are selecting a Matrix GM item then select the Parent SKU, This way when its displays on the web the customer will see the Color and Size drop down selectors to choose from.
Enter the QTY that the student should purchase for the section and enter R/O to indicate if the item is Required or Optional.

Adding Fee(s) Adoptions
You can add POS Fee Code(s) the same way that you would add a sku in the S2=Screen 2. The fee will then be displayed along with the GM and Textbook information in the Adoption/Course search on your website.
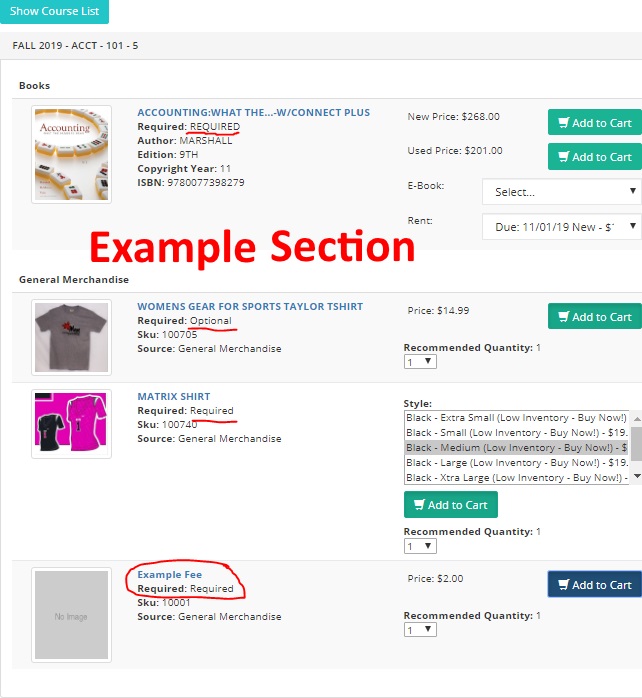
You can also enter in Fee Code(s), this allows you to collect any additional fees that may be required for the course that has been set by the Instructor or Staff. *for details on setting up Fees Codes, reference POS Training
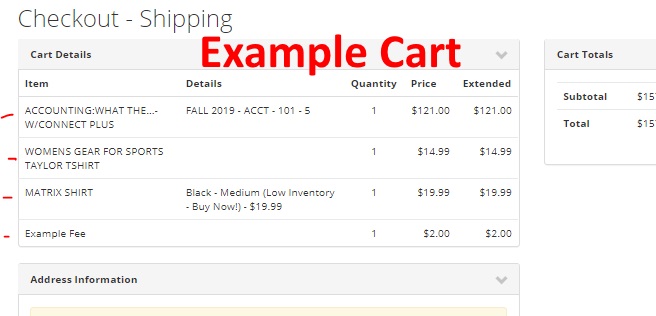
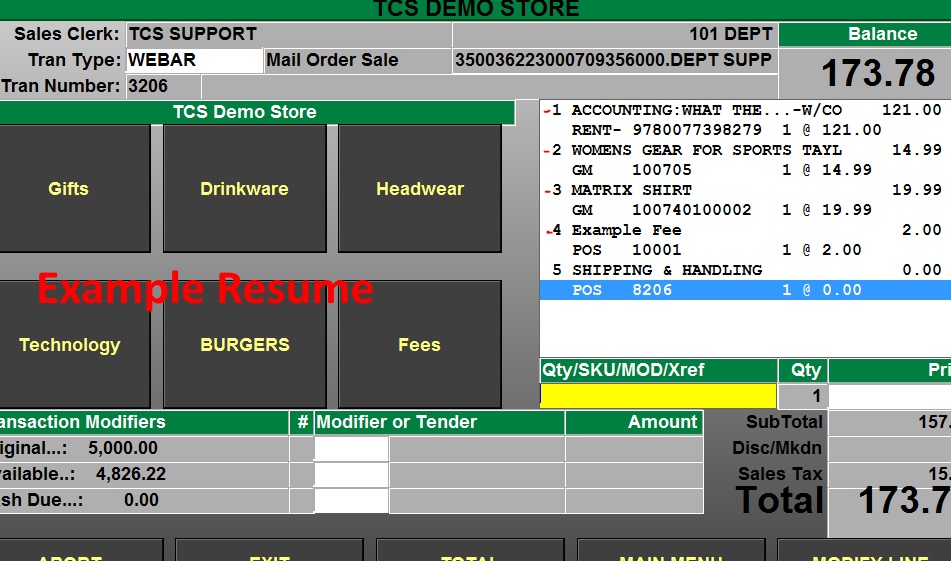
Example web cart
Resume Web Order
Resume Orders that have been placed will look the exact same as other Web Orders. *note you will have to verify the rental item and price when resuming the order. It is best that you have a copy of the order to verify the type or rental and length of rental.
Example Web Order Resume
Textbook Sales History
Added a SH=Sales History to the MF screen, when you select this, the users default store will be used, user can select a different store if more than one is available.
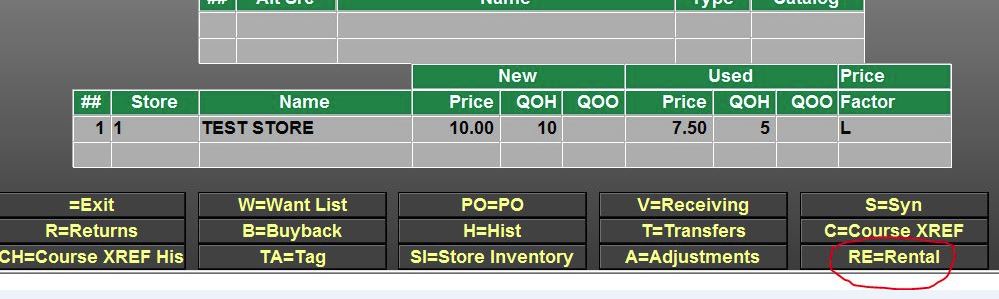
Link to Rental Screen from TX – MI
Added a RE=Rental to the MI screen in TX. This option will only display if there is an associated rental master record. When you view the RE=Rental screen it is passing the “Inquiry” through so you are still in Inquiry mode and will not be able to edit any information in the Rental Master record.
Print Pickslip
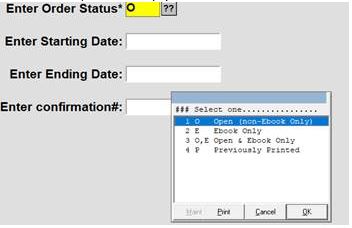
In POS.26.13 (Print Pickslips) the ‘Status’ has been modified to have a ?? button and a new option of O,E has been added that will print any un-printed orders regardless as to weather or not it has an ebook only.
Report: Department Sales
Department Sales
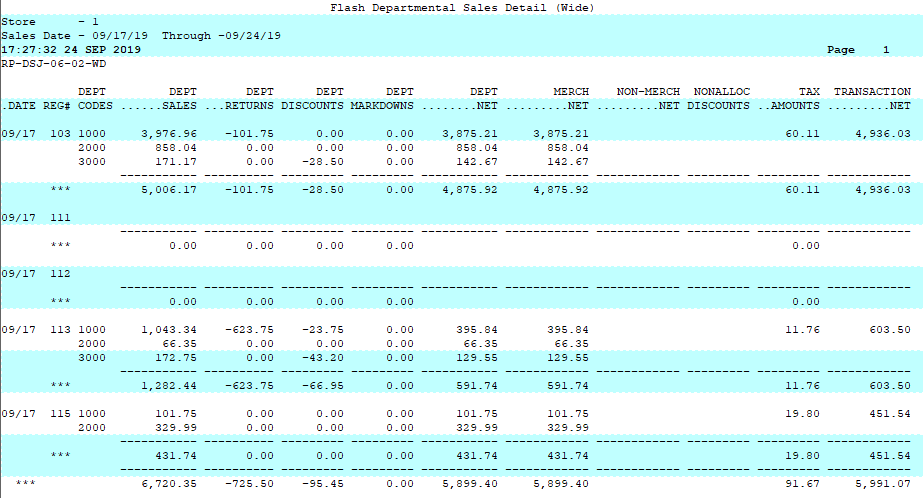
Below is an overview of the Department Sales report.
Path: POS-RP-1-5-2
Purpose: Display the gross to net numbers by department.
Output: Date, Department Codes, Department Sales, Department Returns, Department Discounts, Department Markdowns, Department Net, Merchandise Net, Non-Merchandise Net, Non-allocated Discounts, Total Taxes, Transaction Net.
The summary output combines the sales information for the entire day.
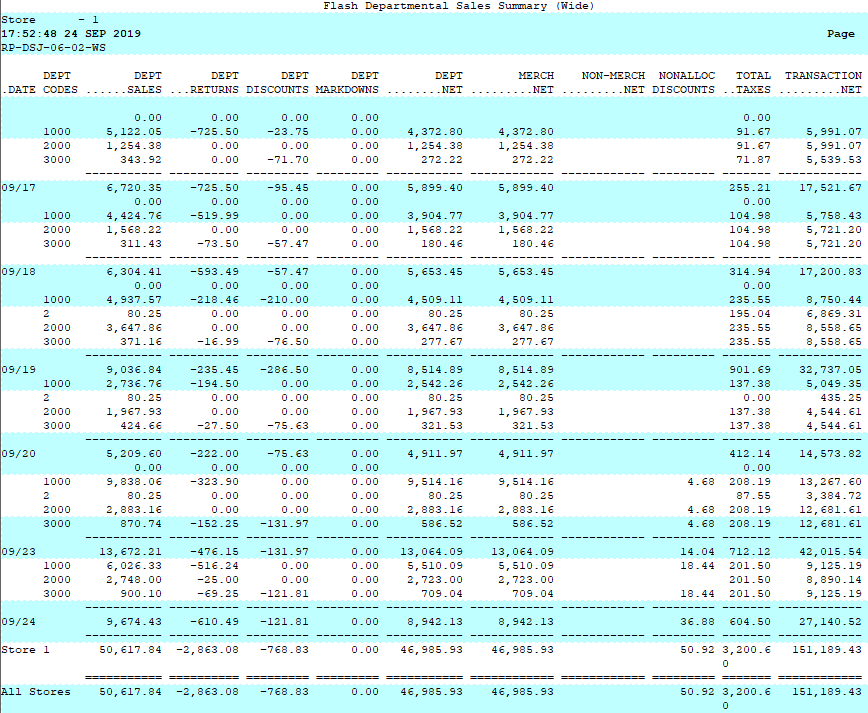
The Detailed version breaks the sales figures out by register.
Report: Store Sales by Store
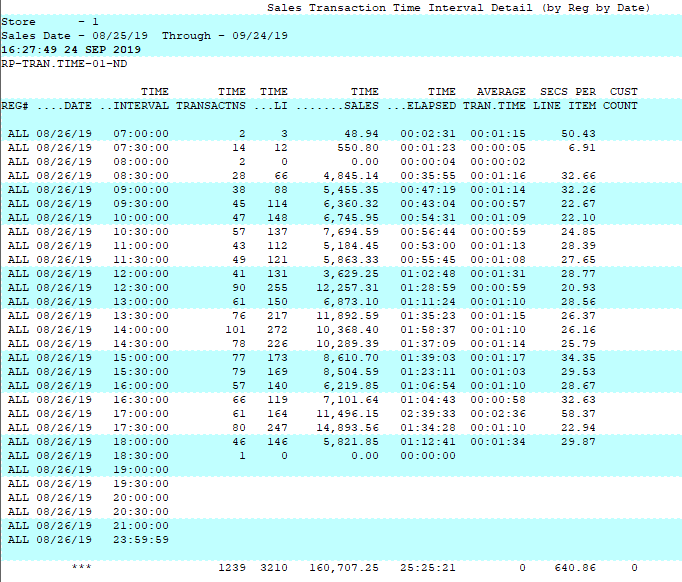
Below is an overview of the Store Sales by Store by Register by Date report which is virtually identical to the Store Sales by Store by Date by Interval.
Path: POS-RP-1-4-1 and POS-RP-1-4-2
Purpose: These reports are used to display the number of transactions, dollar amount and item count for a given time period. This can be in detail or summary format, with store and/or date sub totals.
Output: Register, Date, Time Interval (default 30 mins) Time Transactions (transactions in time period), Time LI (line items per time period) Time Sales (dollar amount sold in time period) Time Elapsed (time between sales) Average Tran.Time (average transaction time), Secs Per Line Item, Cust Count (edge case typically not used)
A Summary can be run to get the ending value for each day, but the true value is in the detailed version of the report.
Web Order Returns
The steps below cover how to return a web order. It’s virtually identical to a regular return, with two exceptions; the transaction type and the tender.
These steps also include returning an ebook. That part of this process is the same for web and regular orders as well.
All web returns must be completed from a Host Connection or your regular web order machine.
- Start by using the MORT transaction type or the return option under your web register
- Look up the customer
- Enter the items to return
- For an ebook, enter the ebook SKU, or scan the ISBN and select the ebook option (if applicable)
- Answer the prompts for the original transaction the ebook was purchased on
- This is so that the system can get the access codes and verify if they are valid for return
- Confirm the access code is correct
- Repeat for any other ebooks
- Note that any access code that has already been activated is not a valid candidate for returns per Redshelf.
- Total the transaction after all items have been returned
- Select the appropriate shipping amount (if applicable)
- The tender should default to the transaction amount + tender type
- If not, enter the amount followed by the original tender type
- e.g. 10.25AR 10.25CC 10.25EL 10.25BL 10.25BLM
- If a Credit Card was used, select either the Match or Swipe option
- Swipe allows the customer to return to a new card. This is rare for web transactions since the customer usually isn’t in the store with their card handy.
- The Match option allows you to return the funds to the original card if a card was used on the original transaction.
- Answer the the original transaction prompts so the system can obtain the credit card token to use.
- Press enter and the process is complete.