Sell Gift Cards Online

The purpose of this article is to cover the steps a customer can take to sell a gift card online.

The general process is to create fee codes at the desired price points, assign them to a a web catalog, and then generate the unique Gift Card/Voucher code when the order has been completed.

Pre-Requisites

  1. Determine the desired price points
  2. Determine the correct class code
  3. If using an image, have the full image name handy

Create Gift Card Fee Code(s)

  1. Navigate to POS-22-23 for Fee Code Maintenance and fill out the necessary fields
  2. Add a new code (we recommend at least four digits)
  3. Enter a description for the gift card
    1. This will display on the website. We recommend stating the value in the description if multiple price options are used.
  4. Assign the appropriate Class Code
  5. Flag whether or not the purchase is taxable (typically no)
  6. Set Factor to 1
  7. Enter the desired amount for Default Amount
  8. Set the Voucher Code to GC
  9. Enter the name of the image to display in the Image ID field (optional)
    1. Be sure to upload any image assigned to the website under the GM Images directory
  10. Repeat as needed for each price point

Add Gift Card Fee to Web Catalog

  1. Navigate to POS-22-5 and enter the desired Catalog ID
  2. Fill out the required fields if this is a new catalog
  3. Add the Fee Code(s) created above in the SKU column
  4. Save your changes
  5. The price points are now available for purchase on the website
    1. Customers can search or navigate through the catalog to get to the item

Order Fulfillment

When processing the transaction, the clerk will process and activate the Gift Card the same as if it was sold in a regular transaction. The only difference is that instead of prompting for a dollar amount, the fee code automatically populate with a dollar amount.


Customer GUI Installation

Below are the steps that one of our customers can follow to install and setup the TCS application on a desktop computer. Ideally these steps are performed via a remote session by members of the TCS support team but sometimes that isn’t feasible.

The technical level of these steps are slightly above normal and should be completed by members of IT staff or individuals comfortable navigating directories, installing applications and copying files.

Pre-requisites

There are a handful of items that are required for a new installation of the software. In migration scenarios (switching from an old PC to a new one) the items will already be available on the old PC. It is necessary to contact TCS support to obtain files for a brand new setup.

  1. OpenVPN configuration files
  2. TCS application with pre-configured connection settings
  3. Local administrator rights to install and configure software

Obtain and Install Required Software

  1. Download the OpenVPN installer from here
    • Run the installer and select the Customize option.
    • Click the red X on OpenVPN Service and select Entire Feature will be installed on local hard drive
  2. Download the TCS application installer from here
    • Run the installer and click next throughout the process. Use the default option on all steps.

Obtain the Configuration Files (Migration Steps)

If migrating from an old PC to a new PC, the configuration files can be copied to a network share, usb thumb drive, etc. and placed on the new PC.

  1. Copy the C:\TCS Host (sometimes just C:\TCS) folder
  2. Copy the Host Connection shortcut from the desktop
  3. Copy the C:\Program Files\OpenVPN\config and the C:\Program Files\OpenVPN\config-auto folders
  4. Disable the OpenVPN service
    • Start > Services.msc
    • Right click the OpenVPNService and select Stop
    • Follow the steps in the Cleanup section once the new PC is confirmed working.

Obtain the Configuration Files (New Device)

Email support@total-computing.com requesting the VPN and GUI configuration files

  • Please include the name of the end user
  • Please include whether this is a brand new computer or if the user is migrating devices

Place the Configuration Files

The steps below cover the scenario where configuration files are sent via email. Essentially the same steps can be followed when copying from an old PC. Just use your thumb drive, network share, etc. as the source vs the emailed zip files.

There will be two zip files included in the email, Host Connection.zip and cust-user-vpn.zip

  1. Download both zip files to the destination machine and copy their contents to the correct directories.
  2. TCS application
    1. Open the Host Connection.zip
    2. Copy (or drag and move) the TCS Host folder inside the zip file to C:\
      • If you use the “Extract all…” option then set the path to C:\
      • The path to the tcs.exe executable file should be C:\TCS Host\tcs.exe
    3. Copy the Host Connection shortcut inside the zip file to C:\Users\Public\Desktop
  3. OpenVPN configuration files
    1. Open the cust-user-vpn.zip file
    2. Copy the contents to C:\Program Files\OpenVPN\Config
    3. Copy the contents to C:\Program Files\OpenVPN\Config-auto

Start and Test

  1. Set the OpenVPN Service(s) to start automatically
    1. Start > type services.msc and run Services with admin rights
    2. Verify the following services have a startup type of Automatic.
      1. OpenVPN Interactive Service
      2. OpenVPNService
    3. Restart the OpenVPNService
      1. Right click OpenVPNService
      2. Click Restart
  2. Launch and test the TCS application
    1. Double click the Host Connection shortcut
      • If any errors appear than this typically means the folder paths are incorrect
    2. Click the Padlock icon and select the Log on button
  3. The application should connect and display the regular login screen. If it does not than please contact TCS support.

Cleanup (Migration Only)

Each VPN configuration is assigned a static IP address. If both the old and new computers connect to the VPN at the same time it will cause a conflict and neither connection will reliably work.

  1. (Required) Navigate to c:\program files\openvpn and delete the config and config-auto folders
  2. (Highly recommended) uninstall the OpenVPN software via standard Windows mechanisms
  3. (Recommended) uninstall the TCS application via standard Windows mechanisms
    • Delete the C:\TCS Host folder and verify that c:\program files (x86)\tcs is removed as well.


Transfer and Import Redshelf Catalog

After adoption information has been exported and sent to Redshelf, they will send a catalog file back that contains the detailed pricing information for available titles. This file needs to be transferred to the hosting server and a process ran to import the data. This is very similar to the process of uploading and importing adoption information.

Prerequisites

  1. FileZilla (or another FTP program) is required to transfer files to the server
    • Instructions on setting up and using FileZilla can be found here.
  2. You must have access to the Redshelf email with the download link

Quick Steps

  1. Download the file from the email link sent from Redshelf
  2. Upload the file to the Redshelf directory on the hosting server via FileZilla
  3. Rename the file to redshelf.txt
  4. Import the data in TX-27-1

Upload The Catalog File

  1. Download the catalog file from the link Redshelf sends via email
    • Redshelf will send an email with a download link similar to this:
    • Click on the link and download the file. Make note of where the file downloads to.
      • If you don’t choose the file location then it typically defaults to your Downloads folder
  2. Open FileZille and connect to the hosting server
    • Navigate to the Redshelf directory in the server pane
    • Navigate to your Downloads directory on the local pane
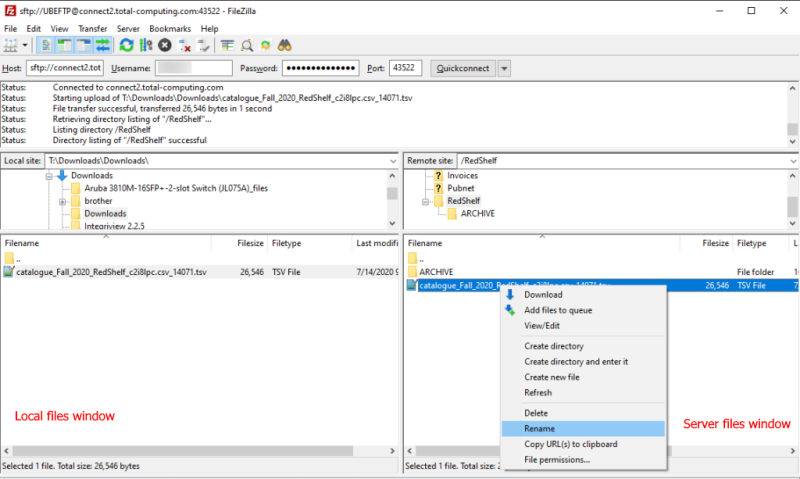
  3. Upload the catalog file to the server by right clicking the downloaded file and then Upload
  4. Rename the file on the server to redshelf.txt by right clicking and select Rename
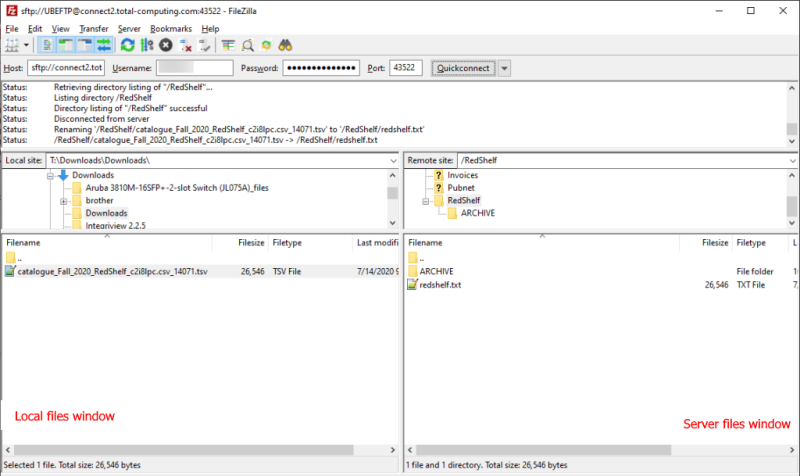
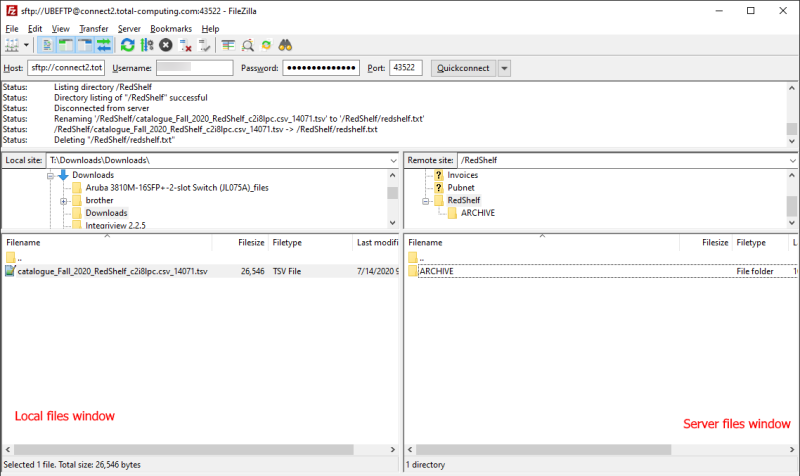
  5. The final result should look like this

Import The Catalog Data

It’s handy to know your ebook class code and your usage periods prior to these steps. Class codes can be found in TX-SU-1-6-22. Usage periods can be found in TX-SU-2-25,R

Note that ALL previous ebook prices will be cleared when you import.

  1. Navigate to TX-27-1 and enter your store number
    1. Vendor Code: R
    2. Ebook Class: (your class code)
    3. Access Periods: Should populate from TX-SU-2-25
      • You can manually change as needed
  2. Run the procedure
  3. Verify that the data is queued up to go to your registers
    1. Quickly navigate to POS-6-2 and there should be items in the Records to be formatted by the Host field.

Verify

  • Spot check various titles in MF > ISBN > E for Ebook to verify that the data was imported.
  • Ring up a title and verify the data is correct
    • Note that your registers must be up to date in POS-6-2 before the data is live

More on Usage Periods

Usage periods tell the system what usage periods to import from the Redshelf catalog. Only using 3-4 usage periods is recommended due to limited tag space.

Common day count periods are 60, 90, 120, 180, 360, 365
ALL can be used for all data
P is for Purchase or Lifetime

Examples:

  • Commas are used to create a list of options
    • 90,120,P
    • Imports for 90 day, 120 day and Lifetime (Purchase)
  • A forward slash is used as an OR option
    • 90,120/180, 360/365
    • Imports for 90 day, 120 when available or 180 as a fallback option, 360 days or 365 as a fallback option.


File Transfer Changes and Setup

TCS customers can transfer files via Secure FTP (SFTP) which allows customers to upload course imports, Redshelf catalogs and various other files for import/export into the hosted system.

Connection Information

The server can be accessed with the information below.

  1. Server: connect2.total-computing.com
    • If IP address is required: 104.209.214.232
    • Please note the server name is the preferred connection method.
  2. Port: 43522
  3. Protocol: sftp

Creating A FileZilla Connection for The First Time

The steps below cover how to install FileZilla if you don’t currently have it on your PC. Please note that you will need your credentials in order to complete the process. You can request your credentials by emailing support@total-computing.com.

  1. Download FileZilla from here.
  2. Run the installer and install with the default options.
    1. Click I Agree
    2. Typically select Anyone who uses this computer and click Next
    3. Leave the checkboxes checked, and if you would like a shortcut on your desktop, check Desktop Icon
    4. Click Next for the default Destination Folder
    5. Next in follow screen
    6. Leave Start FileZilla now checked and click Finish
      • Note that there were no prompts for any addon programs, browser toolbars, etc. as of 5/4/20. Always watch the prompts for any software you download to make sure another program hasn’t been included.
  3. Create the TCS connection and save it in the site manager
    1. FileZilla should already be open, if not, go to Start, type filezilla and open the red FileZilla App
    2. Click OK for the welcome message
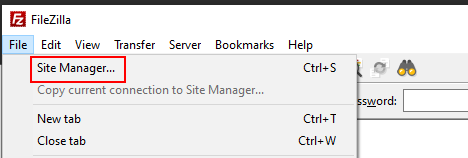
    3. Go to File and select Site Manager
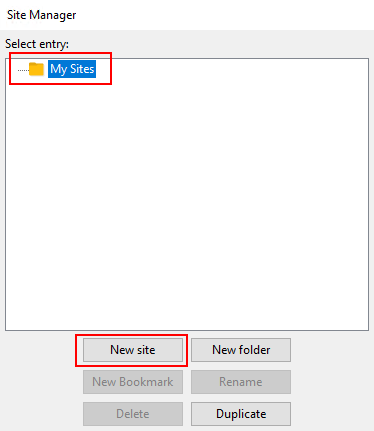
    4. With My Sites selected, click on the New site button
    5. Name the new entry created (typically TCS) and press Enter
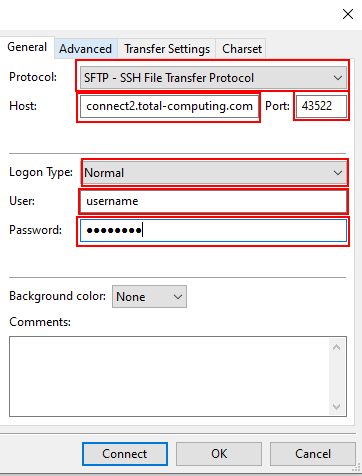
    6. Customize as follows
      1. Change the Protocol drop down from FTP – File Transfer Protocol to SFTP – SSH File Transfer Protocol
      2. Enter connect2.total-computing.com into the Host field
      3. Enter 43522 into the Port field
      4. Logon Type should be set to Normal
      5. Enter your username and password from TCS
      6. Click on OK to save your changes
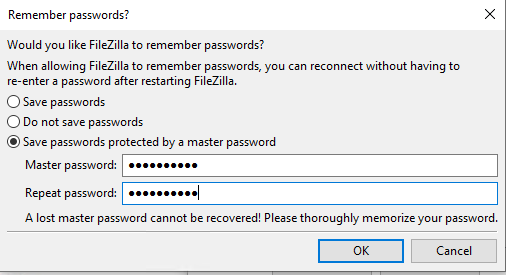
      7. You will be prompted on whether or not FileZilla should remember the site password. It’s recommended to use a master password.
        1. A master password will prompt your for your password that you create.
        2. FileZilla will prompt you for your password every time you connect to the system. After you provide your master password it will use the stored site information to connect.
  4. How to connect
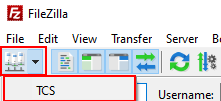
    1. Click on the small Site Manager icon right beneath the File menu option and click on TCS
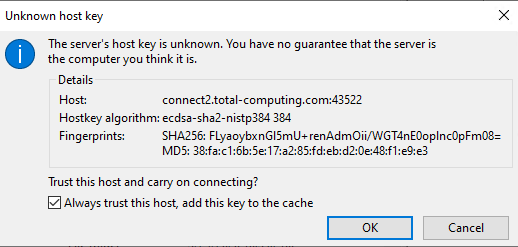
    2. The first time you connect to the new server you will be prompted to accept the server’s host key. Check the Always trust this host, add this key to the cache and click OK
    3. You should then be connected to the server with your PC files shown in the panel on the left, and the remote server files on the right.
  5. How to upload files
    1. This link will take you to their wiki article on navigating the server files, navigating the files on your PC and how to upload and download to/from the server. Please reach out to support if you have any questions after reading that article.


Upgrading to Windows 10

This article covers how to determine what version of Windows is running on a register, if that register is a valid Windows 10 upgrade candidate and what the upgrade process will entail.

We have seen some units with the D2550 processor upgrade to Windows 10 even though they are flagged as incompatible by Touch Dynamic. Upgrading those units may work, but it is risky.

This is a work in progress and information will be updated as it becomes available.

Determine the Windows Version and CPU Model

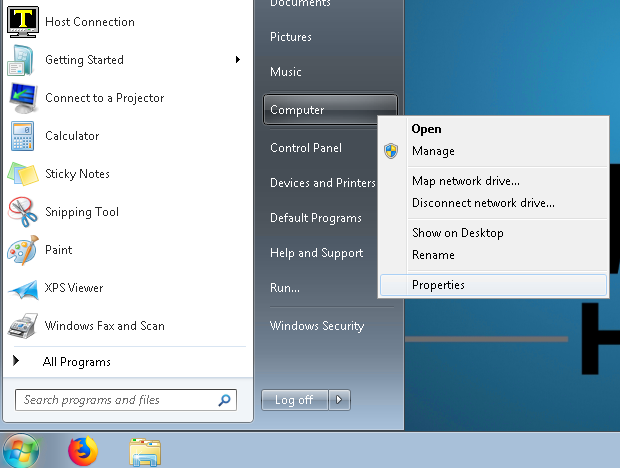
    1. Click on Start
    2. Right click on Computer and select Properties
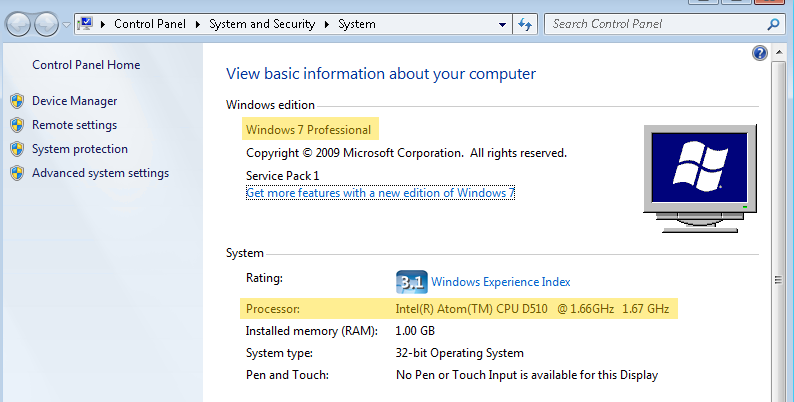
    3. This will bring up the System window with the needed information
      • In the top section we can see that the machine is running Windows 7 Professional and needs to be upgraded.
        • If this shows as Windows 8 or Windows 10 then Windows does not require updating.
      • In the second section we can see that the Processor is an Intel Atom D510 CPU
    4. The CPU model can be compared against the following table to determine if it’s a valid candidate for Windows 10.
      • Celeron 1.0-1.5 N/A
        Celeron M1.86/C2D 1.66 N/A
        Atom N270 1.6 N/A
        Atom D525 1.8 N/A
        Atom D2550 1.86 N/A
        Celeron J1900 2.0 OK
        Ivybridge 1037u 1.8 and i3-3217u 1.8 OK
        SandyBridge G540, G850, i3-2120, i5-2400, i7-2600 OK
        Haswell G1820, G3440, i3-4330, i5-4570S, i7-4770S OK
        Skylake 3955U, i3-6100u, i5-6300u OK
        Celeron J3455 2.3 OK
        Kaby LakeG3930TE, i3-101TE, i5-7500T, i7-7700T OK
        BayTrail Atom Z3745 1.86 N/A
        Cherry Trail Atom X7-Z8750 2.56 OK
      • Since the D510 is not listed with a green OK (it’s too old to even show on the list) it is NOT a valid candidate for Windows 10 and will ultimately need to be replaced.
      • If the CPU was a valid option then one of the upgrade paths below would be the next step.

Upgrading to Windows 10

There are two different options that IT can follow to upgrade to Windows 10. Either an “over the top” upgrade or a fresh install. There are certain steps that should be followed before either option is performed. Our support group is happy to answer any questions or assist your IT in going through these steps the first time.

      • Backup the following directories to a thumb drive. Create a directory for each register’s files. E.g. reg 101, reg 102, etc. with the contents from that register.
        1. C:\TCS
        2. C:\TCSDB
          1. If this directory doesn’t exist then backup C:\IBM\UV
        3. C:\TCS Host or C:\TCS
        4. C:\Program Files (x86)\Vantiv\triPOS Service\tripos.cfg
          1. This will only appear on registers where Chip and Pin (EMV) credit card devices are used.

The register can then be upgraded to Windows 10 through the upgrade or fresh install options. After it has been completed TCS will need remote access via ShowMyPC to reinstall the software, restore the data from the backup and setup the peripherals.

The ShowMyPC session will need to be started while a local administrative account is logged in. Machines where the upgrade option was used will still have their original user which should be fine. Fresh installs will require a new user to be created. This user can be temporary as TCS will need to setup a specific user with local administrative rights.

The time spent by TCS setting everything back up is billable and typically takes around 1 – 1.5 hours to complete on a fresh install and as few as 30 minutes on an over the top upgrade.


Report: Department Sales

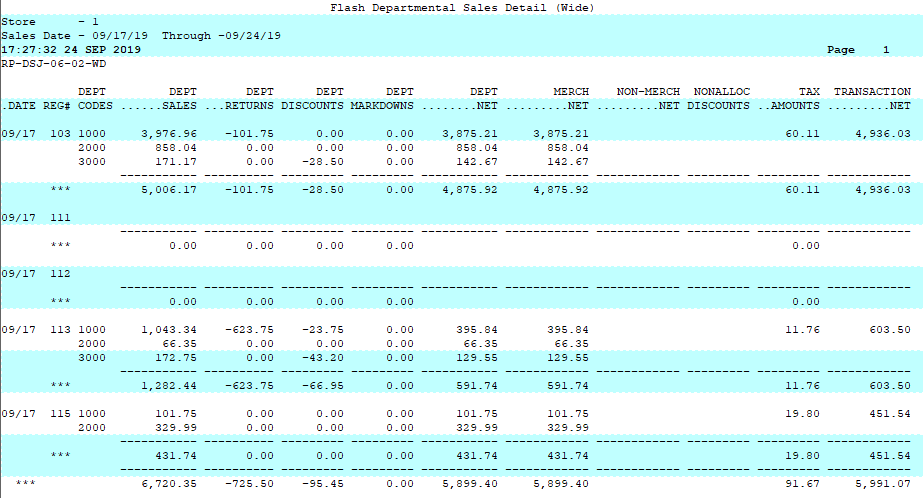
Department Sales

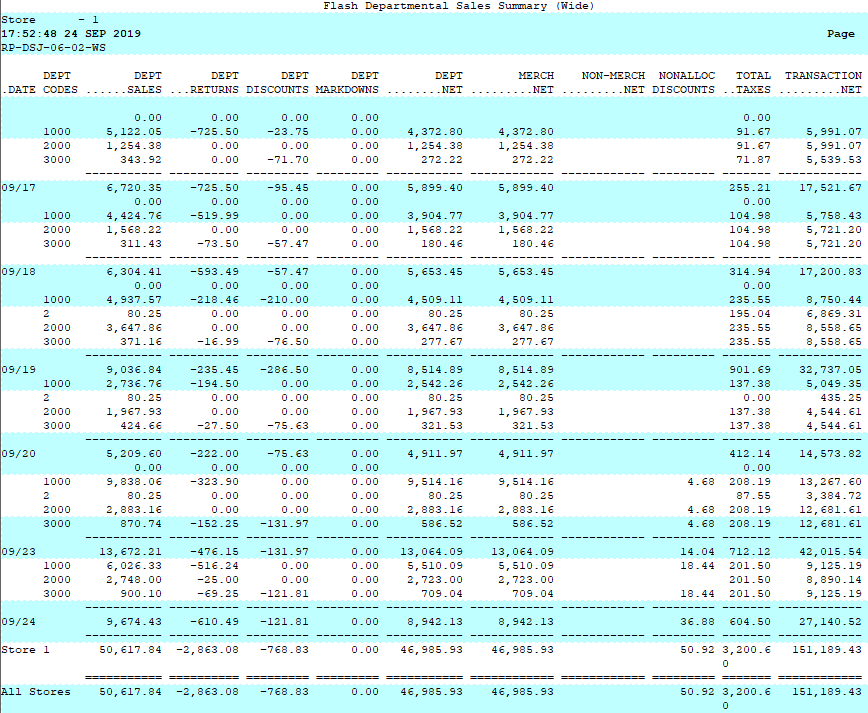
Below is an overview of the Department Sales report.

Path: POS-RP-1-5-2

Purpose: Display the gross to net numbers by department.

Output: Date, Department Codes, Department Sales, Department Returns, Department Discounts, Department Markdowns, Department Net, Merchandise Net, Non-Merchandise Net, Non-allocated Discounts, Total Taxes, Transaction Net.

The summary output combines the sales information for the entire day.

The Detailed version breaks the sales figures out by register.


Report: Store Sales by Store

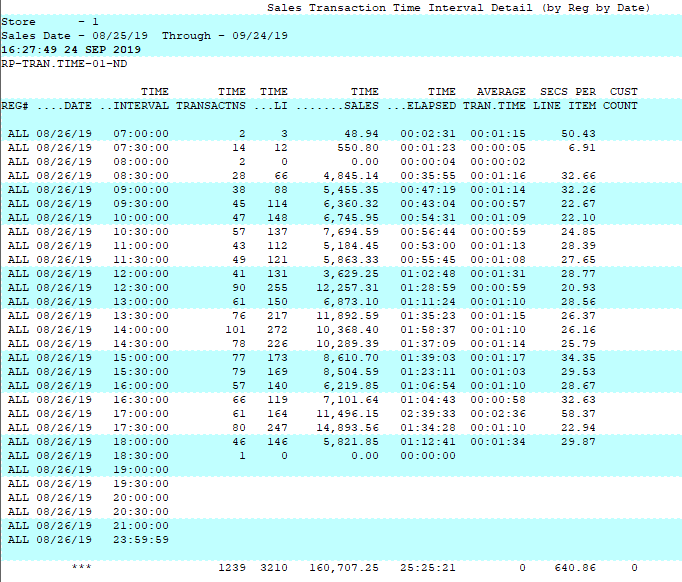
Below is an overview of the Store Sales by Store by Register by Date report which is virtually identical to the Store Sales by Store by Date by Interval.

Path: POS-RP-1-4-1 and POS-RP-1-4-2

Purpose: These reports are used to display the number of transactions, dollar amount and item count for a given time period. This can be in detail or summary format, with store and/or date sub totals.

Output: Register, Date, Time Interval (default 30 mins) Time Transactions (transactions in time period), Time LI (line items per time period) Time Sales (dollar amount sold in time period) Time Elapsed (time between sales) Average Tran.Time (average transaction time), Secs Per Line Item, Cust Count (edge case typically not used)

A Summary can be run to get the ending value for each day, but the true value is in the detailed version of the report.


Web Order Returns

The steps below cover how to return a web order. It’s virtually identical to a regular return, with two exceptions; the transaction type and the tender.

These steps also include returning an ebook. That part of this process is the same for web and regular orders as well.

All web returns must be completed from a Host Connection or your regular web order machine.

  1. Start by using the MORT transaction type or the return option under your web register
  2. Look up the customer
  3. Enter the items to return
    1. For an ebook, enter the ebook SKU, or scan the ISBN and select the ebook option (if applicable)
    2. Answer the prompts for the original transaction the ebook was purchased on
      1. This is so that the system can get the access codes and verify if they are valid for return
    3. Confirm the access code is correct
      1. Repeat for any other ebooks
      2. Note that any access code that has already been activated is not a valid candidate for returns per Redshelf.
  4. Total the transaction after all items have been returned
  5. Select the appropriate shipping amount (if applicable)
  6. The tender should default to the transaction amount + tender type
    1. If not, enter the amount followed by the original tender type
    2. e.g. 10.25AR 10.25CC 10.25EL 10.25BL 10.25BLM
  7. If a Credit Card was used, select either the Match or Swipe option
    1. Swipe allows the customer to return to a new card. This is rare for web transactions since the customer usually isn’t in the store with their card handy.
    2. The Match option allows you to return the funds to the original card if a card was used on the original transaction.
      1. Answer the the original transaction prompts so the system can obtain the credit card token to use.
  8. Press enter and the process is complete.


Touch Screen Menus and Buttons

This article will cover how to modify the touch screen buttons and layouts used in the transaction screen. It will also go over how to create new screens, how to assign those screens to specific registers, and how to find the various fees, modifiers, and other values that a button can have.

A couple points of interest before digging in:

  1. You can view or re-assign the primary touch screen in use at a register by going to Main Menu-5-3-1 or POS-3-1 on the host for host based registers.
    1. Enter the register number you want to view
    2. Check the top right hand area for the Touch Screen Code field. The value of that field is the primary screen for that register. Note that the field could be truncated. Clicking in the field and highlighting it typically displays the entire value.
    3. Assigning a screen to that field makes that assigned screen the primary screen.
  2. Changes to screens should always be done on the host
  3. Changes made to a screen will affect every register assigned to use that screen
  4. Any updates made to any touch screen will not reflect on a register until:
    1. That register is up to date with the host communication in POS-6-2
    2. The cashier leaves the transaction screen to the main menu, then chooses 1. Cash Register to go back into the transaction screen.
  5. Secondary menus are button layouts that cashiers can navigate to. Only the Fixed buttons of a secondary menu are ever displayed.

Transaction Screen Overview

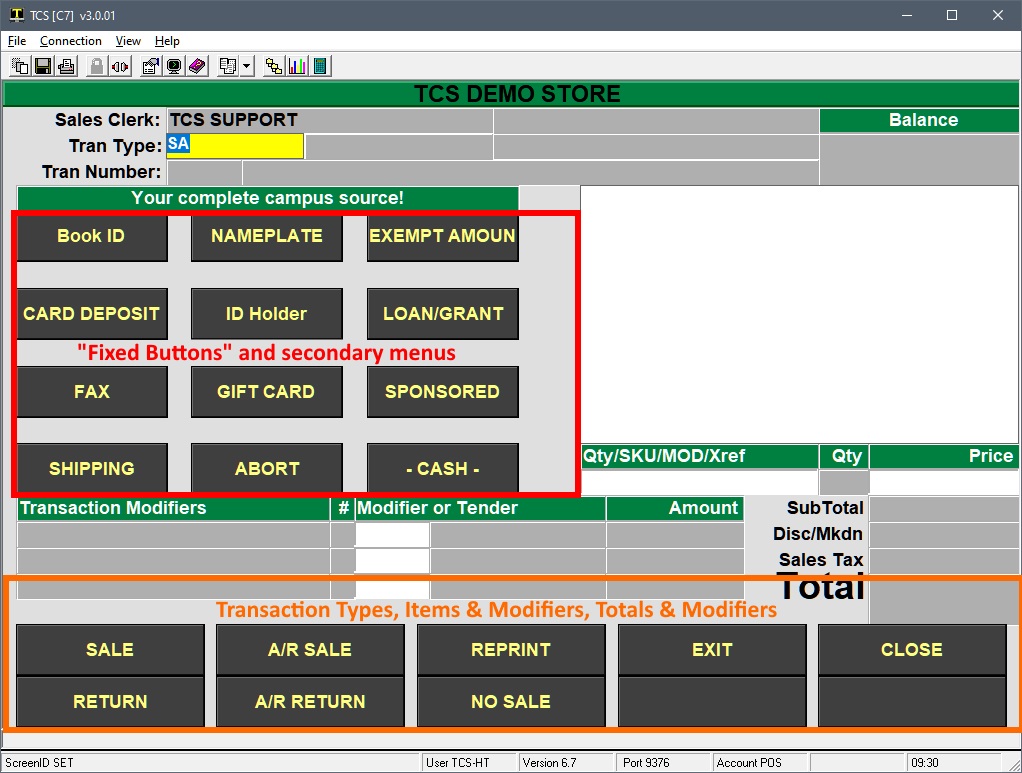
It’s important to first understand the areas of the transaction screen and how they relate to the screen maintenance in POS-3-22. So first, here is a typical touch screen layout:
Changing the Bottom Screen Buttons

Below is the MAIN touch screen layout found in POS-3-22, Touch Screen Codes. This first view are the three tables that control the bottom section of the transaction screen. The F=Fixed Buttons button is what controls the fixed buttons and menu area highlighted in red in the example above.
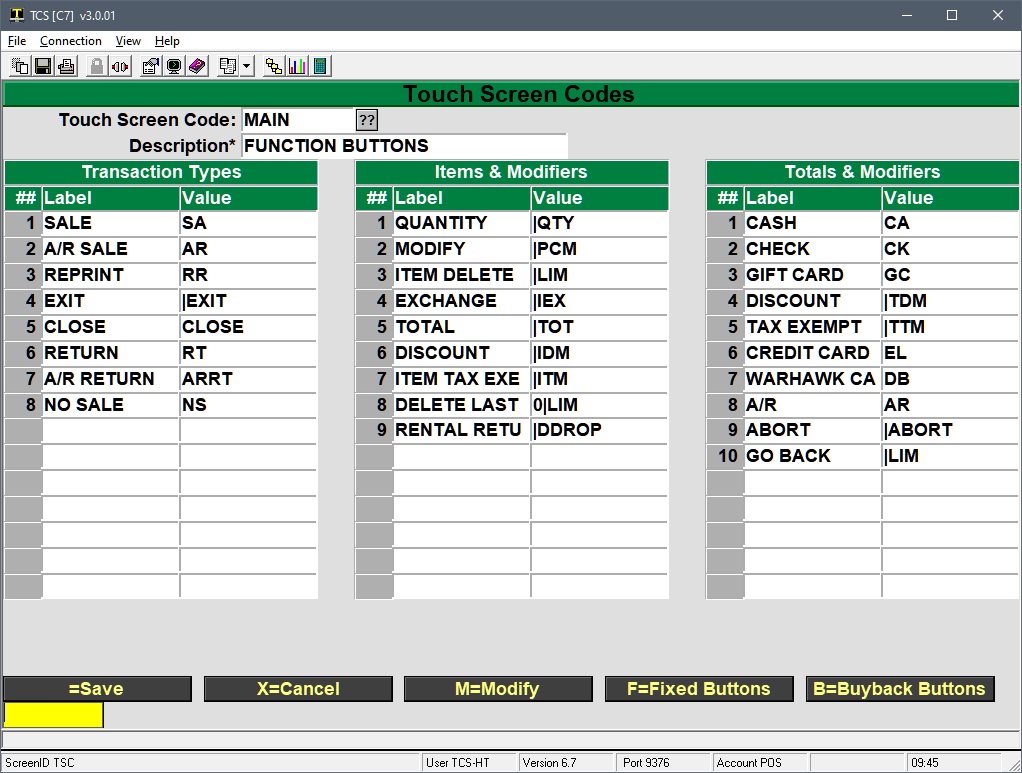
What makes the bottom buttons unique is that they will change depending on what part of the transaction the user is in. Starting with the Transaction Type, moving to ringing up items and using item level modifiers, then on to tender and transaction modifiers after the transaction has been Totaled.
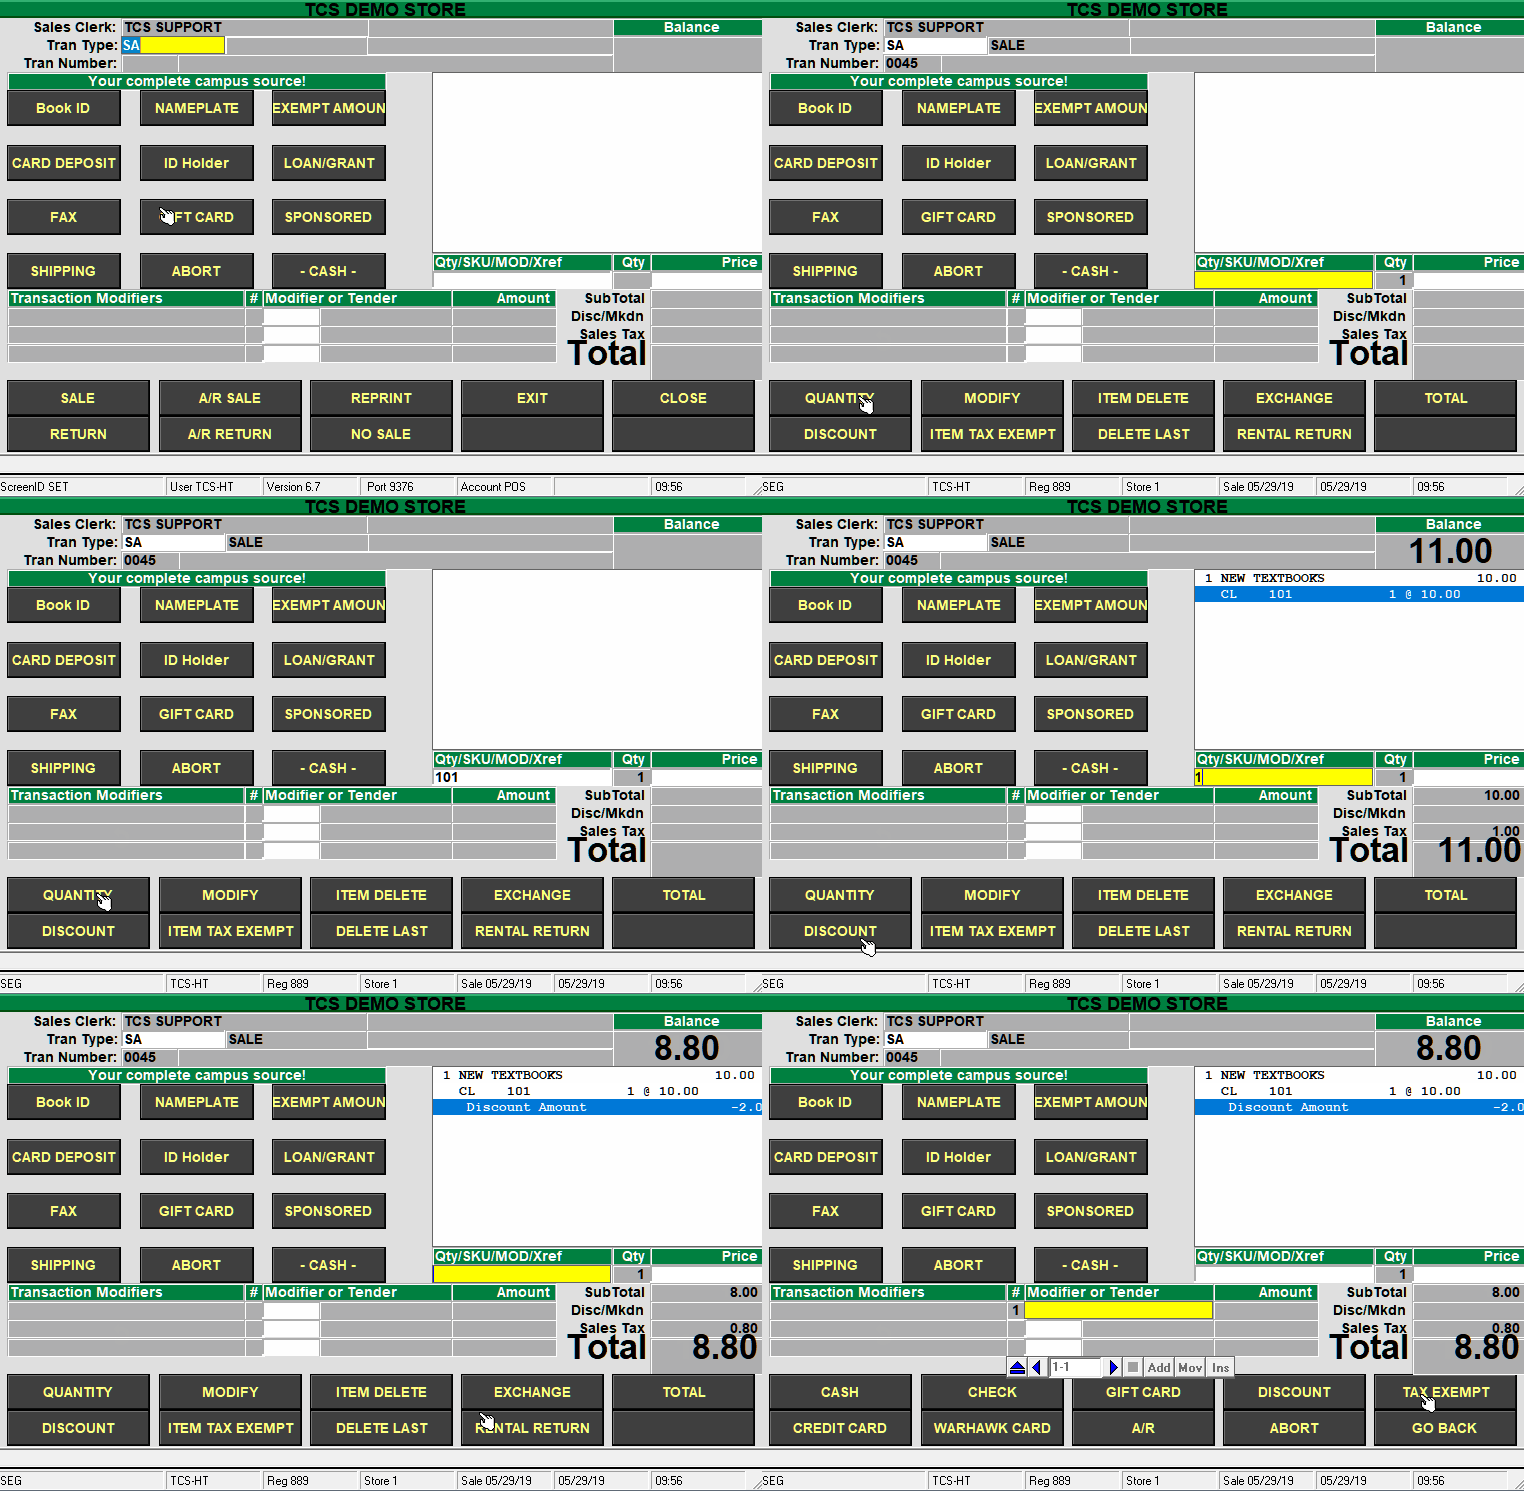
The “Transaction Types” table is what displays on the bottom of the screen when the cashier is in the Tran Type field.

As soon as they start a transaction, the bottom buttons will change and display the buttons mapped in the “Items & Modifiers” table.

Finally, when the cashier Totals the transaction, the buttons change to the buttons mapped in the “Totals & Modifiers” table.

Changing these buttons is straight forward, but there are some restrictions on the buttons along the bottom of the screen.

  1. Only the wording on the button and what it does can be changed.
  2. There is a fixed number of buttons
  3. The layout cannot be changed
    • Buttons can be “moved” by swapping the label and value between different positions in the list
  4. Buttons have to display in the appropriate part of the transaction.
    • e.g. Having a button that discounts the transaction in the “Items & Modifiers” table will never work. A transaction has be totaled (a transaction amount calculated) before the transaction amount can be discounted.
  5. The buttons on the bottom of the screen do not change as you navigate to other secondary menus in the Fixed buttons area.
  6. The bottom buttons will only display the buttons specified in the primary screen layout.

Instructions on adding or changing a button are below. The steps used in this example are for adding a Post Void transaction type.

  1. Navigate the cursor to the existing button to be changed, or empty spot where a button will be added.
    1. Add a line in the Transaction Types table by navigating to the line beneath NO SALE
  2. Specify the Label of the button.
    1. This is the text that will appear on the button. So POST VOID
  3. Specify the Value of the button
    1. This is what the button does. Buttons can be a:
      1. Transaction Type, which can be found in POS-2-5
      2. A fee, found in POS-22-23
      3. A modifier, found in POS-2-2
      4. An item, enter the SKU of any GM or TX item
      5. A tender code, found in POS-2-4
    2. The Post Void transaction type is PV, so that is what is entered
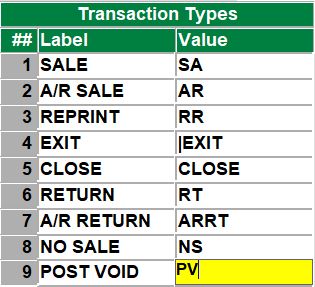
  4. Save your changes
  5. Now every register that is configured to use the MAIN touch screen code will have the new POST VOID button if they are up to date on their host updates.
    • Cashiers will need exit the transaction screen (|EXIT or use an up arrow in the tran type field) and go back to 1. Cash Register from the menu before that change is applied.


Fixed Buttons

The fixed buttons in the main area of the screen allow for greater flexibility compared to the buttons at the bottom of the screen. While the buttons do not automatically change with the flow of the transaction, it is possible to navigate to secondary menus many levels deep, giving manual control to the cashier.

The transaction screen is mapped out in a grid, referenced by it’s columns and rows, and the buttons are drawn using points on the grid. If you press ALT + G you can see the grid as that the buttons are anchored to. Press ALT + G again to toggle the view off. Note that the column starts at 0, not 1.
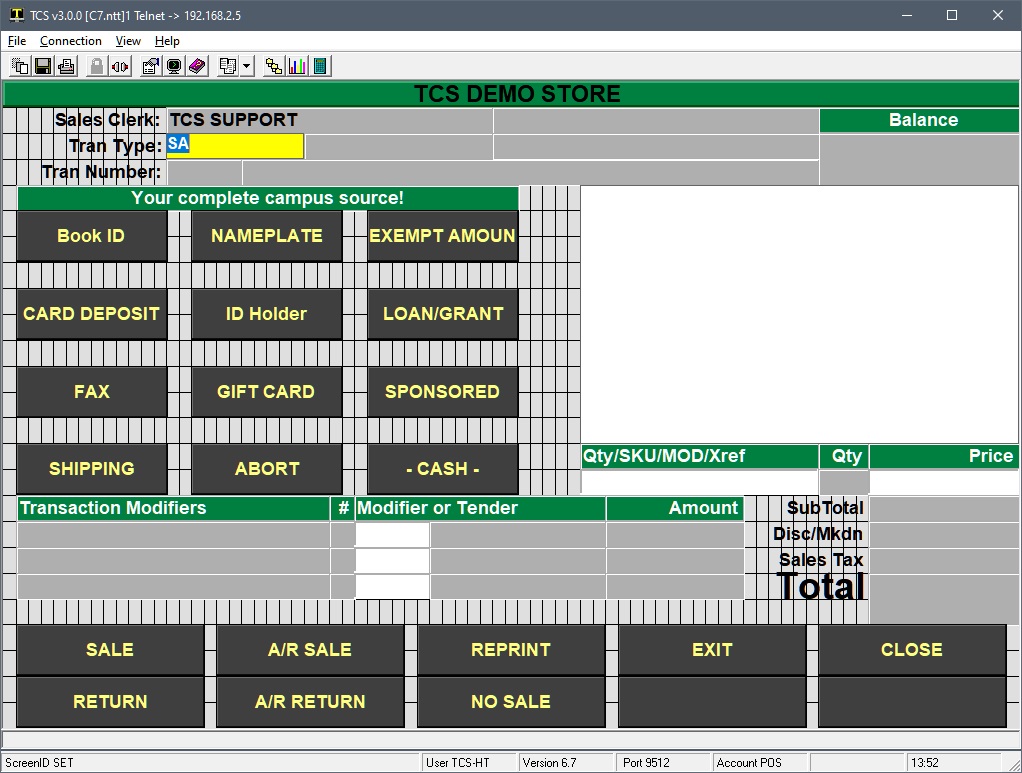
Referencing the above image, the F=Fixed Buttons screen in POS-3-22 now makes a lot more sense.

The description column is simply a reference to the element on the screen. The Col, Row, Width, Height and Just columns control the dimensions of the element. The label is what displays on the “button” and the effect controls whether or not you can click on the element, if it’s indented, raised, etc.
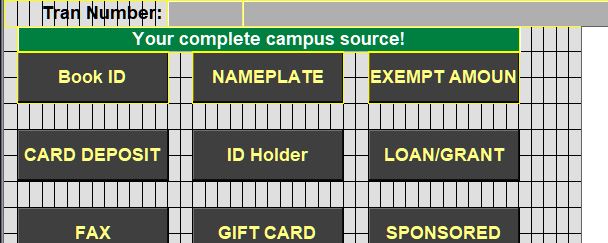
Referencing the grid view, we can see that the HEADER element is our banner/message at the top of the buttons. It starts at column 1 (furthest left is column position 0), runs 39 positions, has a height of 1 and the label is centered. The Value field can’t be empty so the word “blank” is used and the Effect 3 makes the element non-interactive.

All of the buttons are then mapped out in the grid with their dimensions, labels and values. There are seven different button effects that can be used, with effects 3 and 7 being non-interactive. How each effect appears by default is shown below. Actual color, border, font, etc. is controlled by the GUI properties, Entities tab. The button number is the effect assigned to that button.
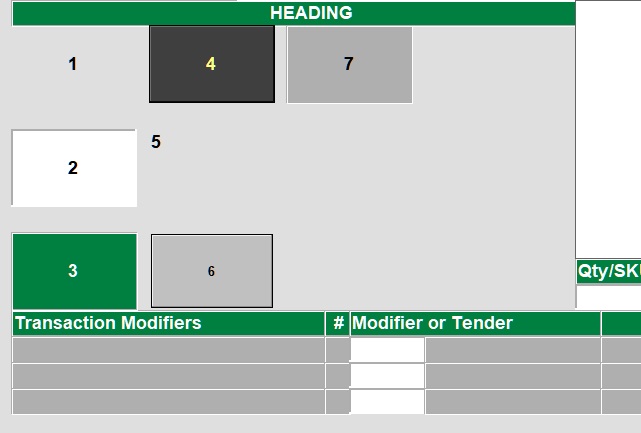
To change a Fixed button:

  1. Bring up the screen in POS-3-22 and select F=Fixed Buttons
  2. Navigate to the Label column and change the wording to match what the button will do.
    • The label is the wording that shows on the button. The text does not wrap.
  3. Specify the Value of the button
    1. This is what the button does. Buttons can be a:
      1. Transaction Type, which can be found in POS-2-5
      2. A fee, found in POS-22-23
      3. A modifier, found in POS-2-2
        • Modifiers are entered as PIPE followed by the modifier code. e.g. |IEX to use the Item Exchange modifier.
        • The pipe | character is necessary because the system needs a way to differentiate between a text based item search and actual modifier codes. If IEX were entered as the value the system would search for items that have iex as any part of their description.
      4. An item, enter the SKU of any GM or TX item
      5. A tender code, found in POS-2-4
    2. There are some pretty advanced functions that can be used for the button Value that are covered at the very bottom of this article.
  4. Repeat for any additional buttons and save your way out.

Default Menus

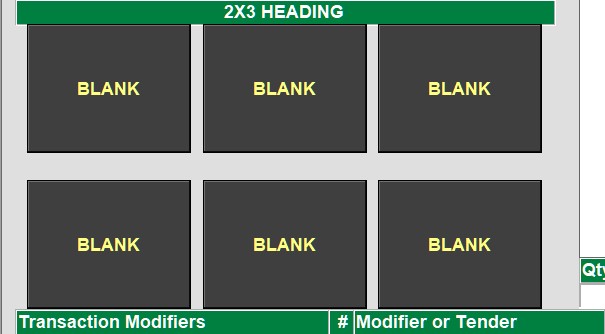
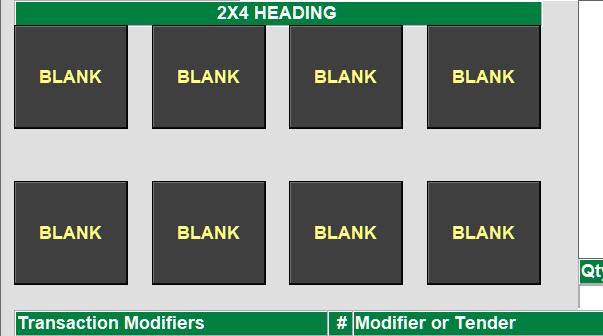
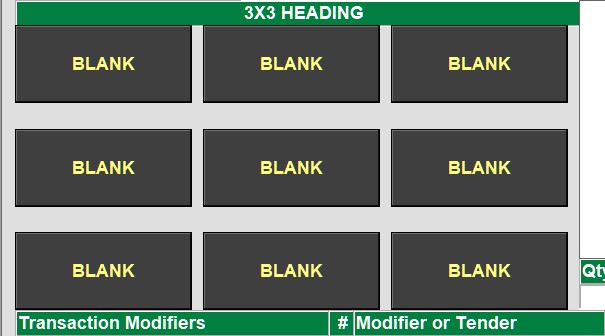
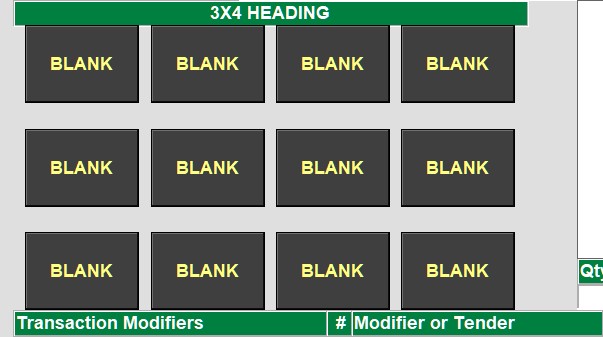
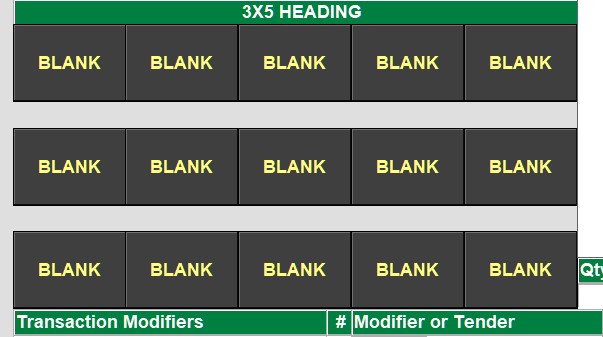
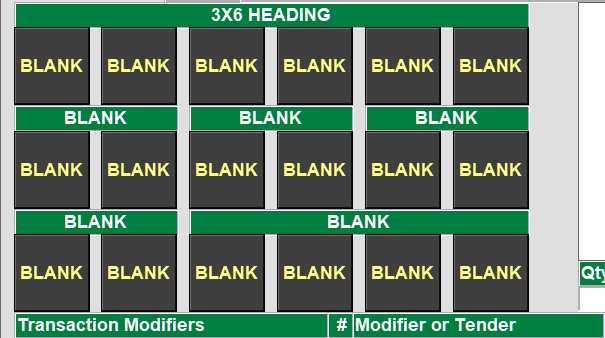
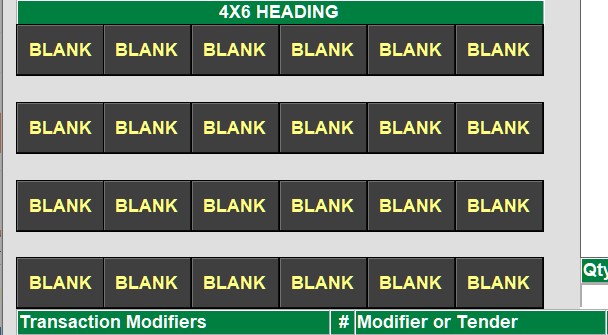
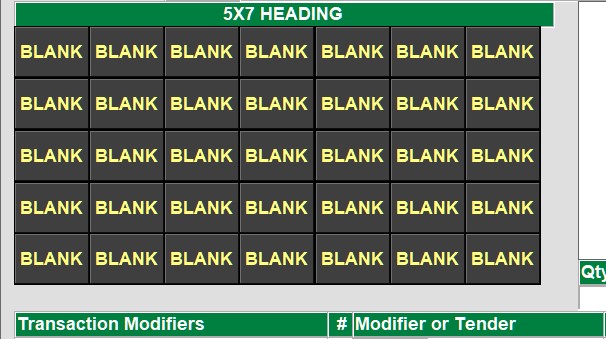
It is NOT recommended to re-arrange an existing menu by moving, shrinking or stretching elements. It is MUCH easier and safer to create a new menu by copying from an existing layout with the correct amount of buttons and then customize them as needed. TCS has a number of “default” layouts shown below that can be used to source new layouts from.

Note that these layouts are all named their heading number. e.g. 2X3 is the layout code for the first image with “2X3 HEADING” in the screen header. Contact TCS support if you don’t have these layouts and would like them on your system.

It’s recommended to reserve one button on secondary menus to reset the screen back to the main menu.

Customizing a Menu

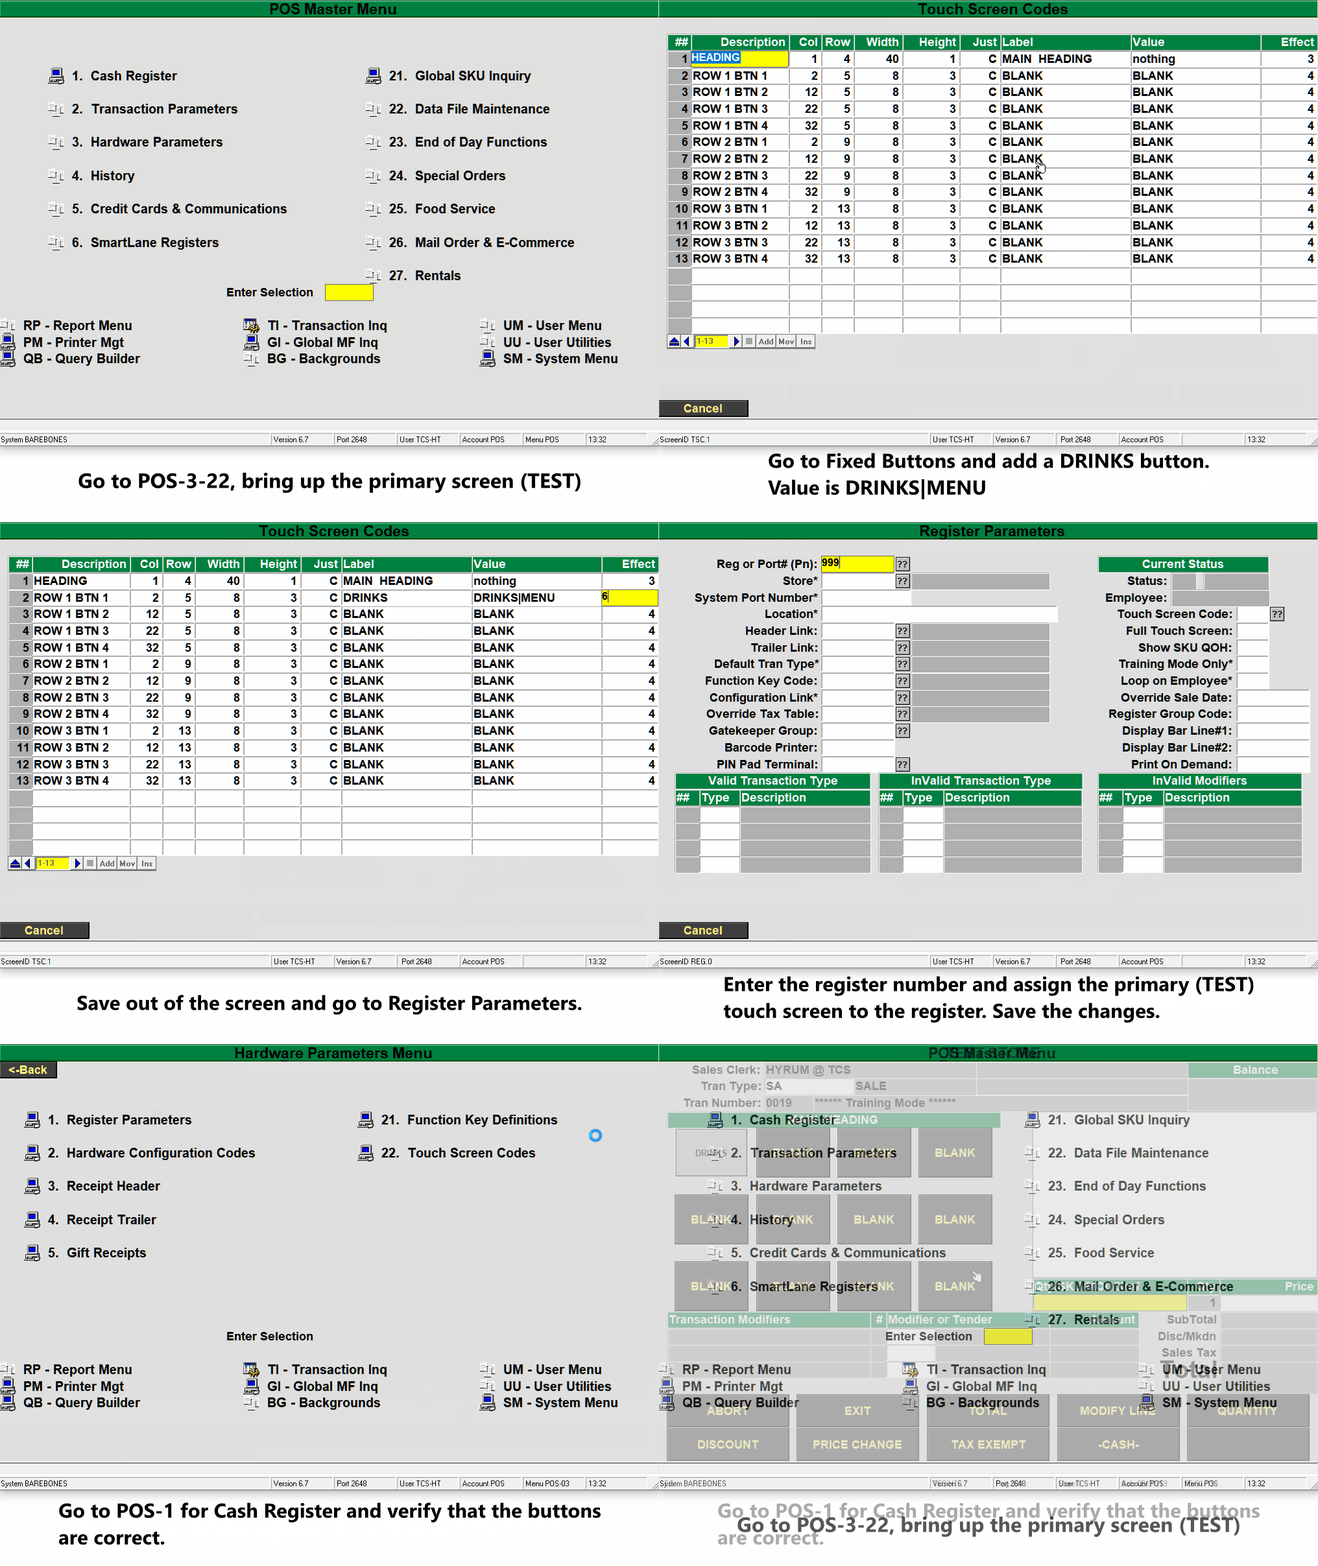
This example will cover how to create/customize a new menu and then link the TEST menu to the newly created menu. It’s recommended to temporarily assign any newly created screens to a host based register in POS-3-1 and then test the changes made as that register. The register will be set to ultimately use TEST as it’s primary touch

  1. Navigate to POS-3-22 and enter a new code for the new screen
    • This example is going to go over drinks, so DRINKS will be used
  2. Select the COPY option and then enter the layout you want to copy from
    • This example will copy from the 3X4 layout so 3X4 is entered.
    • Don’t bother changing any of the three tables of the first screen unless it is going to be assigned as the primary screen for a register.
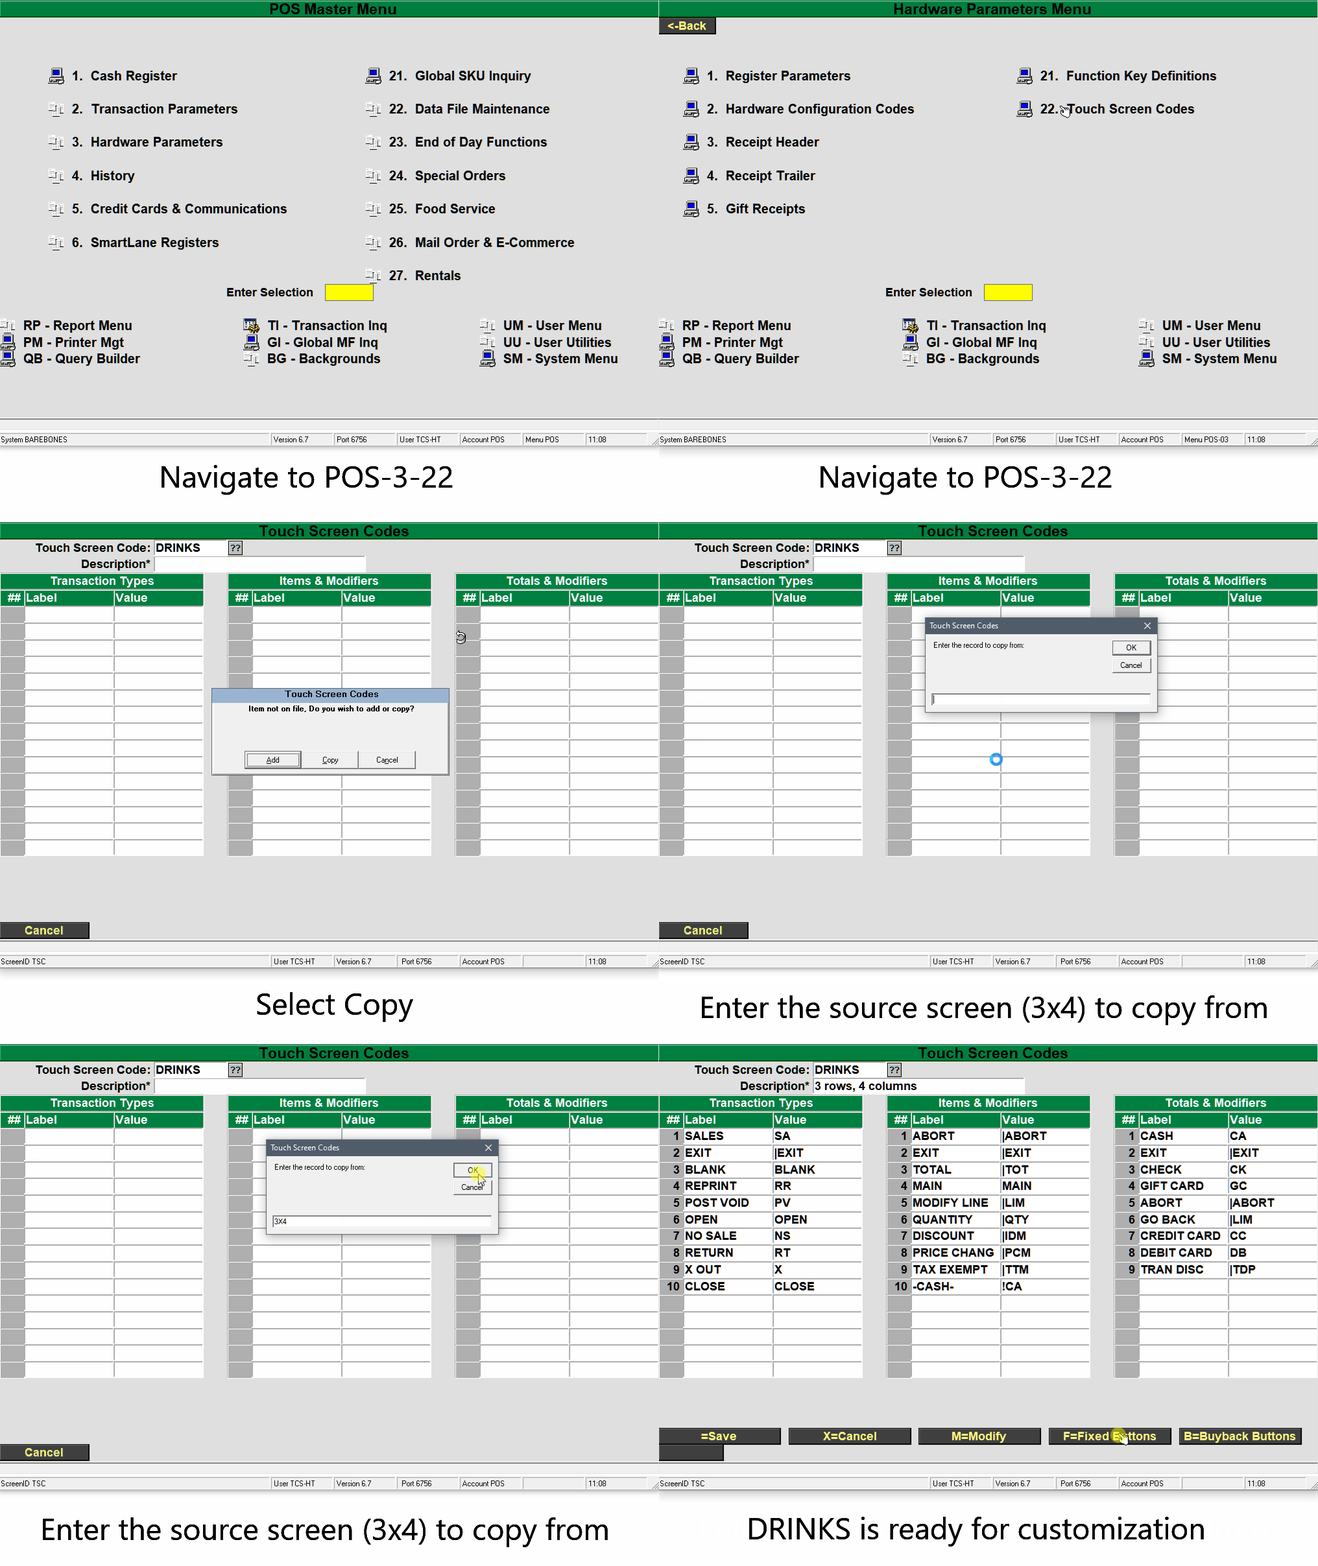
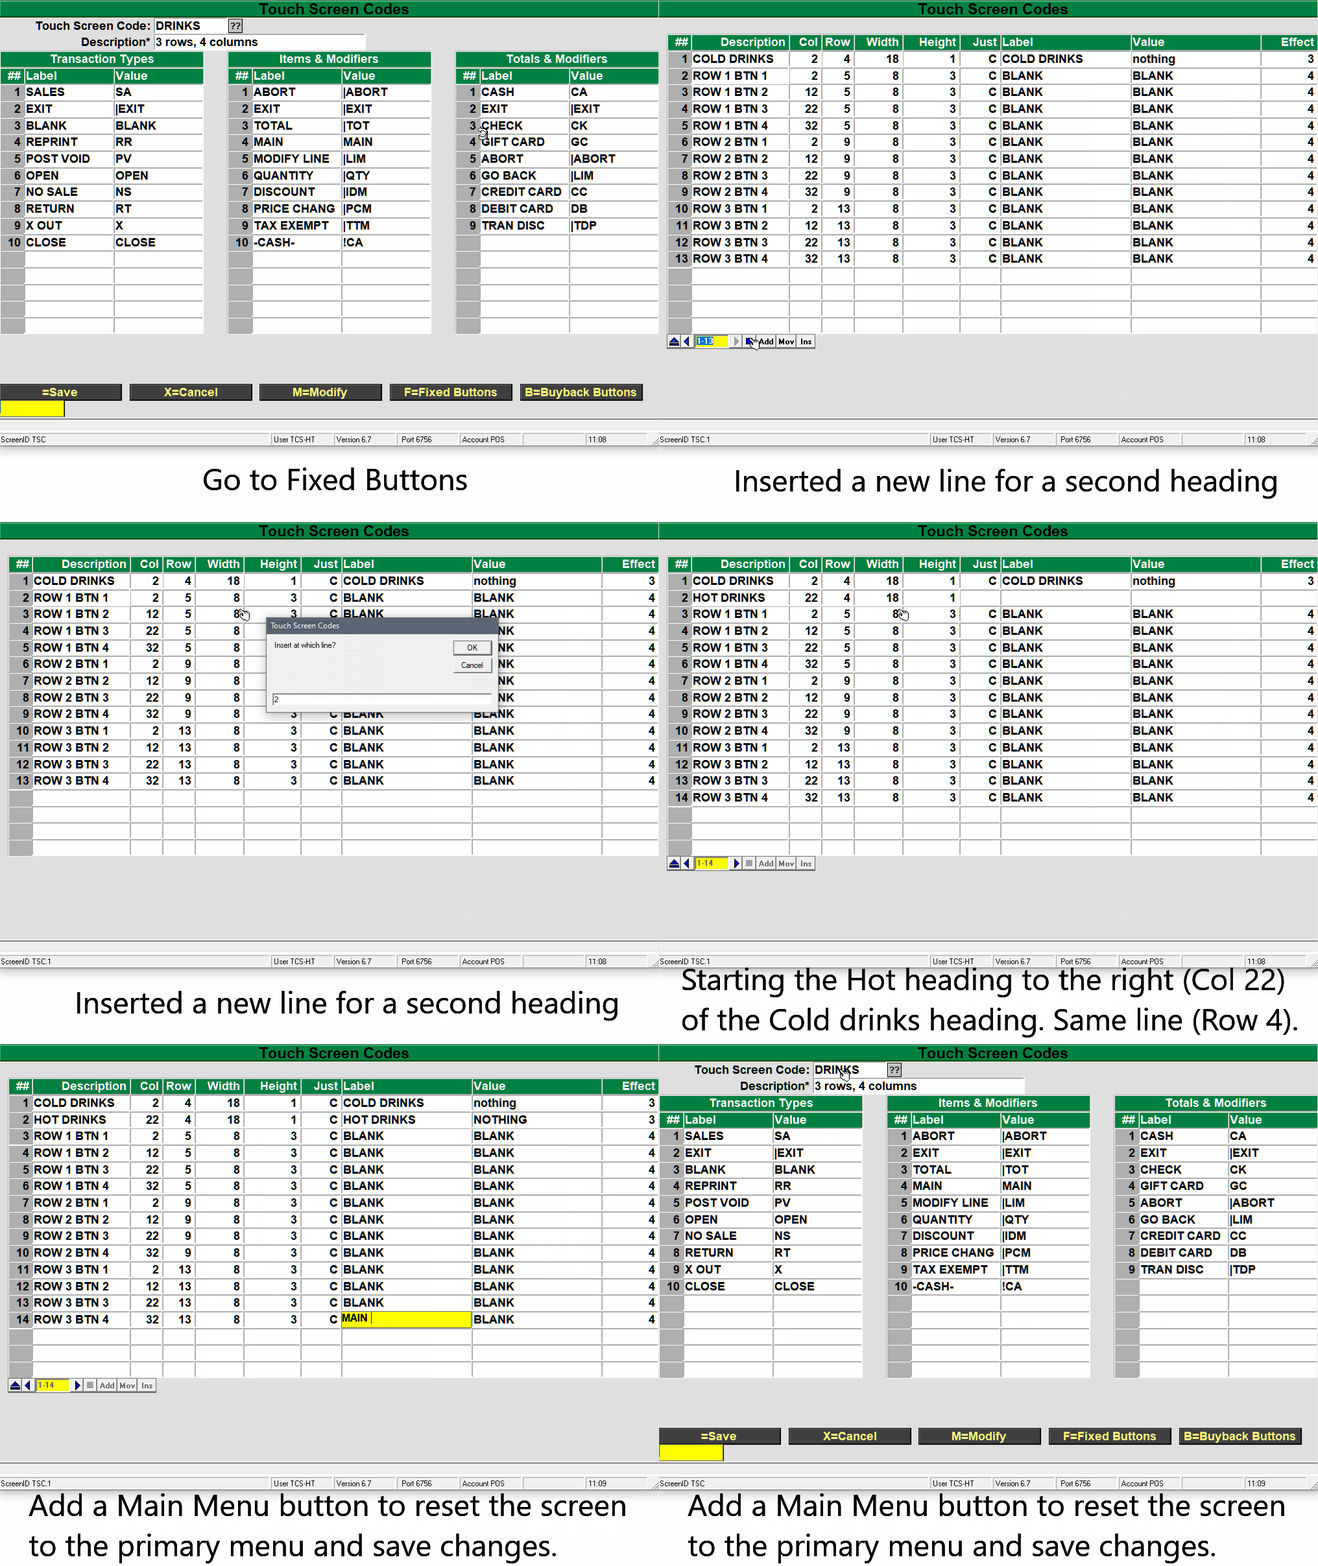
  3. Go to the F=Fixed Buttons and start customizing the menu as needed.
    • The goal is to have a split header (Cold Drinks and Hot Drinks) and to add a button that will return the cashier from this Drinks menu back to the primary menu.
    • The width of the Cold Drinks is shortened to 18 and the label changed.
    • A new line is inserted for the second header
    • The Hot Drinks entity is added, it starts at column 22, stays on the same row 4 and gets a matching width of 18.
    • A MAIN MENU button is added with a value of TEST|MENU
      • TEST will be the primary menu for the back office register
      • The |MENU is a modifier that tells the system go back to the MENU listed in front of the | character.
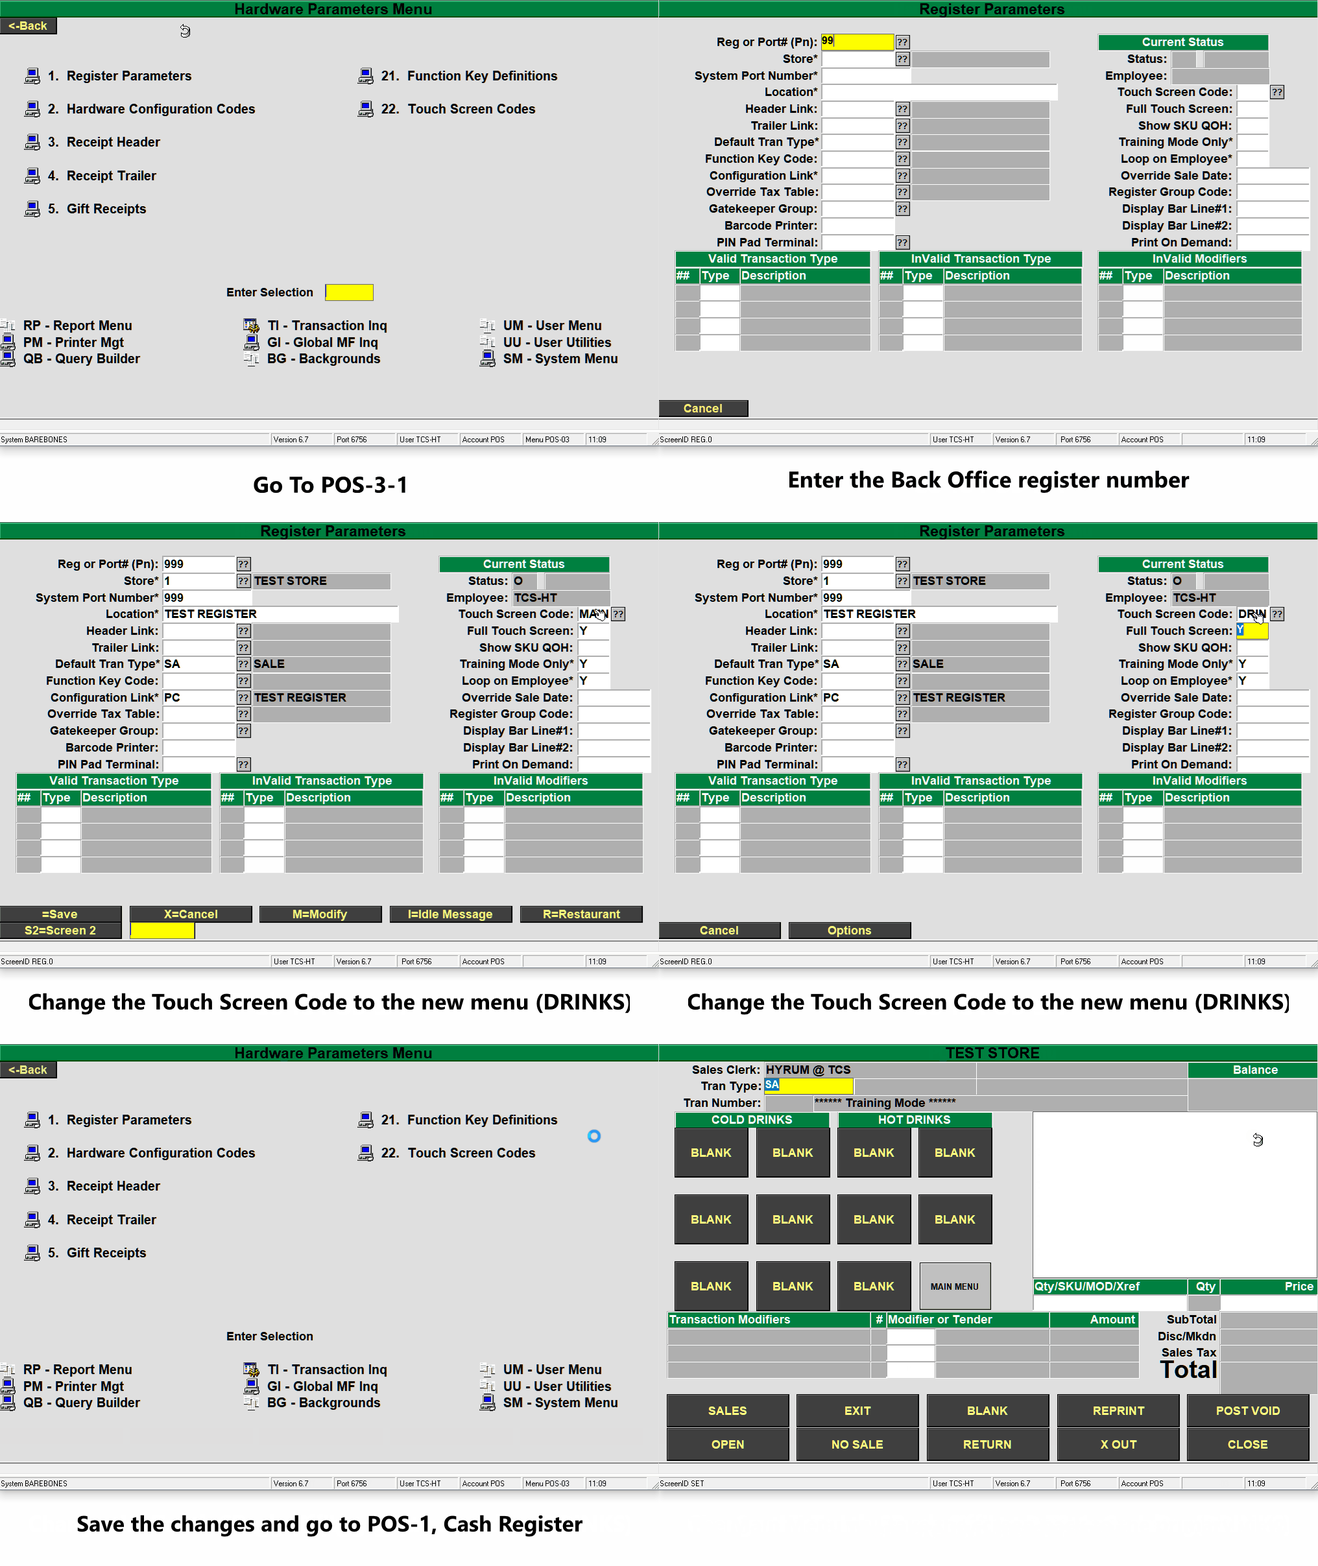
  4. Test the screen once it has been created by assigning the new screen in the Register Parameters
    1. Go to POS-3-1 and enter the back office register number the connection uses
    2. Go to the Touch Screen Code field and change it to match the new code (DRINKS)
    3. Save the changes to the register parameters and go to POS-1 for Cash Register
    4. Verify that the changes are correct.
    5. Make any necessary changes to the layout in POS-3-22
      1. Add the actual drink items to the buttons
        1. Label each button for the item it will ring up
        2. Set the SKU/Fee/etc. for each button
  5. Add a button to the primary (TEST) screen that goes to the new screen (DRINKS)
    1. POS-3-22, TEST screen code
    2. F for Fixed Buttons
    3. Label a button with the new screen code (DRINKS)
    4. The Value will be CODE|MENU (DRINKS|MENU)
    5.  Save your way out
  6. Change the primary screen for the register back to the real primary screen (TEST)
    1. POS-3-1
    2. Enter the register number
    3. Change the Touch Screen Code field to TEST
    4. Save the changes
  7. Verify that everything has come together in the transaction screen
    1. PSO-1 for Cash Register
    2. Test the buttons

Advanced Values

What a button does can go MUCH further than a single item, transaction type or modifier. Below is a list of different ways a button’s value can be set to accomplish more advanced actions.

  1. Values can be “fed” to a modifier to cut down on the amount of prompts a cashier has to respond to.
    1. If the standard discount percentage is 10%, a 10 can be fed to the |DIP (discount item percentage) modifier to automatically discount 10%
    2. The button value would be 10|DIP
  2. A : can be used to combine a modifier with an item. Think of it as a “and now” action
    1. Say 5 of an item are always rung up together. A button can be created with 5|QTY:100256
    2. Specify the quantity of 5, and now apply that to item 100256
  3. A workflow can be created that leads the cashier through a series of steps
    1. Poor example, but say a combo meal is being sold. The goal is to guide the cashier through 1) selecting the burger 2) selecting any condiments 3) selecting any sides 4) selecting their drink
      1. The burger button is pressed. The button has a value of 100256:CONDIMENTS|MENU
        • The burger is rung up and the cashier is taken to a menu full of condiments
      2. The cashier selects a mayo button, a ketchup button and then clicks on a Next button with a value of SIDES|MENU
      3. Repeat the process through the various menus
  4. A |MENU button can reset to whatever the primary touch screen is
    1. RESET|MENU
    2. This can be combined with an item and the : to always reset back to the main menu after ringing up an item.
      1. 100154:RESET|MENU will ring up item 100154 and take the cashier back to whatever the main menu was.

** NEED TO DOCUMENT |QUAL THIS IS DIFFERENT  FROM MEMO. QUAL WILL STACK ITEMS TOGETHER.


Creating a Purchase Order with New Matrix Items

The steps below cover how to create matrix items while you are in the middle of creating a purchase order.
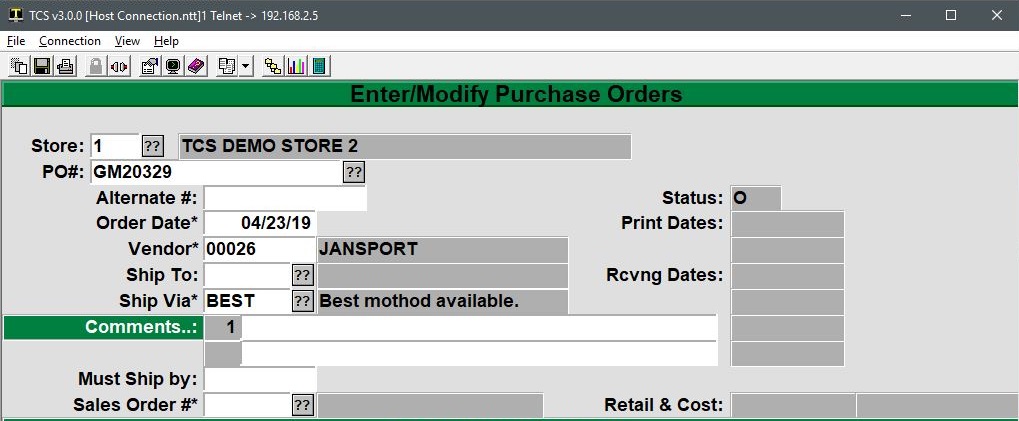
  1. Start a new PO in GM-1-21
    1. Enter a PO# or enter a period “.” to use the next system suggested number.
    2. Optional: Enter an Alternate # for any third party reference numbers.
    3. Enter the order date.
    4. Enter the vendor number, or do a vendor lookup by entering part of the vendors name.
    5. Optional: If you are a multi-store environment then you can use the Ship To: field to specify a store to ship the merchandise to.
    6. Enter a shipment method in the Ship Via field or select one with the ?? button.
      • Additional shipment methods can be added by clicking the ?? button and then clicking on the Maint button on the bottom left.
      • You will be returned to the PO screen after creating your any necessary shipment methods. Just press Enter at the empty Ship Via Code field.
    7. Optional: Enter any order comments.
    8. Optional: Enter any deadline date in the Must Sip by field.
      • The top section of the PO should now look something similar to this:
  2. Start adding items to the PO
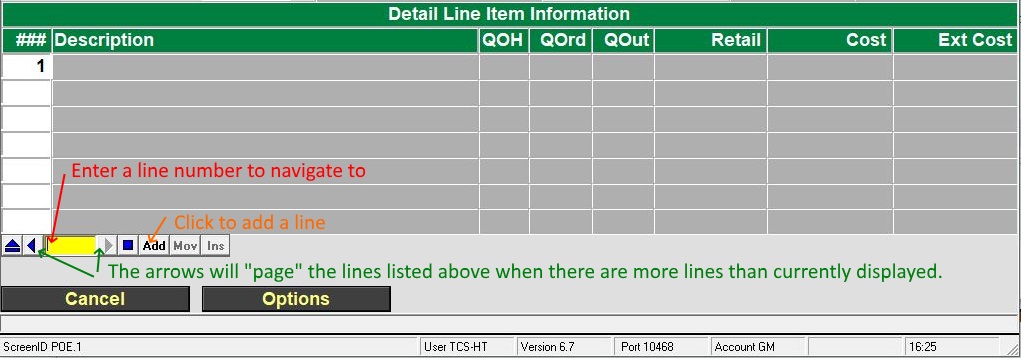
    1. After navigating past the Must Ship by field your focus will be moved to the line navigation tool.
      • This tool can be used to display additional lines not currently displayed on the screen. To add new lines to the bottom of the list, insert lines into the middle of the list, more move items in the list.
    2. Enter a 1 into the text field of the navigation tool to jump to line 1. You can also enter an “A” to add a new line to the PO to the end, if you are at the beginning then it will create the first line.
      • If there was already a line #1, you can enter the next field (2) and it would create a new line for line 2.
      • You can also click on the Add button on the navigation tool but keeping your hands on the keyboard is generally the most effect way to use the system.
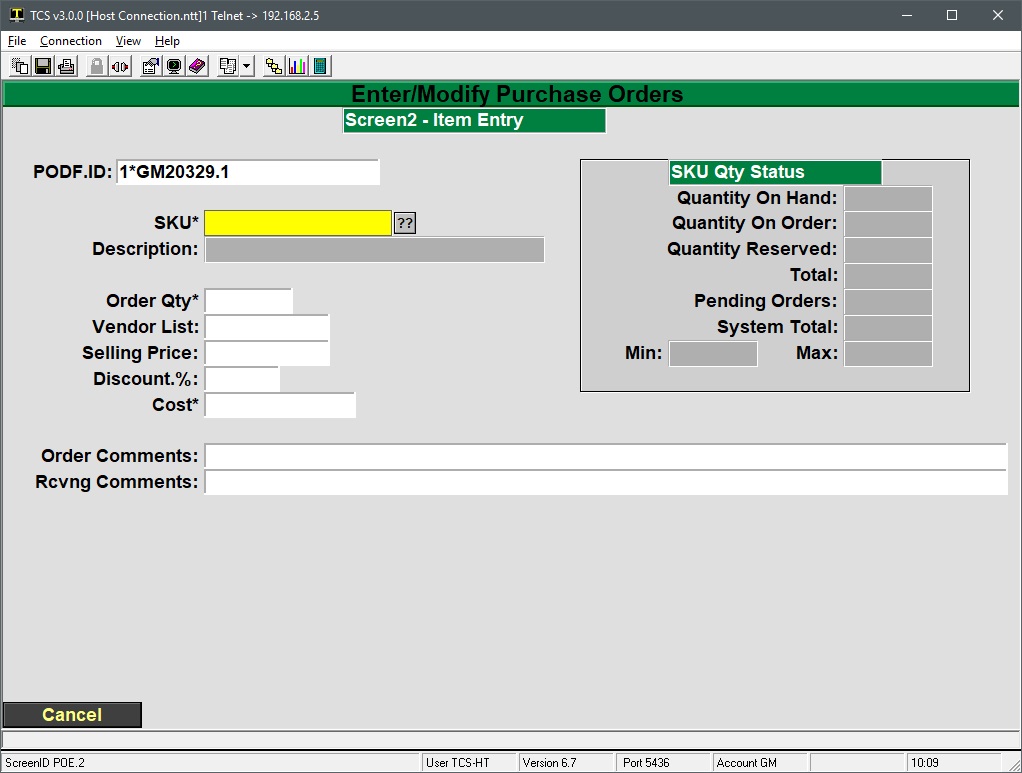
    3. At the Item Entry screen you can add an existing item or create a new item and add it to the PO.
      1. To add an existing item, enter the SKU, barcode, vendor catalog ID or part of the items description into the SKU field.
      2. To create and add a new item:
        1. Enter a . into the SKU field
        2. Select MF Entry option.
          • The quick entry is a bare bone item creation screen. Matrix items cannot be added via the quick entry method. Which falls outside the scope of this article.
          • The process is very straight forward however, simply populate the required fields in the Quick Entry screen, save your item, and then you will be taken back to the Item Entry screen where you can specify order quantities, cost, etc.
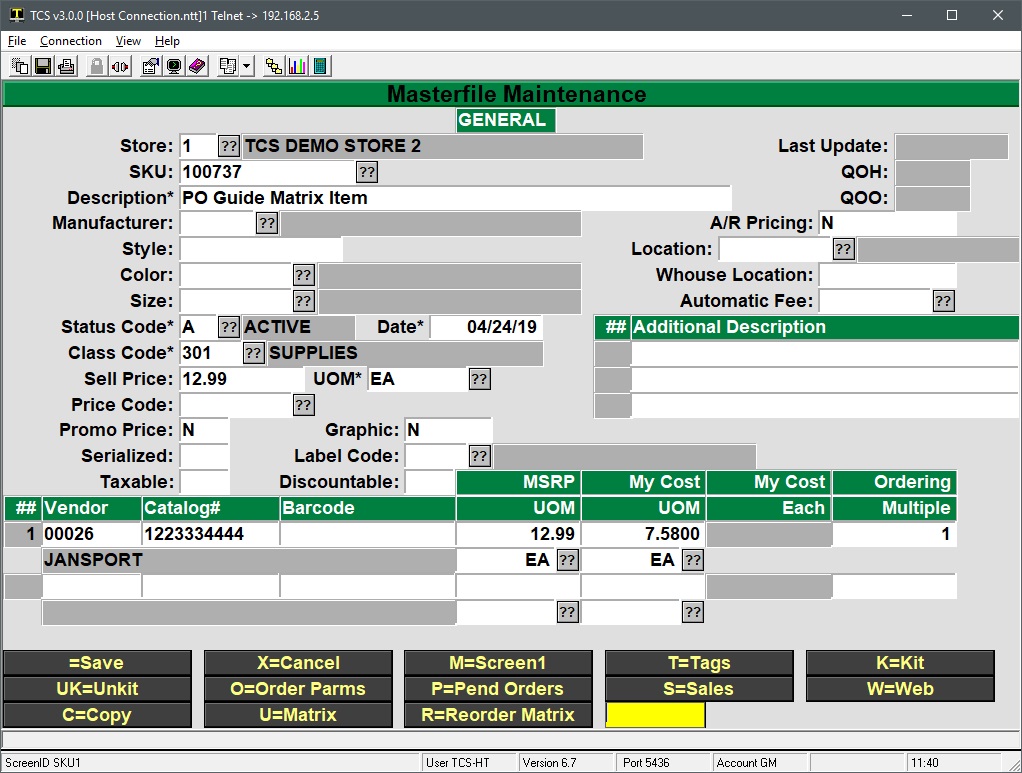
        3. The system should now be at the regular MF/Item screen to create the new item.
          1. Enter a description for the item
          2. Fill out the required fields: Status Code, Date, Class Code, Unit of Measure (UOM)
            • Also fill out any necessary optional fields, notably any color/size fields, the selling price and any vendor information
        4. Enter the order parameters for the new item
          • None of these fields are required and can be skipped by pressing ESC and then Enter
          • The Buyer Code is used to restrict the purchase of this item to a specific employee.
          • Auto Order Code is used to specify the calculation type. Essentially a collection of parameters, calculations and criteria on when an item should be placed on order via the Auto Orders process.
          • Min and Max can be used to specify a minimum or maximum order quantity
          • Order comments will be added to the PO every time the item is placed on a PO
        5. After saving (pressing enter) at the end of the Order Parameters screen the system goes back to the MF item screen.
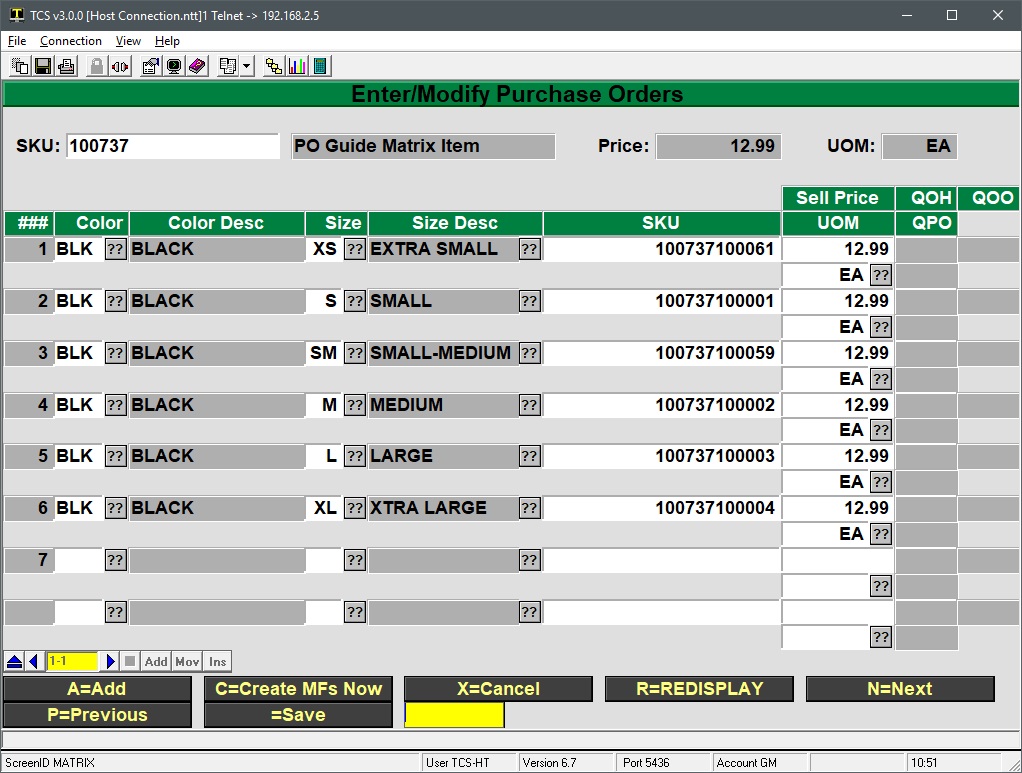
        6. Select the U=Matrix button or type U and press Enter
        7. Click on Continue at the notification that the item will be saved before proceeding to the Matrix screen.
        8. Create any child item(s) to add to this matrix set
          1. Select the A=Add option or type an A and press Enter
          2. Select the color and size codes for the first child item
          3. Press Enter at the SKU field.
          4. DO NOT click past the sku field into another field.
          5. DO NOT change the SKU value.
          6. Enter the selling price for the first child item
          7. Continue adding child items by entering their color, size and sell price of the child item(s) until done.
          8. To complete the process press Enter at an empty Color field. Then press Enter or use the =Save option to save the child items.
          9. Once back at the MF Entry screen enter a . into the SKU field and repeat the steps above to create any additional items until done.
          10. Press Enter at the MF Entry screen’s SKU field to bring the system back to the PO Item Entry process
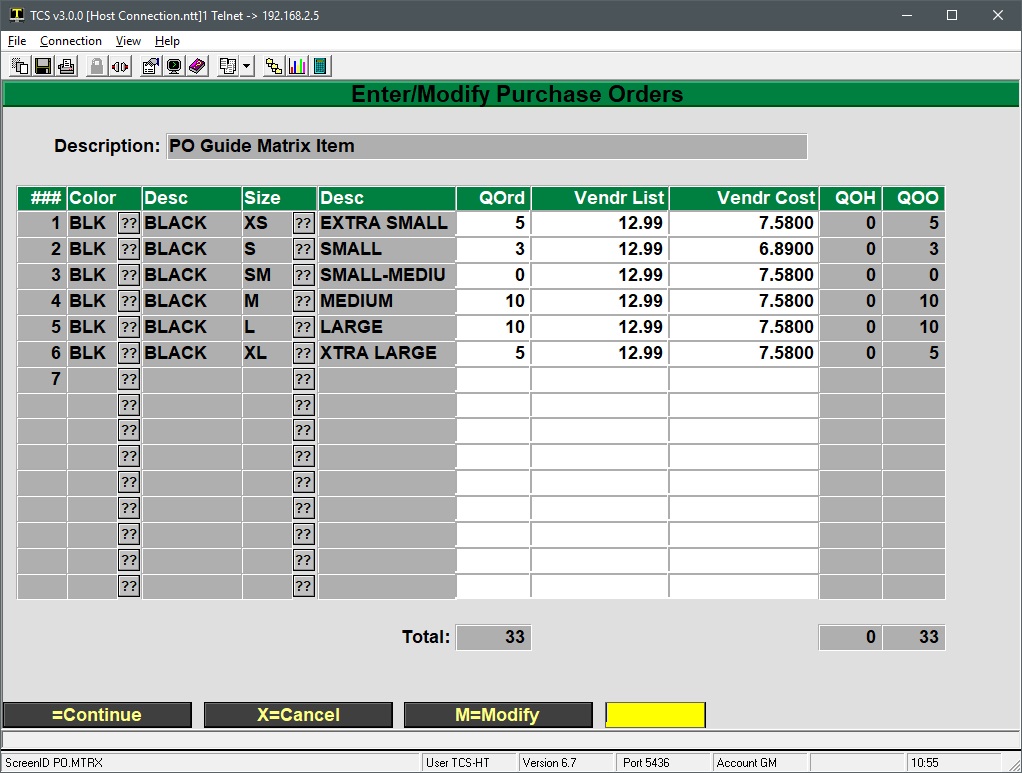
        9. Specify the quantity to order for each child item. The Vendor List and Vendor Cost can also be modified per child item.
          • Press Enter after the last child item. Then press Enter in the Line Item navigation tool to finish editing the child order data.
        10. Press Enter to save the quantities, prices, etc. specified for the child items.
          • M=Modify can be used to go back and change field values.
          • X=Cancel will cancel the ORDER information for this item. The new items will still exist in the system.
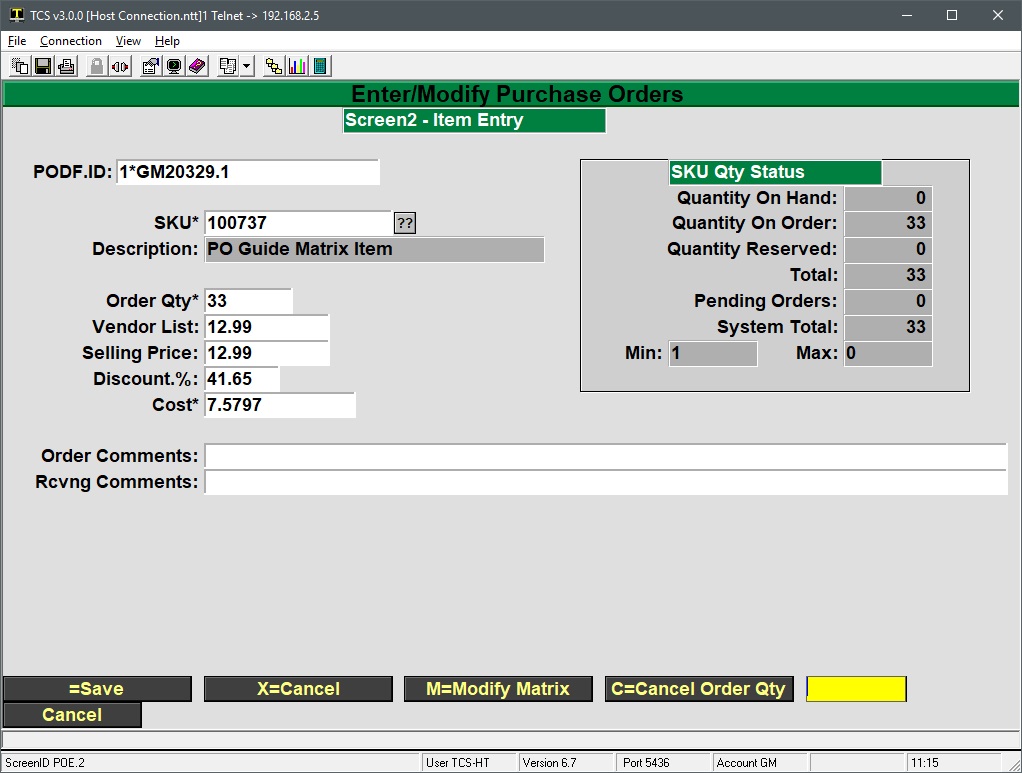
        11. The regular Item Entry screen will then be displayed with an overview of the matrix set on the PO.
          • The SKU is the Mother SKU of the matrix set
          • Order Qty is the combined quantity of the child items on order
          • The Vendor List is the list specified in the Mother SKU
          • The Selling Price is the Selling price of the Mother SKU
          • The Discount. % is the vendor list vs vendor cost percentage
          • the Cost is the average of the CHILD items ordered
        12. Add any order or receiving comments. The screen will then display the options to Save, Cancel, Modify Matrix or Cancel Order Qty. Press Enter to save.
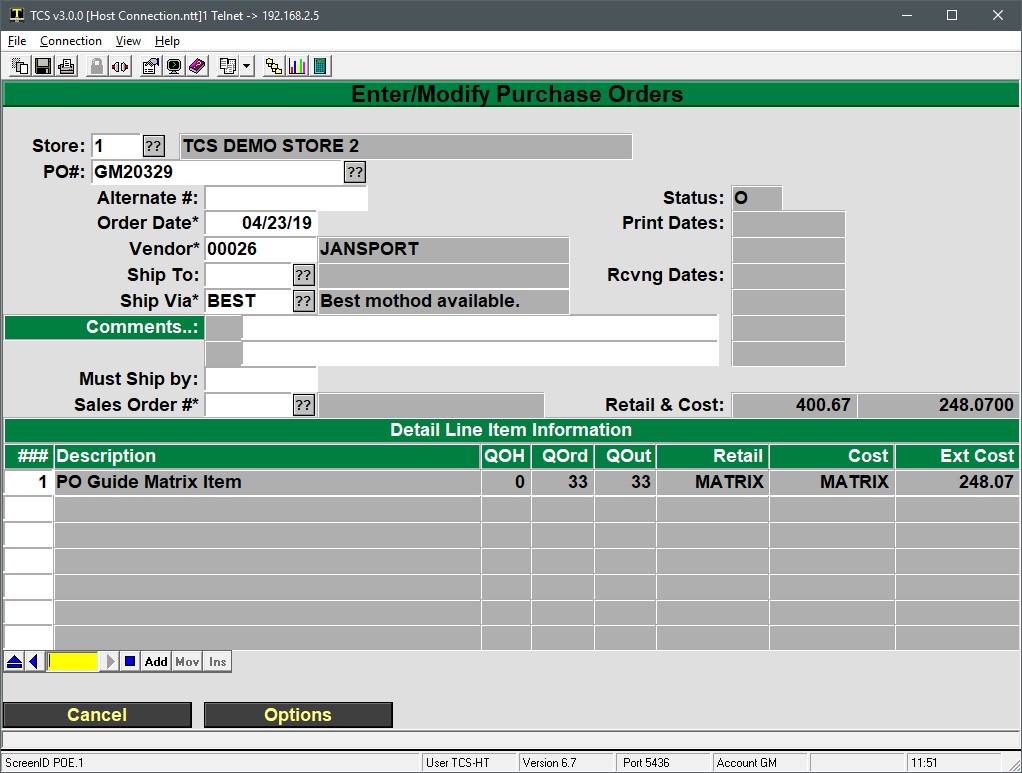
        13. The screen will then go back to the PO overview with the items added into line 1. Focus is placed in the Line Navigation tool.
          • The QOrd (quantity ordered) is the total number of child items ordered.
          • The QOut (quantity outstanding) is the number of child items that have not been received and are still outstanding.
          • The Retail and Cost columns will always display MATRIX when a matrix set has been ordered.
          • The Ext Cost (extended cost) is the combined cost of all child items.
        14. Enter a 2 into the line navigation tool or click on the Add button to add another item to the order.
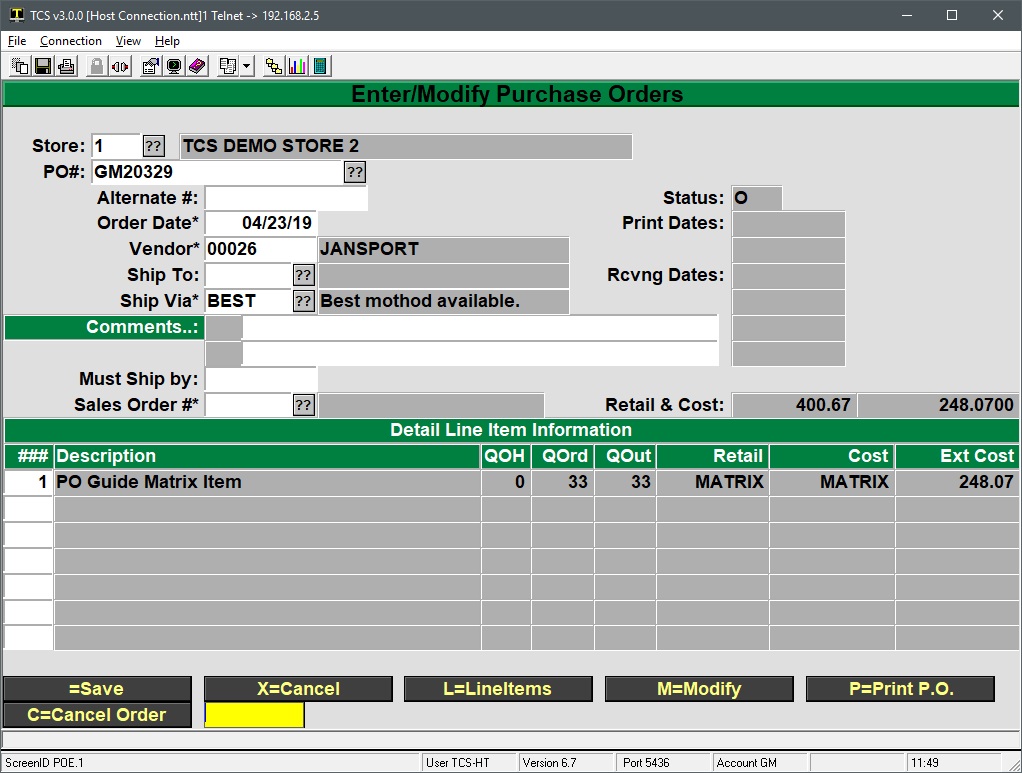
        15. Pressing enter in the line navigation tool will display the options at the bottom of the screen.
          • L=LineItems can be used to navigate to a line item and view the item details, change costs, quantities, etc. for the item on that line.
            • It’s recommended to Save the PO after adding the line items and then go back in to view, modify, etc. to ensure that any work isn’t lost.
          • M=Modify will bring the focus to the top of the PO section to modify the vendor, shipment, comments, etc. fields at the top of the PO
          • C=Cancel Order will cancel the PO and the quantities on order for all items associated with the PO.