User-Cashier Maintenance

User-Cashier Maintenance

User and Cashier maintenance has been modified. You can now create or edit a user id and the cashier set from both screens UU.5.1 and from POS.22.1, both screens allow you to perform the same functions and the cashier maintenance has been merged to the user maintenance screen. The new menu screens have the name User-Cashier Maint.

Creating a User ID

When you enter a User ID, if the ID already exist then it will display the information. If it is a new ID then you will be prompted to with 3 options, ‘Add’, ‘Copy’, ‘Cancel’. If you Select ‘Add’ then you will need to enter all of the required information for the user. If you select ‘Copy’, then you will be prompted for a user/cashier code that the system will copy valid transaction and Invalid Transaction options from. ‘Cancel’ will cancel the input of the user maintenance.

  • User Id:                 This is the id assigned to the user and what they will use when they logon to the register, if they are setup as a cashier then this will also be their Cashier ID.
  • Name:                 The Name of the user.
  • Password:                 Here you will enter the temporary password assigned to the user. When you enter a password, it will prompt for you to reenter the password to make sure there was not a typo in the first attempt. The user will then be prompted to change their password the first time they log on. When setting up or changing a password, the user/cashier should logon to a host computer first so that when they change their password the change will go down to all of the registers. Any password changes made on a Smartlane register will only be on that register and it will NOT be transferred back to the host or to any other register.

  • Department:                 This is a free form field that you can enter the department that the user is assigned to.
  • Always Display Help (D): Enter a ‘D’ to always display help or a ‘Y’ for Performance. (You should always use ‘D’).
  • Require Clocking In: Enter a ‘Y’ only if you are using the Integris Time Clock feature, this should normally be blank or ‘N’.
  • Check Background Process:         Enter a ‘Y’ only if you want the system to check for background processes when the user logs on, this should normally be set the ‘N’ or blank.
  • Credit Card Access: Enter a ‘Y’ to allow this user to access credit card data. This should normally be left blank.
  • Cashier*: Enter a ‘Y’ if this user will also be setup as a Cashier, if it is set to ‘Y’ then the bottom prompt will also have a CM=Cashier Maintenance option and when you save the record, the cashier maintenance window will display to complete the cashier setup.
  • Active User*: This feature is still in development and is not used by the system. If you wish to prevent a user from logging in, then you can set the ‘Expires’ to 0 or delete the User ID.
  • Expires*: If you have just reset the password then this will display ‘Reset90’ this indicates that the user will have to reset their password the next time they log on and that it will be good for 90 days. Once the password is reset then it will display 90. By PCI requirements we must set this to 90 or less, if you change it to less than 90 then the user will expire that many days after the day the password was last changed.
  • Email Address: Enter the email address for the user.
  • Use Menu Tree: If this is set to ‘Y’ then the user can use the GUI Menu Tree    that you can use to navigate the module that you are currently in.
  • Supervisor: If you are using the Integris time clock then you can enter the supervisor id for time clock reporting.
  • Function Key Code: Here you can set the function key setup to use for this user.

Menu Options

You can set which menu options the user will have access to by adding or removing the options here and you will set what privilege level the user will have when they access the module.

  • Priv Enter the level that this user will have in associated account, for instance, if the user is set at 50 and a menu level is set at 75 then the user will not be able to access that option.
  • Menu The menu option that they will select
  • TCL Table Always set this to L1
  • Pick Account Enter the Pick account that the option is to access.
  • Description The description of the menu option

Stores

Default Store     This is the default store that the user is assigned to.

Valid Stores        This is where you can enter any or all (*) of the stores that the user will have access to.

Save/Cancel/Modify/Cashier Maintenance

Once you have created a User then you have the options below. If you have set the Cashier*: field to ‘Y’ then if you save this record and have not selected the Cashier Maint option, the Cashier maintenance window will display to allow you to edit the cahier information.

  • =Save                 Select this (or just hit the enter key) allows you to save the changes that you have made
  • X=Cancel Select this to discard any changes you have made
  • M=Modify Select this to start at the top and make any changes to the displayed record
  • CM=Cashier Select this to display the screen for the Cashier Maintenance.

Cashier Maintenance

The first time you enter the screen you will be prompted to ‘Add’, ‘Copy’, ‘Cancel’. If you Select ‘Add’ then the information from the ‘user’ screen will be copied over and you can enter any of the additional information as needed. If you select ‘Copy’, then you will be prompted for a cashier code that the system will copy valid transaction and Invalid Transaction options from. ‘Cancel’ will cancel the input of the cashier maintenance.

Code, Name, Status, Security, Password, Default Menu, TCL Table are all locked fields and can not be modified on this screen, they are for display only.

Drawer Number:              If your cash registers have multiple drawers then you can enter the drawer that this user will be assigned to, otherwise leave blank.

Check Clock:                       If you are using the Integris time clock then enter a ‘Y’ if the user must always be clocked in before entering a cash register. You can also enter an ‘L’ to require clocking in but returns the employee back to the sign-in box. Normally this will be left blank.

Valid Transaction Types:               If you enter something in these fields then these will be the only transaction types the cashier can perform. Normally you only enter something in the Valid or Invalid not both.

Invalid Transaction Types:            If you enter something in these fields then the cashier will be able to perform all transaction types except the ones entered. Normally you only enter something in the Valid or Invalid not both.

Add logo to Receipt

Logo Setup and Installation for Epson printers

Printer Software install

Image preparation and requirements

Loading Image onto printer

Configuring POS software to print images


Printer Software install


  1. Download the Advanced print driver from the Epson site
  2. Start the install of the advanced print driver
  3. On the first screen select next
  4. Accept the terms of the license agreement
  5. For the setup type select Standard
  6. Click the add printer button
  7. Select the correct driver for your printer and the port type (In this example I am using a T88IV on a COM port)

  1. Configure the communication settings for your printer
  2. After you select next you are taken back to the printer configuration page. Select the next button and continue with the installation.
  3. You will be prompted to select next on the next window
  4. Once the install is finished select the finish button

Image preparation and requirements


The source image can be either a jpeg or PNG or BMP

I have found that a max image width of 500px works best but the image can be of any size as you can run it through an optimizer.


The instructions below will be for a JPEG but can be applied to most images


  1. Save your image to a folder or the desktop
  2. In a web browser navigate to http://www.imageoptimizer.net (I use this site but almost any optimizer will work for this)
  3. Upload the image to the site
  4. Under the optimization options select the following (The Max height will auto adjust during the optimization)
    1. Quality: Minimum file size
    2. Max width: 500
  5. Select Optimize now
  6. The next screen now shows the original width and height and the size on the left and the new width and height and size on the right
  7. Select the download to your computer button and it will save your image to your device
  8. Move and rename it to something that you will remember.
  9. Right click the optimized image and select edit.(Works best if you do this in paint)
  10. Select File then save as BMP Picture
  11. Select the location you would like to save it to.
  12. Rename it to something that will be easy to find(for example Logo)
  13. Select the drop down and select Monochrome Bitmap
  14. When prompted select Ok     


Loading Image onto printer

  1. Open devices and printers and locate the printer that was installed in the first segment.
  2. Right click your printer and select printer properties
  3. Select the Utility tab then select the EPSON Flash Logo button

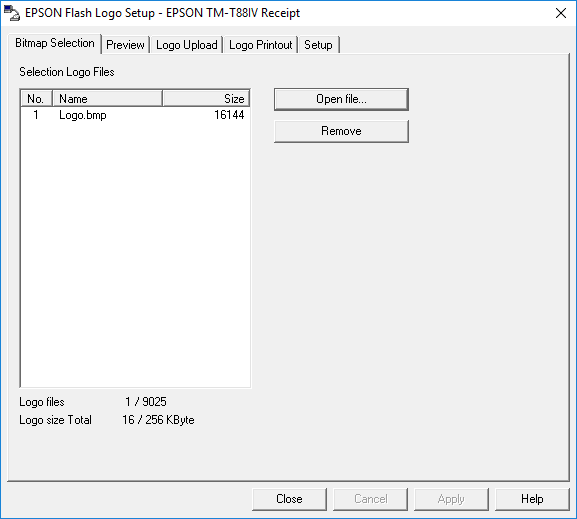
  1. On the next window that opens select the Bitmap Selection
  2. Select Open File and locate your image
  3. In the file manager select okay and then you will be returned to the bitmap selection window
  4. Repeat steps 5 and 6 if you have more images to load
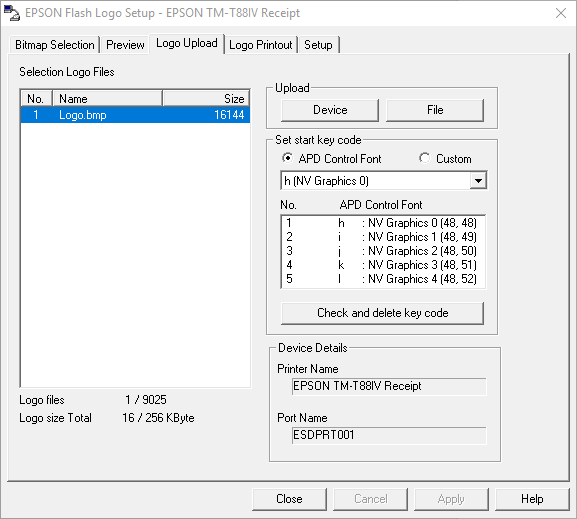
  5. Select the Logo Upload tab
  6. Leave the settings as they are and select the Device button (The file option will generate a file that can upload the image. This option is very sporadic when uploading the images)
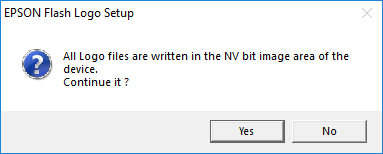
  7. It will take a second or two but you will receive a prompt asking if you want to continue select yes
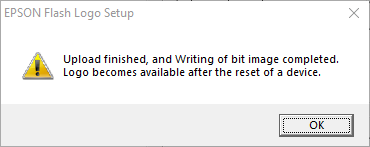
  8. The upload process can take a some time and may lock up but it will show the following prompt when it is finished.     
  9. Select ok and then toggle the power on the printer off then on.
  10. You can then close out of the flash logo setup and continue to the next section.

Configuring POS software to print images
This section works best in a GUI connection

  1. Open the TCS GUI and login to POS
  2. Navigate to Hardware Configuration Codes (POS-3-2)
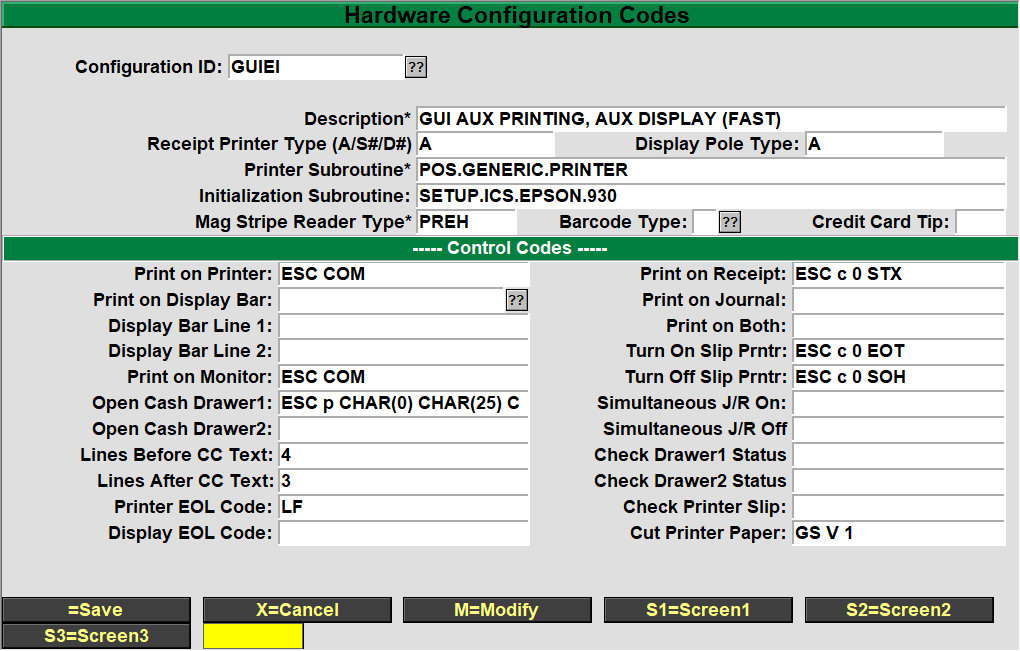
  3. It is recommended to create a new Configuration ID but you don’t have to

For this example I am creating a copy of GUIE named GUIEI

  1. Select your configuration code
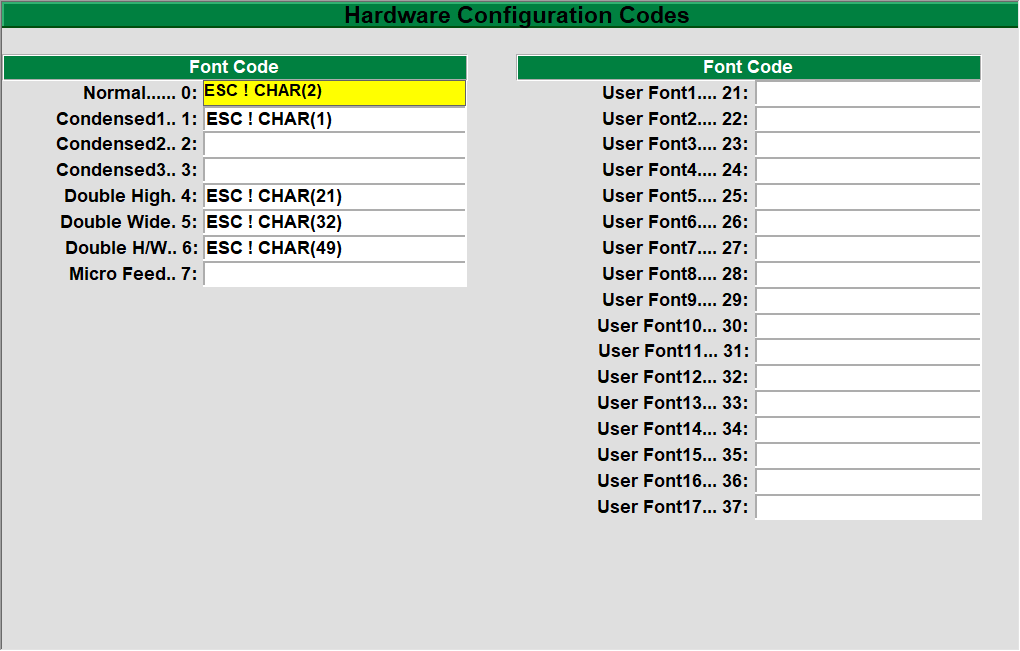
  2. Select Screen 2 by either typing S2 or selecting the button
  3. Click the entry box next to User Font 1…. 21:

For TM 88 the current code that prints the first uploaded image is (
This may change to the proper ESC codes at some point)

HEX1d HEX28 HEX4c HEX06 HEX00 HEX30 HEX45 HEX30 HEX30 HEX01 HEX01

To print the second image use

HEX1d HEX28 HEX4c HEX06 HEX00 HEX30 HEX45 HEX30 HEX31 HEX01 HEX01

For any images following the first two replace the ## in the line below with a number above 31 ( 32- 3rd image , 33 – 4th image, 34 – 5th image)

HEX1d HEX28 HEX4c HEX06 HEX00 HEX30 HEX45 HEX30 HEX##HEX01 HEX01

  1. Hit enter a few times until you are back at the Hardware parameters menu
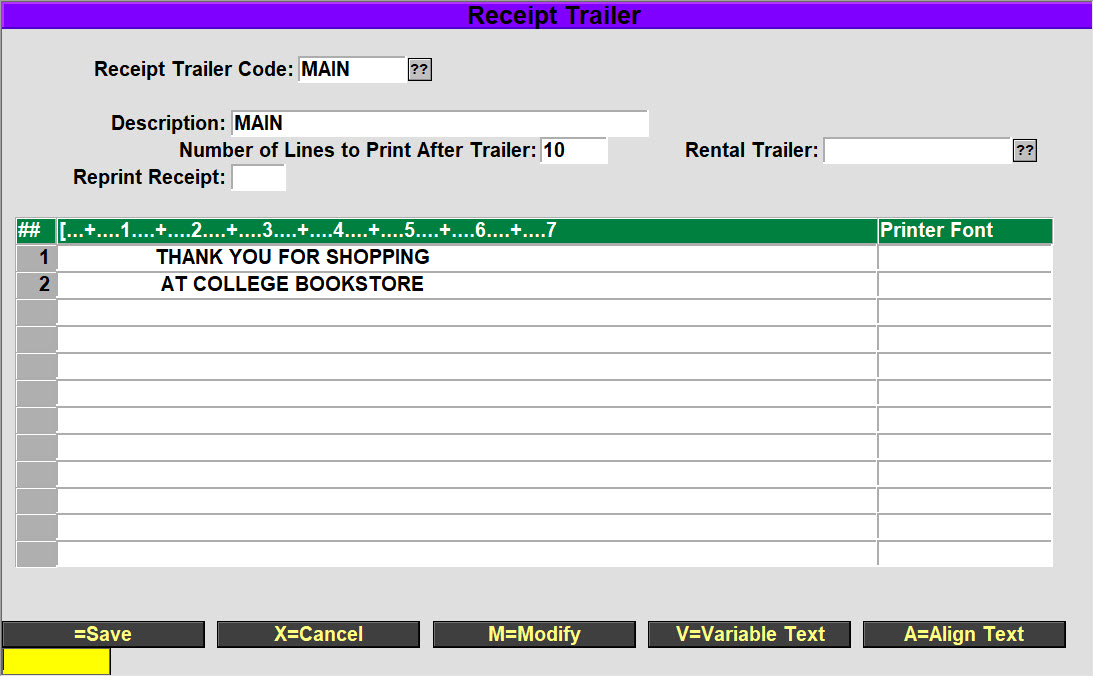
  2. Now select Receipt header  POS.3.3
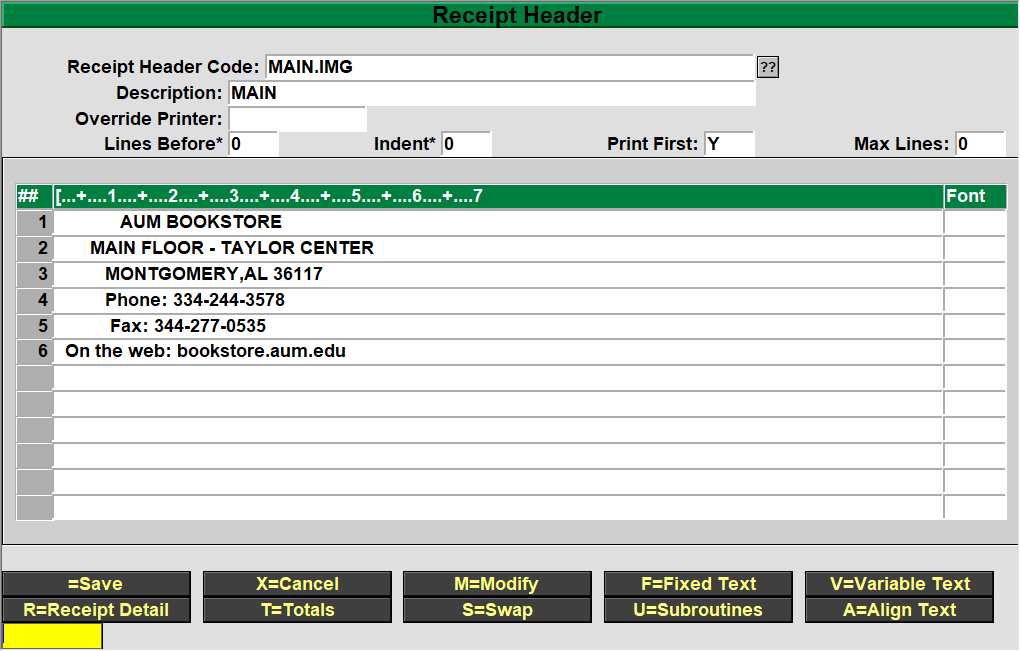
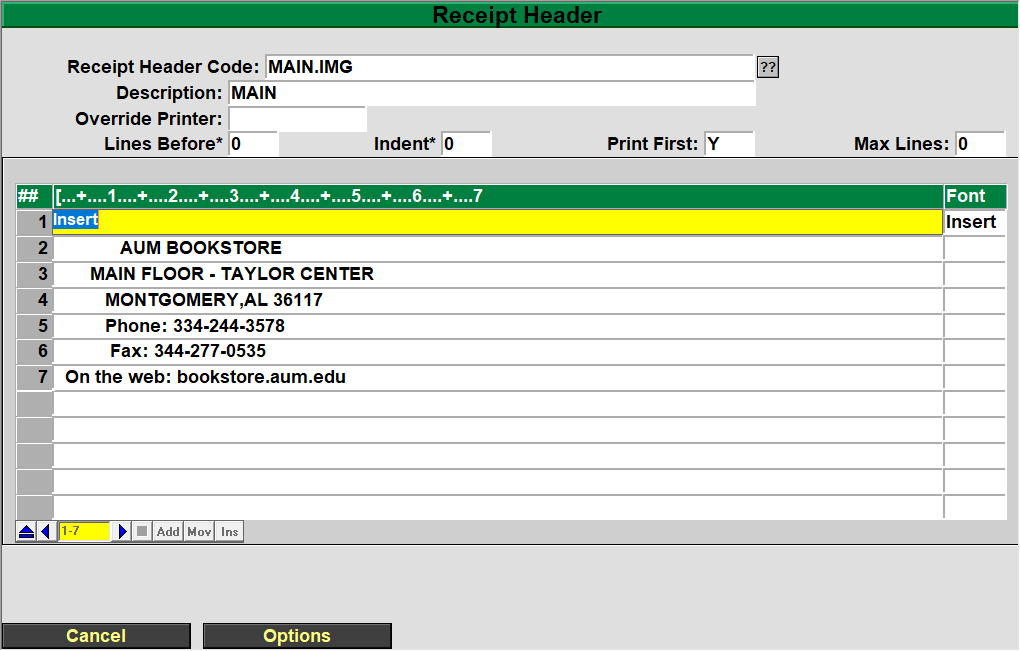
  3. Either create a new one or select your existing header(in this example I am using a copy of MAIN named MAIN.IMG
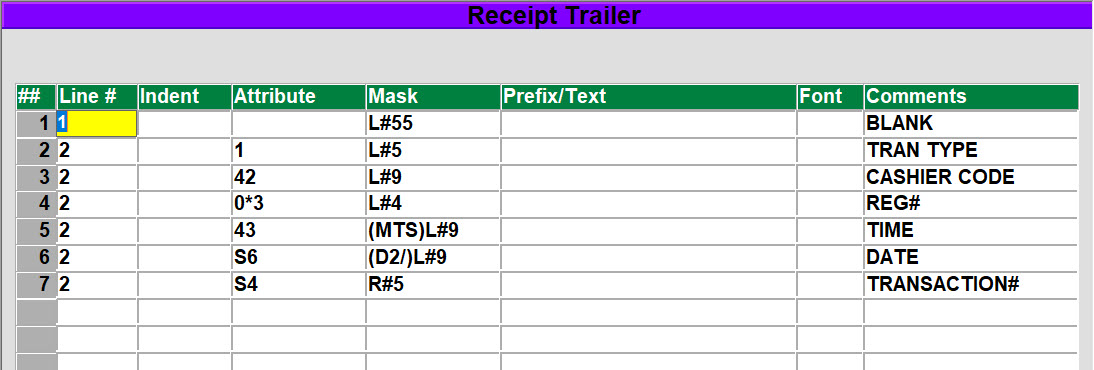
  4. Select the last line of the header and hit enter until you get the insert option at the bottom
  5. Select insert
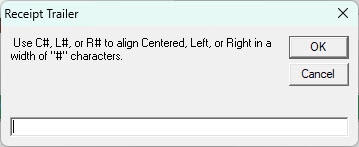
  6. When prompted type 1 and hit okay
  1. You will now have the following view
  2. Hit the spacebar 3 times and hit enter
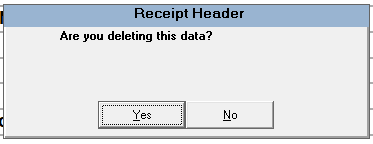
  3. When prompted with are you deleting this data select no     
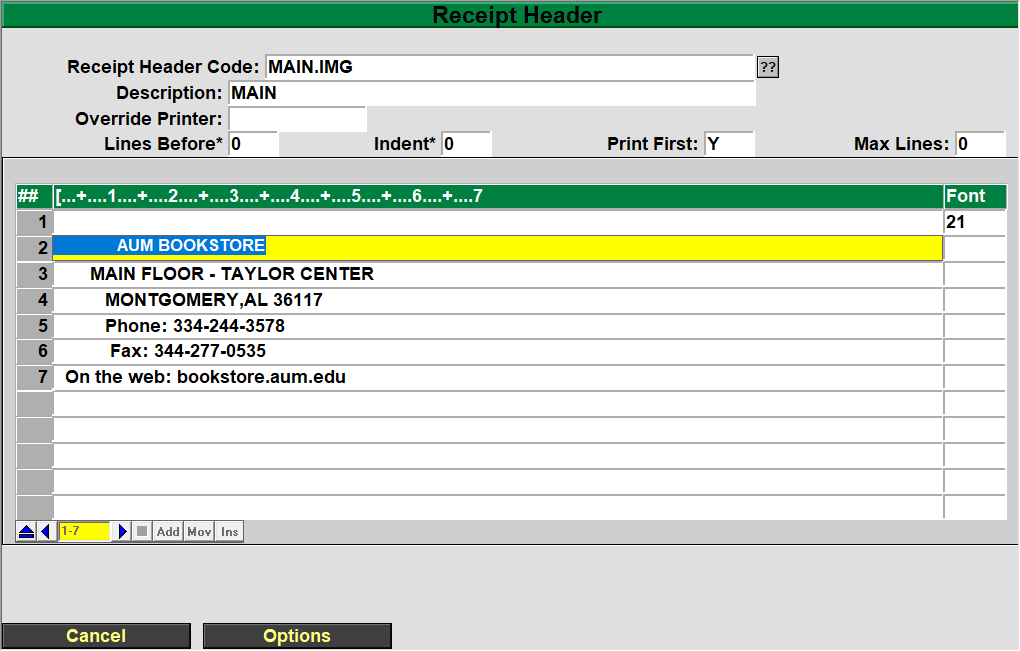
  4. You will then be shifted to the font section
  5. Here you will enter the font code you set above.
  6. Hit enter until you are back and the Hardware Parameters Menu
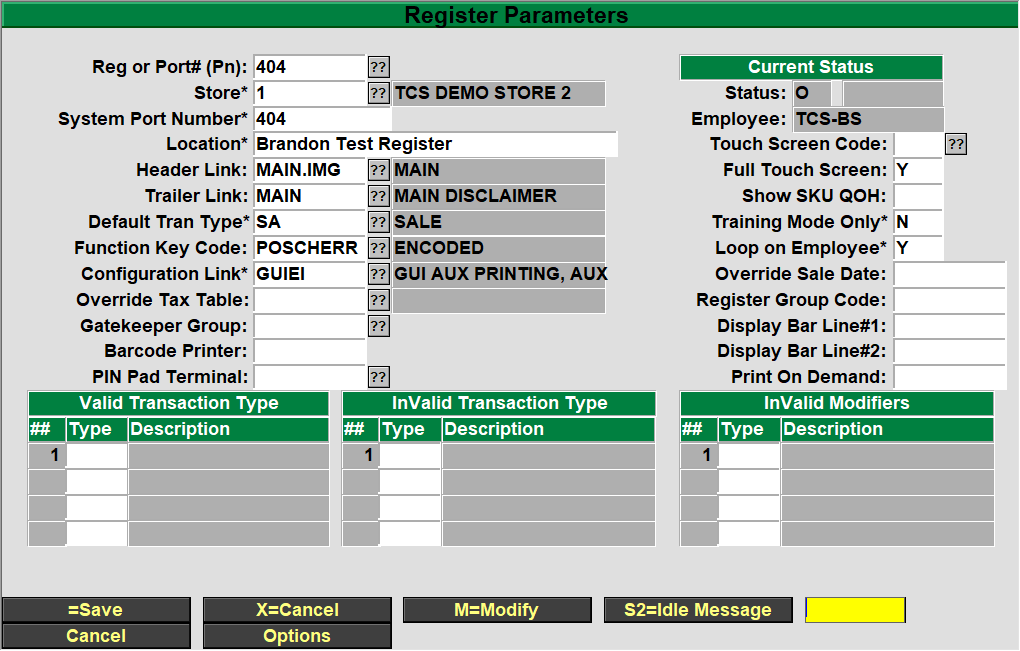
  7. Select option 1 Register Parameters
  8. Enter your register number (In this example I am using register 404
  9. Change the following options (If you changed your default header and configuration you can skip this step)
    1. Header Link
    2. Configuration Link
  1. Once changed hit enter until you are back at the main POS screen
  2. If you are making this change on the host or on the smartlane you can now select option 1 Cash Register and run a test transaction.

After running the transaction, you should now have an image on your

receipt. Below is an example


Online Orders Resume Suspend and Modify

Resuming Online and Mail Order Transactions

Prerequisite

  • The employee resuming the transactions are setup as Cashiers.
  • The PC or Register has been setup to run “Back office” or Web orders.

Once you have received your online orders you will need to resume the transactions on the system to fulfill and complete the purchases. *note that the card used to purchase the items is not changed until the resume transaction has been complete at the store. Online orders and the credit cards used for them are only verified valid and are not charged until the online order is completed in the store.

Your register must be open for the day in order to complete web transactions. Referrer to the general cash register training for Opening your register.

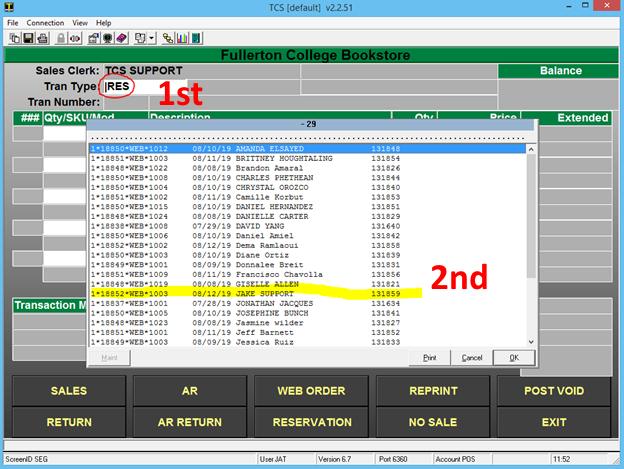
  1. Select the Transaction type Resume, Tap or Click the touch button, keyboard key or simple type |RES to bring up a listing of all pending orders on the system.
  2. Select the order you are completing from the list of suspended transactions displayed.

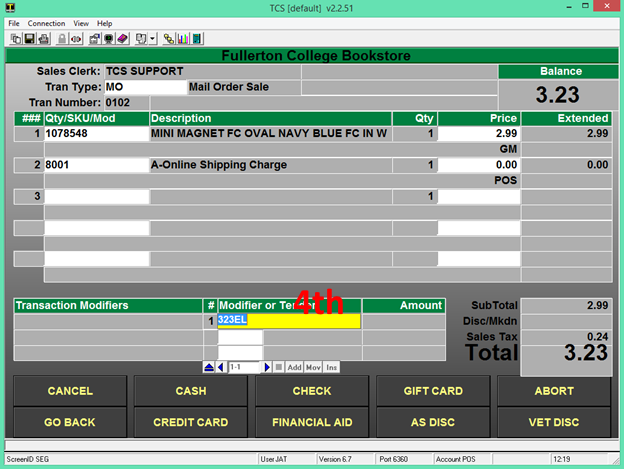
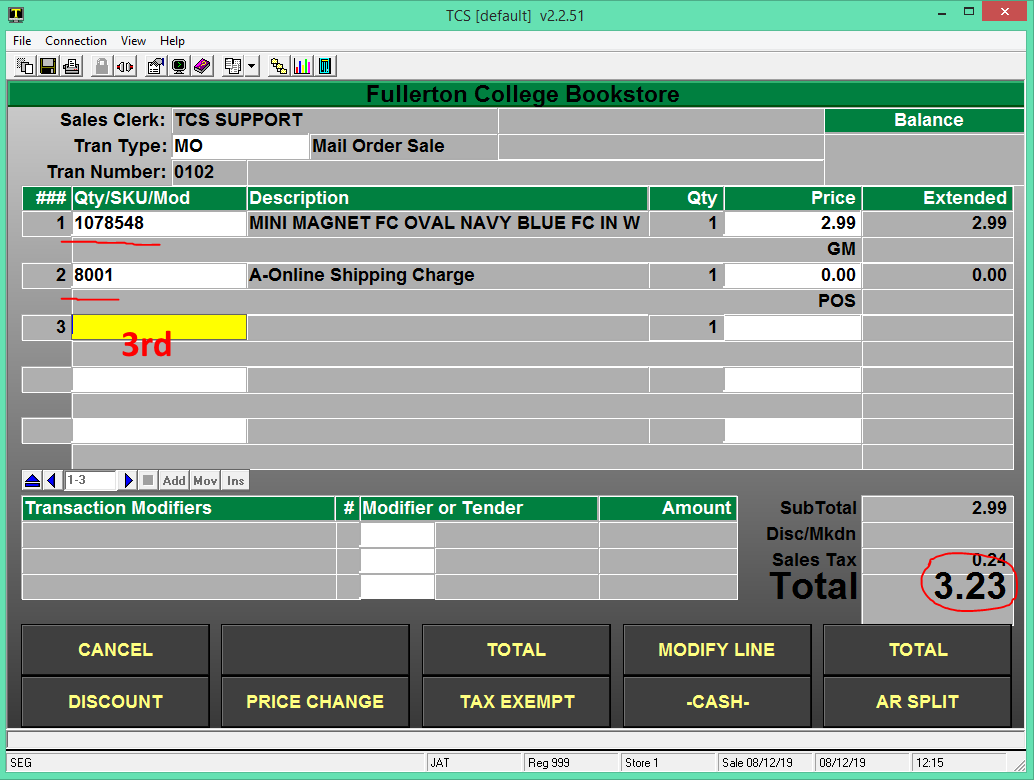
3. Your order will be displayed on the screen with the items the customer purchased in their online order. Review the items and remove, add or adjust and verify the contents of the order. *note that freight will display on pickup orders as a $0.00 dollar amount.

* If you modify the Freight you must use the Frieght modify option. This will be setup when the webstore and registers for processing online orders were setup (MOF) **

*If you modify the any item in the webtransaction you must use modify buttons that were created during the setup procedures.(MOM)**

*(MOM) and (MOF) are specific modifiers for online orders. Don’t you keyboard shortcuts for modifying web orders. example |LIM (line item modify) this will not work on a web transactions. 

4. Totaling the online order will auto populate the tender code and transaction amount. You don’t need to do any modifications to the tender code unless the customer is using a different payment method than the one they used online to make the purchase.

  • Press enter through the tender field.

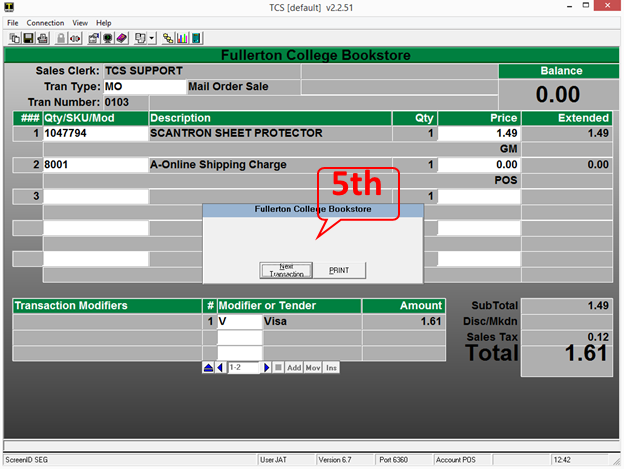
5. When the transaction is completed you will be prompted to proceed to the Next Transaction or to Reprint the current transaction.

  • At this stage in the order fulfillment an email will be sent to the customer notifying them that there order has been completed. *these email setting are setup during the initial setup of the webstore

Mail Order & Online Order with Returns and Transaction Match Tender

Prerequisite

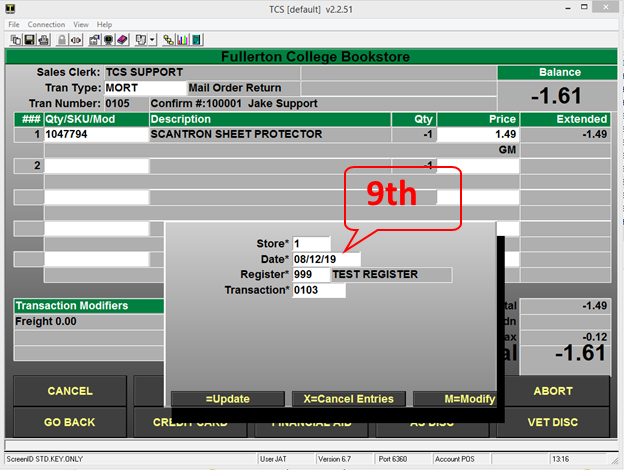
Original Transaction number, date and register. This can be in any form but all of the material is required to complete the return process.

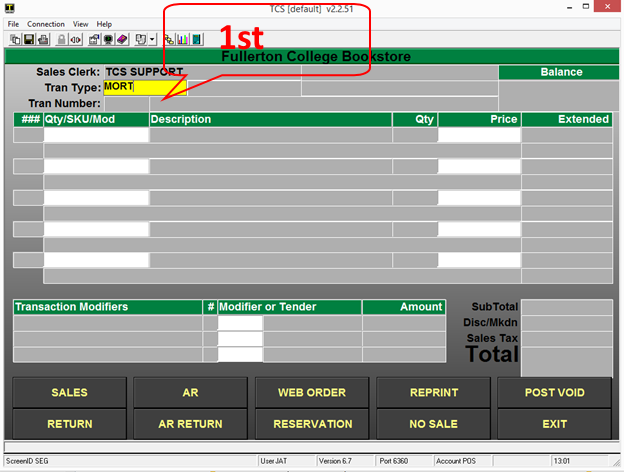
  1. On your back office, web register or any machine that has been setup to process web transactions go into the Cash Register function and select MORT, select the mail order return button or key that is setup to perform a mail order transaction.


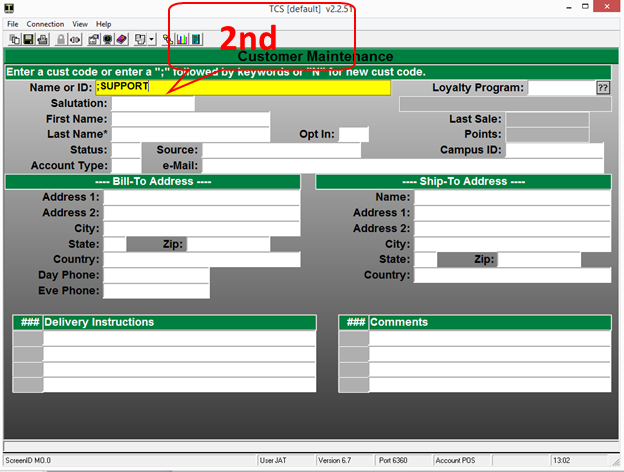
2. Input the customer ID or preform a search using the ;user’s name or portion of name.

  • You will be prompted for the customer name or ID that preformed the original transaction that you are wanting returning items against.

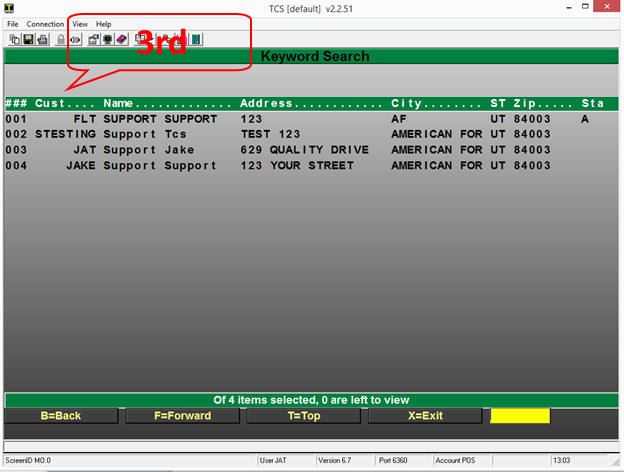
  • If you searched using the ; keyword search, select the appropriate customer to proceed to return items.
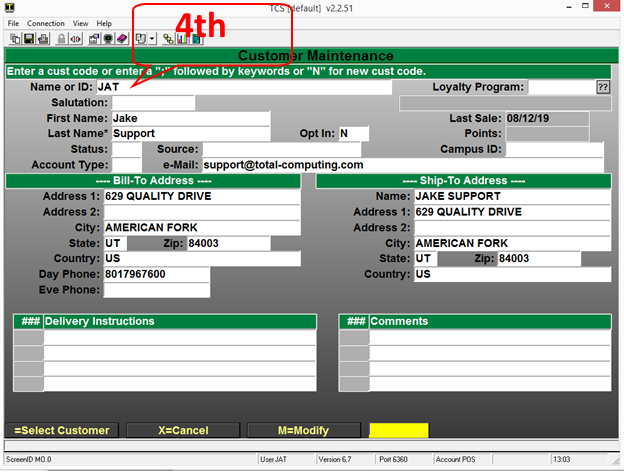
  • If you input the customer ID the search results should not display and the process should move you past the lookup and allow scanning items for the return.

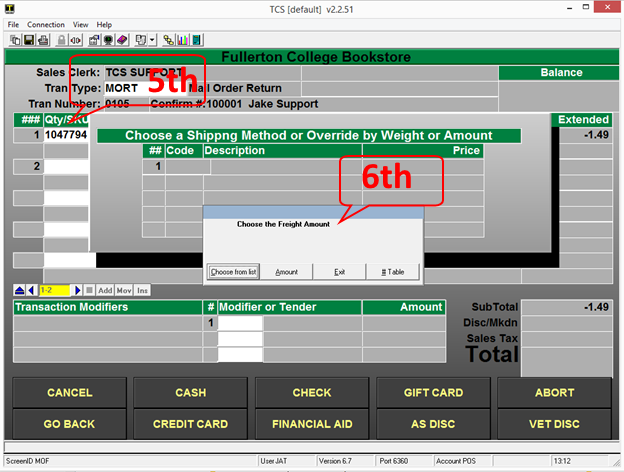
5. Once you have selected or input the correct customer all you will need to do is scan or type in the items that were on the original order into the sku field.

  • Once you have scanned or entered the items that you wish to return on the order and select Total you will be prompted for any shipping charges that you wish you apply to the return.
  • You can select a specific amount or select from a shipping table that you have setup or simple exit past this prompt.

  • Once you have scanned all of the items to be returned on the online order you will just need to Total the transaction and review the transaction total.
  • The Tender and amount should auto populate based off of the original transaction.
  • You will press “Enter” to proceed to the step

*note the system will not allow the tendered amount to be greater than the original purchase amount for the order.

**do not change the default tender code unless you are giving back cash or store credit. The tender determines what the cashier is prompted for.

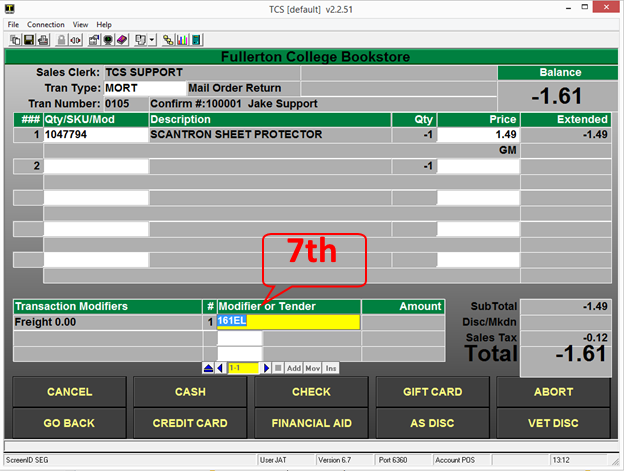
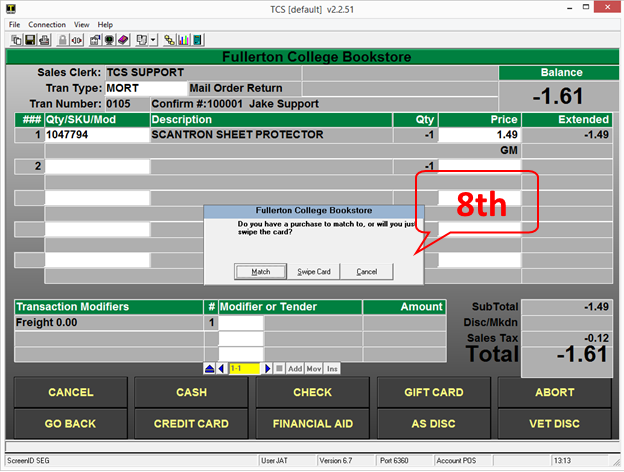
  • After you have accepted the tender and amount you will be prompted on how you would like to accept the payment return method.
    1. If the customer is present and has the credit card that they used to purchase the items you can have them swipe into your card reader their card when prompted.
    2. If you choose to refund to the original card that was used for the transaction you would select the “Match” option. You can use the “Match” option even if the customer is present with the original purchase card and the customer will not need to do anything.

*note that not all web registers are equipt with a card terminal.

  • Input the transaction information is the only way to match a transaction against the original transaction. All of the inputs must match exactly.
  • It is important to note that even though you can have multiple Stations or Registers preforming web order usually all web registers utilize the same web register number.


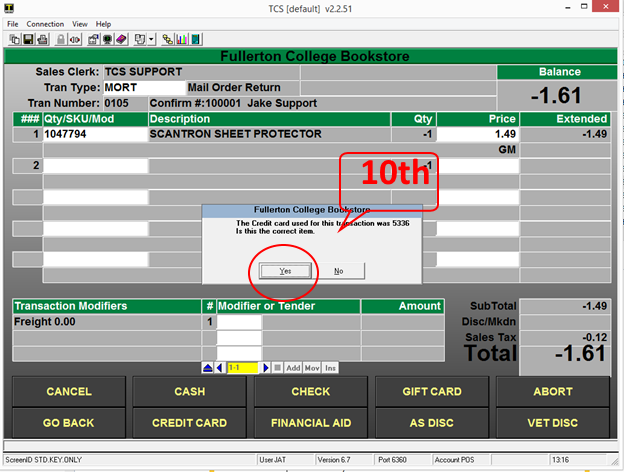
  • If the system matches the original transaction you will be prompted to verify the last 4 digits of the original transaction.

*note you can find the last 4 from the email confirmations or by reprinting the original receipt. If you do not have access to that information you may run several sales reports or lookup the transaction under the Mail order Customer Maintenance.

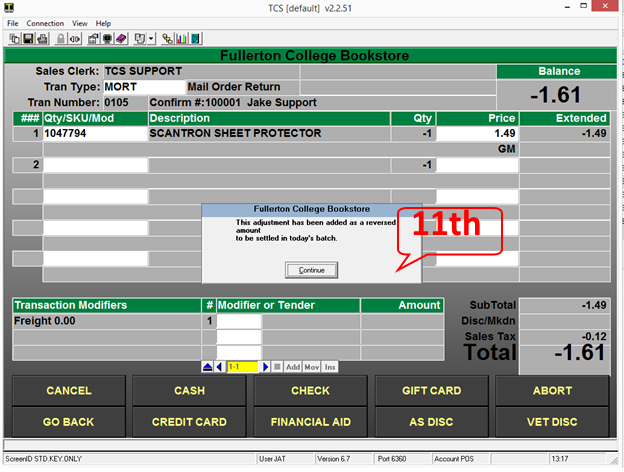
  • If the transaction matches and the tender total does not exceed the original purchase amount you will be displayed a message that the adjustment to the customer’s card has been made and the funds will be set to return to their card.

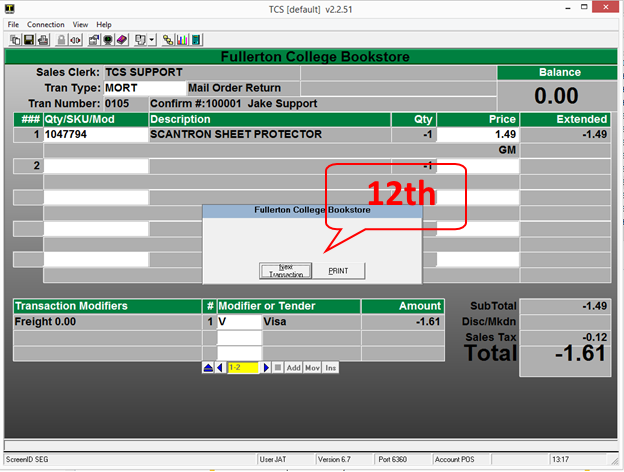
  • The last prompt you will receive once the return has been completed is to move onto the next transaction.
  • The system should print-off a return transactions receipt.

Suspending & Resuming orders from your Web register

  • Any time that you are in a weborder transactions you can EXIT or ABORT to suspend the transaction or delete the transaction.
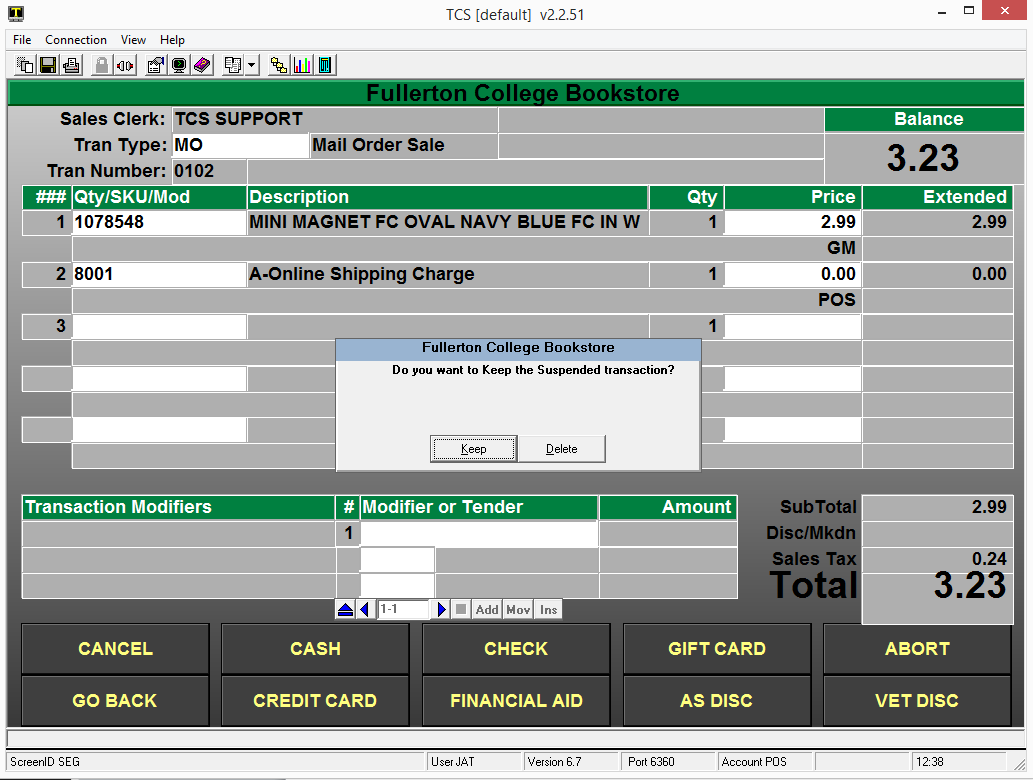
  • When you have selected a way to exit out of the web transaction you will be prompted to “Keep” or “Delete” the transaction. When you select the default option to “Keep” the transaction is restored to its original state so you can access the order at another time.
  • You can also select the “Delete” option when exiting your transactions and all of the information will be removed from the system and you will no longer be able to process that order.

*note that if you modify the online web transaction that those modifications will need to be added back as the “Keep” option restores the transaction prior to any of the users changes.

Declined Online Orders

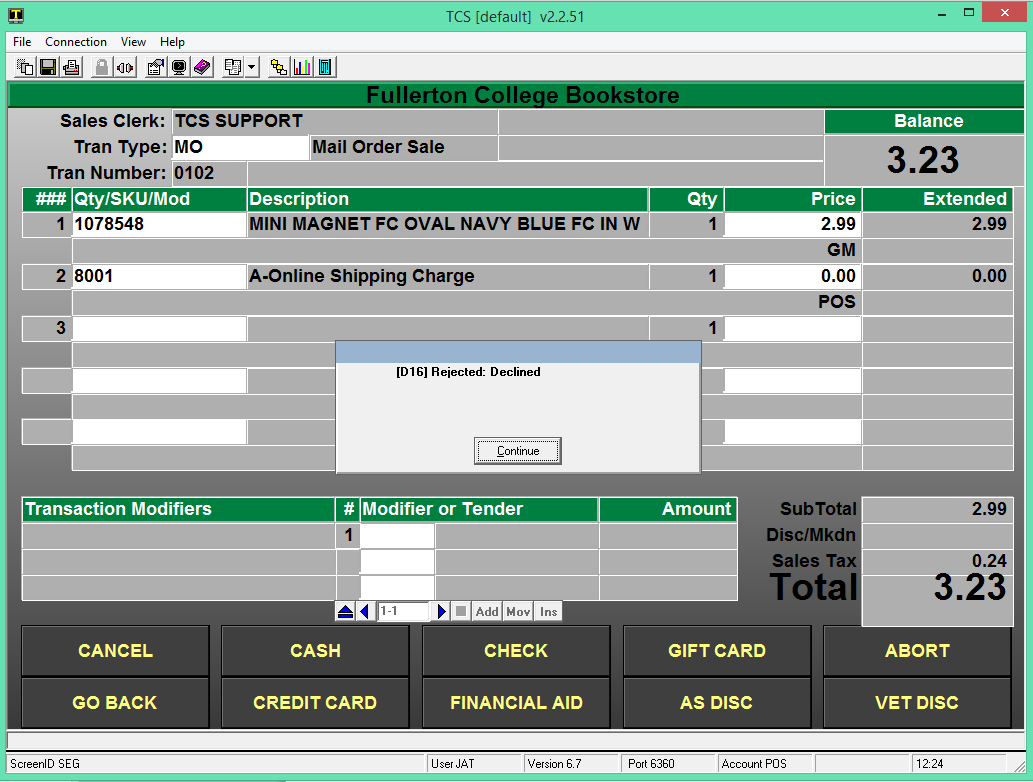
  • When you receive a declined response from the transaction when you try to process a web online order you will need to reach out to the customer to inform them that their card has been declined.
  • You can use the ABORT, EXIT or SUSPEND options to leave the transaction. Make sure that when prompted to “Keep” or “Delete” the transaction that you select the Keep option until the issue has been resolved.

*Please note that credit cards are not charged until the online order has been fulfilled at your web register.


Campus Integration Web

Campus Integration – Pass Student Course info to webserver to get a listing of books. For Sections webstore 2.x only.

Url: http://client.site.com/campus-integration?classxml={data} Method: POST

Data Example:

<?xml version="1.0"?>
<datareturn>
    <studentname>Michael Shattuck</studentname>
    <studentid>testid</studentid>
    <term>06-2014</term>
    <cmpcode>06-2014</cmpcode>
    <courses>
        <dscr>
            <dept>ACCT</dept>
            <nbr>2010</nbr>
            <section>1367</section>
        </dscr>
        <dscr>
            <dept>ACCT</dept>
            <nbr>2010</nbr>
            <section>1368</section>
        </dscr>
    </courses>
</datareturn>

Details

  • The data sent will need:
  • studentname – Only used to display on the page
  • studentid – Only used to display on the page
  • termid
  • cmpcode – campus/store id
  • courses – a list of course descriptions (this will be used to display the details for all courses provided. Each course is wrapped in a ‘dscr’ tag and will need the following:
    • dept – department id
    • nbr – course id
    • section – section id
    • The data needs to be url-encoded and will replace the ‘{data}’ section or the url.

Final example URL:
POST http://demo.campuswebstore.com/campus-integration?classxml=%3C%3Fxml%20version%3D%221.0%22%3F%3E%0A%3Cdatareturn%3E%0A%20%20%20%20%3Cstudentname%3EMichael%20Shattuck%3C%2Fstudentname%3E%0A%20%20%20%20%3Cstudentid%3Etestid%3C%2Fstudentid%3E%0A%20%20%20%20%3Cterm%3E06-2014%3C%2Fterm%3E%0A%20%20%20%20%3Ccmpcode%3E06-2014%3C%2Fcmpcode%3E%0A%20%20%20%20%3Ccourses%3E%0A%20%20%20%20%20%20%20%20%3Cdscr%3E%0A%20%20%20%20%20%20%20%20%20%20%20%20%3Cdept%3EACCT%3C%2Fdept%3E%0A%20%20%20%20%20%20%20%20%20%20%20%20%3Cnbr%3E2010%3C%2Fnbr%3E%0A%20%20%20%20%20%20%20%20%20%20%20%20%3Csection%3E1367%3C%2Fsection%3E%0A%20%20%20%20%20%20%20%20%3C%2Fdscr%3E%0A%20%20%20%20%20%20%20%20%3Cdscr%3E%0A%20%20%20%20%20%20%20%20%20%20%20%20%3Cdept%3EACCT%3C%2Fdept%3E%0A%20%20%20%20%20%20%20%20%20%20%20%20%3Cnbr%3E2010%3C%2Fnbr%3E%0A%20%20%20%20%20%20%20%20%20%20%20%20%3Csection%3E1368%3C%2Fsection%3E%0A%20%20%20%20%20%20%20%20%3C%2Fdscr%3E%0A%20%20%20%20%3C%2Fcourses%3E%0A%3C%2Fdatareturn%3E

College WEB Interface Data Connector webstore 2.x

The data sent to the D3 server included:

  1. XMLDATA (see below)
  2. TERMID (201440)
  3. STOREID (1)
<?xml version="1.0" encoding="UTF-8"?>
<datareturn>
 <term>201440</term>
 <studentname>Kyleah S Gamble</studentname>
 <studentid>S00000000</studentid>
  <courses>
    <dscr>
     <dept>HIST</dept>
     <nbr>1100</nbr>
      <section>400</section>
     <cmpcode>Bookstore Online</cmpcode>
    </dscr>
    <dscr>
     <dept>PSY</dept>
     <nbr>1100</nbr>
      <section>403</section>
     <cmpcode>Bookstore Online</cmpcode>
    </dscr>
    <dscr>
     <dept>FHS</dept>
     <nbr>2450</nbr>
      <section>402</section>
     <cmpcode>Bookstore Online</cmpcode>
    </dscr>
    <dscr>
     <dept>ENGL</dept>
     <nbr>1010</nbr>
      <section>418</section>
     <cmpcode>Bookstore Online</cmpcode>
    </dscr>
  </courses>
</datareturn>


Implementation Guide for IT

Network Rules

The following is a list of connections that may need to be opened on any firewall systems regulating traffic to/from the bookstore to the outside internet.

Mandatory

  1. Outbound UDP traffic to 104.209.214.232 on ports 1171 – 1174. This rule is to allow the cash registers and back office workstations to establish a VPN connection to the point of sale host.
    1. We use OpenVPN for the VPN connections
    2. Client/server communication is encrypted using the AES-256-GCM encryption algorithm
  2. The customer is contractually required to provide remote access for the SmartSuite support team when needed.
    1. Zumasys uses the ConnectWise remote support tool to assist customers when they do not have a tool for us to use.
    2. If the firewall rules block the establishment of outbound connections then it will be necessary to allow network traffic for the ConnectWise application.
      • If your firewall appliance supports URL/Alias’  then whitelist the following:
        • https://zumasys.screenconnect.com/
        • relay://instance-sisn83-relay.screenconnect.com:443/
      • Whitelist the following IP addresses if your firewall appliance does not support URL/Alias whitelisting
        • 54.188.209.27 – port 443
        • 44.224.173.7 – port 443
    3. The customer must provide a reasonable solution for remote support access if the customer is unable, or unwilling, to utilize the ConnectWise application.
  3. Vantiv/Worldpay Credit Card Processing
    1. This is required to allow on premises cash registers to perform credit card authorization requests via their P2PE devices.
    2. If your firewall supports domain based filtering, then you can simply add a rule to allow traffic to https://transaction.elementexpress.com on port 443.
    3. They round robin through the IP addresses below.
      1. 74.120.156.1 to 74.120.156.254 Port 443
      2. 74.120.157.1 to 74.120.157.254 Port 443
      3. 74.120.158.1 to 74.120.158.254 Port 443
      4. 74.120.159.1 to 74.120.159.254 Port 443
  4. Bolt/CardConnect Credit Card Processing
    1. This is required to allow on premises cash registers to perform credit card authorization requests via their P2PE devices.
    2. Their IP address range is:
      1. 198.62.138.0/24
      2. 206.201.63.0/24
    3. An up to date list can be found on their support site: https://support.cardconnect.com/bolt/terminal/network-whitelisting
  5. Administrative permissions are necessary to install and configure back office workstations with SmartSuite software.
    1. A temporary administrative account can be created for Zumasys use in installing SmartSuite software.
    2. A member of the Customer’s IT staff can accompany Zumasys staff to each workstation to provide administrative credentials as needed

Optional/Situational

  1. Any batch import/export processes will require SFTP access to connect2.total-computing.com (104.209.214.232) on port 4355.
    1. Batch processes include student information, course information, financial aid, etc.
    2. Credentials will be provided during the installation phase.
  2. Redshelf ebooks authorizations require access to the following IP addresses on ports 443 and 80.
    1. 34.196.10.62
    2. 34.196.7.198
    3. 34.206.13.124
    4. 5.171.101.186
  3. Sender authentication setup for emailed reports, order notification and rental notices originating from the hosting system.
    • These communications are configured with the customer’s domain in the “From” address which will trigger spam/junk filters if the steps below are not taken.
      1. Sendgrid Domain Authentication
        • This is completed during the installation and onboarding process and requires the following
          1. Various DNS records to be added to the customer’s DNS service
          2. Modification of the customer’s SPF, DKIM and DMARC records to include the Sendgrid service as a valid sender
    • If the Sendgrid Domain Authenitcation is not completed, it may be necessary to whitelist the following domains and IP used by our Sendgrid service. This is not ideal as our customer’s end users have an increased chance of not receiving email communications.
      1. 149.72.56.9
      2. em94.total-computing.com
      3. em1553.total-computing.com
    • The system may also be configured to use a customer owned Sendgrid service using their basic SMTP service.
  4. Website password reset emails are sent via a second service. This service will ultimately be phased out in favor of the Sendgrid service.
    1. 166.70.13.231 – out01.mta.xmission.com
      166.70.13.232 – out02.mta.xmission.com
      166.70.13.233 – out03.mta.xmission.com
      198.60.22.202 – mgr2.xmission.com

Software and Data

Zumasys does not provide any backup services for data stored on hardware at the customer’s site. All customer data on the SmartSuite servers is backed up daily for 90 days. Weekly backups are retained for at least 180 days and monthly for one year.

Any removal of data, software or utilities installed during the installation phase will incur a per-hour charge to reinstall and reconfigure. This includes installing any of the above on re-imaged or new/upgraded hardware.

Any in-warranty hardware repairs to hardware provided by Zumasys that removes software or data will not incur the hourly charge to reinstall and configure.

Virus and Malware Protection

Zumasys does not provide or install any Anti-Virus or Anti-Malware software on any customer machines. It is the responsibility of the customer to install, update and run such products at their own discretion.

Real-time data monitoring programs may need to be configured to exclude certain programs (VPN, Cash Register application) and certain directories if the real time protection features interfere with the day-to-day operations. Zumasys can provide a list of directories, executables and/or services that may need to be added to exclusion lists if real-time monitoring is having an adverse effect on register operations.

Pre-Existing Hardware and Peripherals

Pre-existing hardware is under the customer’s responsibility to support. Zumasys staff will do their best to ensure peripherals work within our system, but the ultimate responsibility for unsupported hardware is on the customer. Below is a list of items that fall under the customer’s responsibilities to support when they are not purchased from Zumasys.

  1. Receipt Printers
    1. USB and Serial receipt printers are typically compatible as long as they support Epson emulation.
  2. Scanners
    1. Scanners may need to be programmed to read certain barcode formats.
  3. Report Printers
    1. The SmartSuite system supports printing to printers that natively support PCL5. Some printers that emulate PCL 5, and some PCL 6 printers, may work. Post Script and other non-PCL based printers are not recommended or supported in any way.
  4. Barcode Printers
    1. SmartSuite supports printing formats for the following brands. Note that model specific features or functions may require additional effort to setup and configure.
      1. Zebra
      2. Datamax
      3. Cognitive
  5. Inventory scanners
    1. Metrologic Scanpal v2 and Tricoder scanners are currently support in SmartSuite.
  6. Credit Card Readers
    1. Zumasys officially supports credit card readers purchased through Zumasys.
  7. Customer displays
  8. Programmable Keyboards
  9. Cash Drawers
    1. Zumasys only supports cash drawers that connect to the receipt printer CD port.


Firewall Rules

Below is a list of traffic that will need to allowed through the bookstore firewall for access to TCS systems. We also need to know the forward facing IP that bookstore traffic comes from in order to enable certain processes. Primarily for SFTP access to import any course adoption records, student accounts, etc. that the bookstore may need to import in bulk.

I’ve added the URLs in case your firewall supports URL based filtering.

  1. transaction.elementexpress.com port 443
    1. This is the URL for the credit card authentication requests.
    2. They round robin quite a few IP address
  2. 104.209.214.232 port 1191 over TCP
    1. Used for OpenVPN traffic
  3. redshelf.com
    1. All registers that will process RedShelf e-books will need access to Redshelf’s services. The addresses that need to be accessed from all POS stations that will sell RedShelf products are 34.196.10.62, 34.196.7.198, 34.206.13.124 and 35.171.101.186 on port 80 and 443.