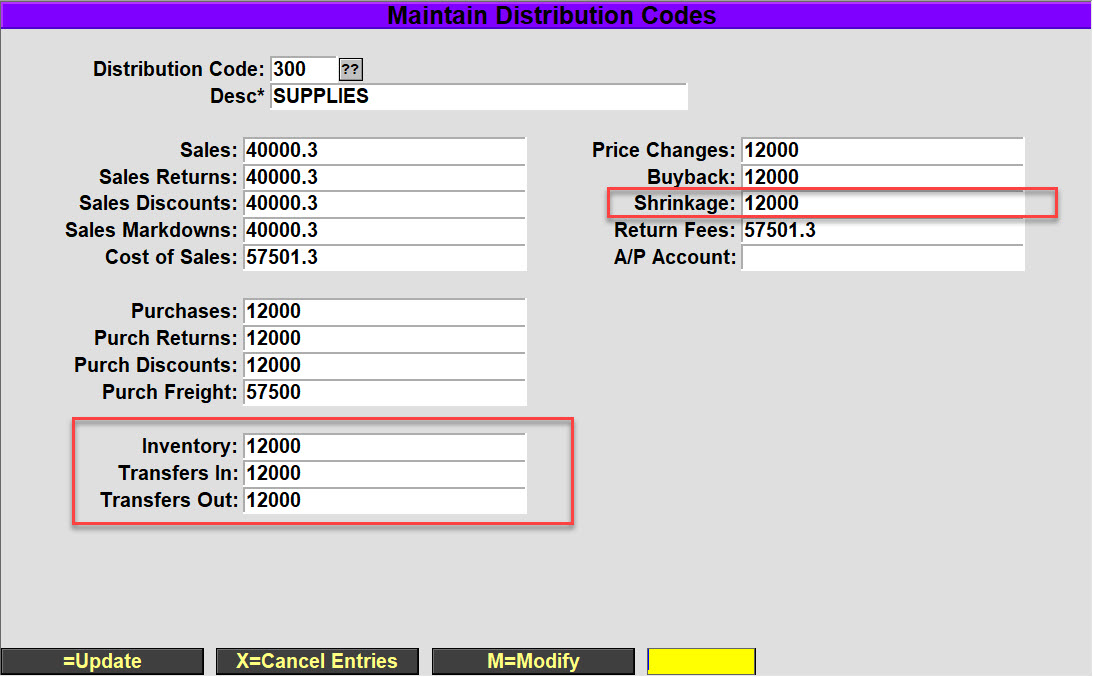
Update Item Costs To All Stores

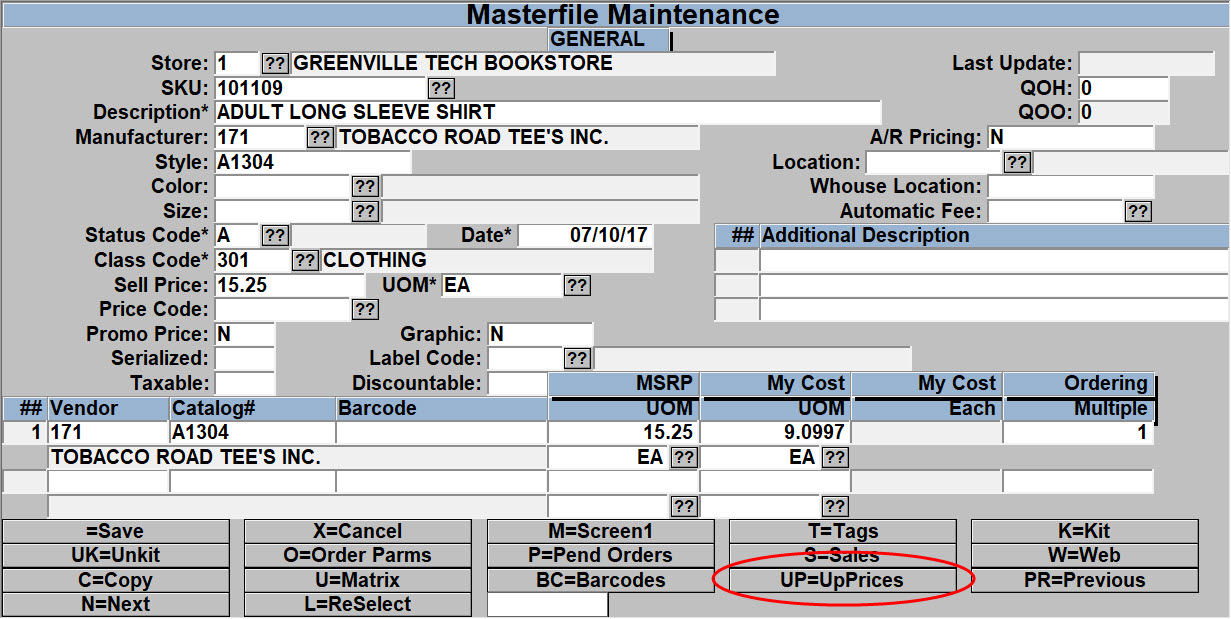
  • In GM Master File (MF) maintenance, bring up an item.
  • On the bottom options row, select the ‘UP=UpPrices’ button to update the cost, for the item displayed, from Store 1 to all other stores. The update will only update from store 1 to other stores. When you select the option, the process will run without any further input from the user.


General Merchandise Training

Overview


GM/Trade refers to the General Merchandise and Trade Books components of the TCS system. Since most of their functions are similar, they are combined here. All merchandise items are maintained in a master file (MF), referenced by SKU/ISBN. SKUs may be added or deleted as required. Synonyms allow one item to be referenced by more than one SKU. The module handles Purchase Orders, Receiving, Returns, and Physical Inventory. A perpetual inventory is maintained; each receiving adds to the inventory, each sale subtracts from it. You can print bar-coded labels for the merchandise and print various reports.


Master File


Creating a New MF Item


  • At the ‘Enter your user id:’ prompt, type “GM” to log onto the General Merchandise account.
  • From the GM master menu, type in “MF” for ‘Master File Maint”.
  • At the ‘SKU:’ prompt, there are three (3) different ways of adding a new item (or assigning it a SKU number). Either way is acceptable.
    1. Let the system automatically assign a SKU number
      1. To let the system automatically assign a SKU number, enter a ‘period’ “.” and the system will assign the item the next sequential SKU number in the system.
      2. After entering a period “.”, your next prompt will be the ‘Description:’ field.
    2. To enter in your own SKU number
      1. Enter in the SKU number you have listed for this item.
      2. After entering your own SKU number, you will be presented with the prompt “Item not on file, Do you wish to add or copy? [A]=Add, [C]=Copy, [X]=Cancel”
        • Choose “A” to add the item
        • Note: You will only be presented with the ‘Item not on file’ prompt if the SKU number is not found in the system. If there is already an existing SKU number, the item that has that SKU number will be displayed. You will then either need to delete the old item, or assign the new item a different SKU number.
      3. Scan the manufacturer bar code to create the SKU number (if you have a scanner available at the workstation that you are at)
        1. Scan in the manufacturer bar code using the scanner.
        2. After scanning in the manufacturer bar code, you will be presented with the prompt “Item not on file, Do you wish to add or copy? [A]=Add, [C]=Copy, [X]=Cancel”
          • Choose “A” to add the item
          • Note: You will only be presented with the ‘Item not on file’ prompt if the SKU number is not found in the system. If there is already an existing SKU number, the item that has that SKU number will be displayed. You will then either need to delete the old item, or assign the new item a different SKU number.
  • Enter the description of the item at the ‘Description:’ prompt.
    1. a) Make sure you use ‘meaningful’ descriptions, and try not to abbreviate. Most descriptions can be accomplished using 25 characters or less (including spaces), but you may use as many as 45 characters.
    2. Make sure you are consistent in describing like items. This field is a ‘cross-reference’ field, which means, you are able to do a search on various items by simply typing in a description of an item. For example:
      1. PEN will pick up PENcil, PEN, PENtal, PENdaflex
      2. CAN will pick up CANdy, CANvas, CANdle, CANary, CAN
  • Enter the Vendor Number for the Manufacturer in the ‘Manufacturer:’ field.
    1. Presently, Manufacturer and Vendor are the same thing unless you have created Manufacturers in your Vendor Maintenance as well. In that case, enter in an appropriate Manufacturer number.
    2. You may also enter in a short description of the Vendor/Manufacturer such as “SUP” for ‘Supplies are Us’. Keep in mind that you will also pick up any other vendors having ‘SUP’ in their name.
  • The ‘Style:’, ‘Color:’, and ‘Size:’ fields are optional fields.
  • The ‘Status Code:’ field automatically defaults to “A” for Active.
  • The ‘Date:’ field will automatically default to the current date.
  • You must enter a valid Class Code in the ‘Class Code:’ field.
    1. You may enter a “??” or “//” to display a list box of valid class codes.
  • Enter the Selling Price of the item in the ‘Sell Price:’ field.
    1. Entering “500” will be taken as $5.00. Only entering “5” will be taken as $0.05.
  • The ‘UOM:’ field (Unit of Measurement) will normally default to “EA” for each.
  • The ‘Price Code:’ field is optional and is used in special sale circumstances.
  • The ‘Promo Price:’ field will default to “N” for No. Accept this default.
    1. This field is used in special sale circumstances.
  • Enter “Y” in the ‘Print Label?:’ field.
  • Enter the type of Bar Code Label Code you would normally use to print bar codes for this item in the ‘Label Code:’ field.
  • Enter “Y” or “N” if the item is taxable or not in the ‘Taxable:’ field.
  • Enter “Y” or “N” if the item is allowed to be discounted or not in the ‘Discountable:’ field.
  • You must enter a valid Vendor for this item in the ‘Vendor’ field.
    1. You may do a “??” or “//” to display a list box of valid vendors, or you may enter in a brief description of a valid vendor such as “SUP” for ‘Supplies are Us’.
  • The next two fields “Catalog #’ and ‘Barcode’ are both optional and can be left blank.
  • You are required to enter in a Vendor List price in the ‘Vndr List’ field. Typically, the ‘Vendor List’ and ‘Sell Price’ are the same prices.
  • Enter “EA” in the ‘UOM’ field (Unit of Measurement)
  • Enter in the Vendor Cost in the ‘Vndr Cost’ field.
    1. The Vendor Cost is what you pay for the item – not what you will sell it for.
  • The ‘UOM’ field under vendor cost automatically defaults to ‘EA’.
  • The ‘Min Order’ field defaults to “1” and can be left at that number.
  • If you are able to receive this item from multiple vendors, enter in the second vendor on line 2, and repeat steps 18-24.
  • Keep pressing the ‘Enter’ key until you come to another screen (the rest of the fields in the first screen are optional).
  • All the fields in this second screen are optional as well, so you can press ‘Enter’ until you see the ‘Options’ at the bottom of your screen.
  • Press ‘Enter’ to accept the default of ‘Save’ (< >=Save).


Every item you will use in the system must be set up in this manner. In some of the processes that you will encounter, you will be asked if you would like to create a new item. Regardless of where you are at in the system and whatever process you are in that is asking you if you want to create a new item, you will go through the steps listed above in creating that new item.


Synonyms


Sometimes it’s necessary to refer to the same item by more than one SKU. This is readily done by making the second (third, fourth, etc.) SKU a synonym, pointing to the original SKU. Go to Synonym Maintenance (GM-SU-01-21) and enter the new SKU as the Synonym ID. Then enter the name of the existing SKU; it’s description will be displayed. Press Enter to save the synonym. When either value is entered as a SKU, the original record will be accessed.


To subsequently delete the synonym, go to Synonym Maintenance, enter the synonym and enter ‘D’ for delete.


Promo Pricing


Special pricing can be applied in a 2 for 1 type of setting or a flat promo price. Each type of pricing can be applied over a range of dates or indefinitely.


Price Tables


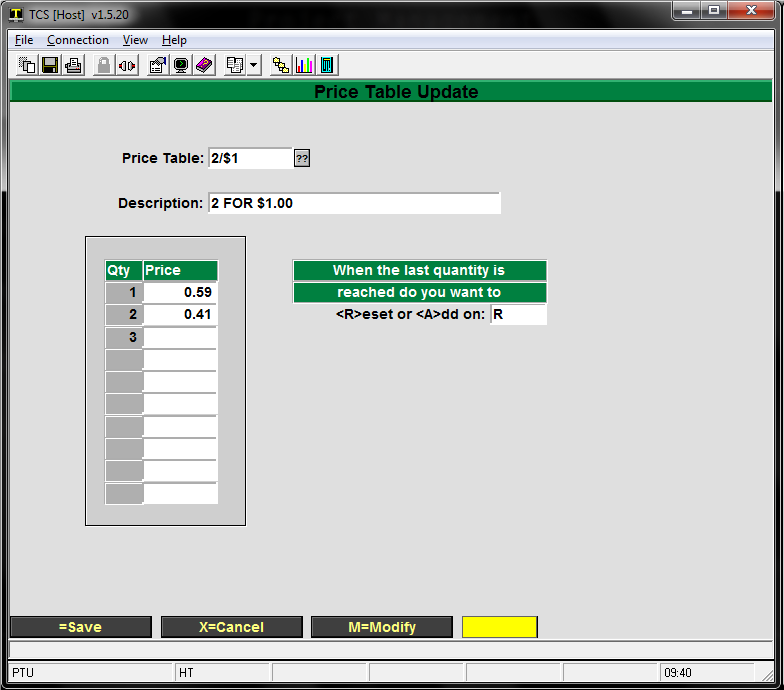
Price tables are built in GM-SU-3-22 and are the only method for setting up 2 for 1 type discounts.

The following example will cover how to create a 2 for 1 discount that resets on the last quantity.

  1. Create a new table or pull up an existing one.
  2. Make sure the description is acceptable
  3. Use “M” to modify
    1. Qty1 is the original sale price of the item
    2. Qty2 is the price to be charged for the second item. The two prices added together should equal the desired discount price. In this example .59 + .41 = $1.00
  4. Enter an A to add or an R to reset
    1. An A will continue pricing additional quantities of the item at the same price as the final Qty in the table. I.e. a 3rd item sold will ring up for .41 since .41 was the last price entered
    2. An R will reset the pricing of subsequent items to the top of the table. A 3rd item will sell for .59; a 4th will sell for .41.
  5. Save the table, remember the table’s name for setting up the MF record.


Purchase Orders


Creating Pending Orders

Creating Pending Orders involves two steps, creating your pending orders, and then creating the purchase orders from pending. The purpose of Pending Orders is to group the items together that are going to the same vendor and putting them onto the same PO, This makes the process simpler for the vendor and yourself. Let’s get started with creating our pending orders.


  1. At the Enter your user id: prompt, enter ‘GM’ to log onto the General Merchandise Account.
  2. When you arrive at the GM main menu, Enter in a ‘1’ to take you to the Purchasing Menu.
  3. You are now at the main purchasing Menu, Choose option number ‘1’ to enter/modify pending orders.
  4. Next you will be prompted for a ID or Option To create a new one enter in a period and press enter.
  5. The next field you will be prompted for is the SKU number, enter in the sku of the item you want to place an order for and hit the enter key.
  6. Once you have hit enter it should automatically have filled in the Description, Manufacturer and Vendor Sometimes an item will have more than one particular vendor, if the one that was brought up is not the one you want to use, type in the correct vendor number and hit return.
  7. After you have verified the vendor is correct and you have to hit the enter key. The Store number, shipping code, and prices are automatically filled in. If all the rest of the information is correct, you will only need to change the quantity if it is greater than the default that is set to ‘1’.
  8. Once you have entered the amount you want ordered, you will be prompted for the UOM (Unit of Measure), Enter in the code for the ordering units here. These codes are set up using the following menu path: SU-Codes-Units of Measure.
  9. Enter through the rest of the fields until you come to the options at the bottom of the screen. You now have the Option either to save it by pressing the enter key, or cancel the pending order by pressing X.


You have now created a pending order for that item. Once you have gone through and created pending orders for all the items you need, it is time to create your purchase orders.


Creating Purchase Orders from Pending

  1. Once you are finished creating all your pending orders, it’s time to create

Purchase Orders. From the main purchasing menu, choose option ‘4’ Create

Purchase Orders (from pending) and enter.

  1. Enter in the specific vendor you want to create the purchase order for. Leave

vendor # blank to process pending orders for all vendors. If you only want to

process pending orders for specific vendors, enter the number or numbers

(separated by commas).

  1. Leave the release date field blank to process all pending orders regardless of

release date. If you specify a release date, all pending orders with a release date

equal to or earlier than that date will be processed.

  1. Enter ‘Y’ to include pending orders with no release date Enter ‘N’ to

exclude any pending orders without release dates assigned.

  1. Choose ‘Y’ to run procedure or ‘X’ to cancel.


You have now created a Purchase Order. After you have ran the procedure it should show you the First PO was #______ and the Last PO was #______. It should also send those numbers to the printer for you to keep as reference once you receive the items. Now that you have created a purchase order it is time to learn how to receive against a Purchase Order.


Creating Purchase Orders Manually

  1. From the GM Master Menu, choose option 1 for Purchasing.
  2. Next choose option 21 to Modify Purchase Orders.
    1. Even though the option here says to ‘Modify’, this is the option to create a manual purchase order.
  3. At the PO # prompt, enter a ‘.’ to get the next system assigned PO number.
    1. Throughout the system, entering a period (.) in a key field (the key is the unique identifier of the item that you are creating – whether you are creating a new PO, receiving log, SKU….) will let the system assign the number.
  4. A prompt will appear letting you know that the item you are creating is not on file. Choose the Add option to add the item.
  5. If you need to adhere to certain PO numbers, enter in your PO number in the Alternate #
    1. The number (either numeric or alpha/numeric) entered in the Alternate # field will print on the PO as the PO number. The system assigned number will also be printed on the PO as a reference number.
  6. The Order Date will default to the current date, but can be changed to the date of your choosing.
  7. Enter the Vendor you will be creating the purchase order for.
    1. You can choose the vendor by either entering the vendor number or by entering the vendor name.
      1. If you enter the vendor number, you must enter the entire number.
      2. If you enter the vendor name, you need to enter at least 3 letters of the vendor name.
        • American Vendors can be entered by full name, by Ame (or more letters), by Ven (or more letters), or by Ame Ven (or more letters).
        • Outstanding Office Supplies can be entered by full name, by Out (or more letters), by Off (or more letters), by Sup (or more letters), by Out Off (or more letters), by Off Sup (or more letters), by Out Sup (or more letters), or by Out Off Sup (or more letters).
          1. Note that the order of the words does not matter. Outstanding Office Supplies will be found if you enter Supplies Office, or Sup Outstand Off.
  1. Enter your store number in the Ship To
  2. Enter the preferred method of shipping in the Ship Via
    1. If you are unsure what to enter, you may choose from a list that will display by entering two question marks (??).
  3. Entering Comments is optional as well as the Must Ship By
  4. To start adding items to the PO, choose the Add option when prompted as the line number is displayed.
    1. Choosing the Add option will display another Order Entry
  5. Enter the SKU or Description of the item that you want to order.
    1. If you enter the SKU number, you must enter the entire SKU.
    2. If you enter by Description, you can enter part of the description as in the case of entering the vendor name.
  6. Enter the quantity you wish to order in the Order Qty
  7. The Vendor List, Selling Price, Discount %, and Cost fields will all default to the values assigned in the Master File for the item that you are ordering. You can change any of the values if you need to.
  8. Both the Order Comments and Rcvng Comments fields are optional.
  9. Choose the Save option to add the item to the PO.
  10. Continue choosing the Add option for as many items that you want to place on the PO.
  11. When you have completed entering the items for the PO, do not choose the Add option – instead, press the Enter key to continue.
  12. Choose the Save option to complete the Purchase Order process.
    1. Make sure you make note of the system assigned PO number for printing and receiving purposes.


Modifying Purchase Orders

  1. From the GM Master Menu, choose option 1 for Purchasing.
  2. Next choose option 21 to Modify Purchase Orders.
    1. Note, this is the same option used in creating Purchase Orders.
  3. Enter in the PO number of the PO you wish to modify.
  4. If you need to modify the Alternate #, Order Date, Vendor, Ship To, Ship Via, Comments or Must Ship By fields, use the modify option.
  5. If you need to Add new items or Change existing items, choose the Line Items option.
    1. To Add new items;
      1. Choose the Add option and add the new item using the same process as creating a purchase order.
    2. To Change existing items;
      1. Enter the line number of the item you wish to change and modify the item.
    3. When you have completed any modifications to the PO, choose the Save option to save and update the PO.


Printing Purchase Orders

  1. From the GM Master Menu, choose option 1 for Purchasing.
  2. Next choose option 22 to Reprint Purchase Orders.
  3. Since you can print more than one PO at the same time, enter the PO Number of the first PO you wish to print in the First Purchase Order #
    1. If you are only printing one PO, you must still enter the PO Number in the First Purchase Order #
    2. If you are printing more than one PO, the PO Number entered in the First Purchase Order # field must be sequentially lower than the next PO (keep the PO numbers in order).
  4. Enter the PO Number of the last PO you wish to print in the Last Purchase Order #.
    1. If you are only printing one PO, you must still enter the PO Number in the Last Purchase Order #
    2. If you are printing more than one PO, the PO Number entered in the Last Purchase Order # field must be the last PO sequentially of the group of PO’s you want to print.
  5. Enter the Printer Number you wish to print to in the Printer Assignment
    1. Each printer used to print through the system has been assigned a printer number. You must enter the printer number as Fx with x indicating the printer number.
      1. If printer number 2 was going to be used to print the PO, F2 would be entered in the Printer Assignment field.
    2. Choose the Y = Run Procedure option to print the PO.


Receiving


  1. From the GM Master Menu, choose option 2 for Receiving.
  2. Next choose option 1 for Receiving Log.
  3. Since the Rcv Id is assigned by the system, enter a period (.) to get the next system assigned receiving ID number.
  4. A prompt will display if you are creating a new receiving log letting you know that the item is not on file. Choose the Add option.
  5. The Rcv Clerk field will default to the user that is signed on to that port, and the Rcv Date will default to the current date. Both may be modified if you wish.
  6. Enter the PO Number you wish to receive against in the PO Num field.
  7. a) The PO Number you will need to enter is located on the PO as either the Order Number or Reference #.
  8. i) Use the Order Number if you are using the system assigned PO Numbers to do all of your tracking for you.
  9. ii) Use the Reference # if you are using the Alternate # field when creating the PO. The Reference # will then be the system assigned PO Number.
  10. At the prompt “A new PO number will remove any existing Line Items”, choose the Accept PO Number option.
  11. Some of the fields will automatically fill in using information that is on the PO that you are receiving against. With the other fields (up to the Inv Total field), they are all optional fields and do not need to be filled in. Below are brief descriptions of the optional fields if you do want to fill them in.
  12. a) Comments – receiving log comments
  13. b) Shipped Via – the method of shipment
  14. c) Cond Code – what kind of condition did the shipment arrive to you in
  15. i) The condition codes are user defined codes and can be maintained at GM-SU-03-23
  16. d) Num Pallets – how many pallets were used for this shipment
  17. e) Num Cartons – how many cartons were in this shipment
  18. f) Inv Num – what is the invoice number for this shipment (Leave at NOINV if you do not have a number at this time.)
  19. g) Inv Date – the date of the invoice
  20. The Inv Total field is a required field and a figure needs to be entered.
  21. a) If you have the invoice, enter the amount of the invoice.
  22. b) If you do not have an invoice, you still need to enter an amount. Entering a zero (0) is a valid amount.
  23. Entering an amount in the Freight field is optional. If you have an invoice, enter the amount of freight if listed.
  24. You will be prompted with a message to Select a method for sorting the PO lines. It is strongly suggested to choose the PO line numbers option.
  25. a) Choosing the PO line numbers option will always keep your receiving log and purchase orders in the same order. This is extremely useful when receiving against multi-line PO’s.
  26. Depending on how your system is setup, you may or may not be prompted with the option to choose your method for entering received quantities.
  27. a) If you choose the Exception option, all of the order quantities of the items that are on the PO will be listed as the received quantities as well. This is useful when receiving an order that the majority of the items ordered are accounted for EXCEPT for a few items – thus the term Exception. You can still modify the received quantities regardless of what figures have been entered.
  28. b) If you choose the Manual option, you will need to go through each and every item listed on the Receiving Log and enter an amount – even if that amount is zero (0).
  29. With the cursor in the SKU field, press Enter to accept the SKU number.
  30. Enter the quantity received in the RQty field.
  31. You then have the opportunity to change any of the price and cost information. Making changes here will affect the master file if you choose to have your system automatically roll over receiving prices.
  32. a) To automatically roll receiving prices, see GM-UU-23-01-store number-screen 3.
  33. If you want to print tags for the items you are receiving, enter a Y in the Tags field.
  34. Continue through the rest of the receiving log until you are finished.
  35. The two main options at the bottom of the screen are S = Save, and P = Post & Save.
  36. a) The Save option will allow you to save the receiving log and gives you the opportunity to modify the receiving log at a later date (by entering the Receiving Log Id number instead of a period at the Rcv Id prompt). Using the Save option will not post the received items to the inventory.
  37. b) The Post & Save option will save the receiving log and post the received items to the inventory. Using the Post & Save option will not allow you to modify the receiving log at a later date.
  38. When choosing the Post & Save option, you may get a prompt letting you know that the Line item total + freight does not match the invoice total.
  39. a) If you did not have an invoice to enter an invoice total from, your figures will not match. Choose the Accept option in this case.
  40. b) If you entered an invoice total from an invoice, and the figures do not match, you may want to choose the Re-enter option and see if any of the line items had a price change.
  41. c) You may also choose to ignore the prompt and just choose the Accept


Returns


  1. Manual Chargeback or Pending Return
  2. a) It must first be decided whether to enter a chargeback or enter a suggested return.
  3. Chargeback
  4. a) Enter a chargeback if you know exactly what it is that you want to return.
  5. Suggested Returns
  6. a) This is to generate suggested returns or entering pending returns that can later be changed into a chargeback.
  7. Clear Suggested Returns
  8. a) Before you generate suggested returns, it is a good idea to run this procedure to clear out any suggested returns that may be lingering in the system.
  9. Create Suggested Returns
  10. a) This will create a number of pending returns with a status of ‘S’ for suggested. The initial selection is by the TR.MF or GM.MF file selecting with a quantity on hand greater than zero, checking also that purchase orders exist on file. The criteria on the returns are also different, than those in TEXT, in that the return is based on highest cost for the return with a secondary selection given based on the expiration date of the invoice.
  11. Sales Cutoff Date
  12. a) Anything that has not been sold since this date will be selected.
  13. Vendor Number
  14. a) You may limit this according to vendor.
  15. Expire Days
  16. a) To restrict it to items that will expire within a number of days, enter the number here. This is maintained in Vendor Maintenance (VM) with the vendor maximum months and the vendor minimum months.
  17. Enter Pending Return
  18. a) This allows you to enter the pending return yourself. It will remain as a pending return until made a chargeback or deleted.
  19. Modify Pending Returns
  20. a) You still may modify a pending return, before it becomes a chargeback.
  21. Change the Return Status to “Release”
  22. a) In order to change the pending return into a chargeback, you must first change the return status to release. This can be done individually, in Pending Return Maintenance, or you can change the status of the pending returns of a certain vendor all at once in Pend Returns Maint by Vendor.
  23. Create Chargeback
  24. Create from pending Returns
  25. a) This is a batch process that will consolidate all of the pending returns of a certain vendor and create a chargeback. The return status of the pending return must be ‘R’ for release.
  26. Manually Create a chargeback
  27. Select the option “CHARGEBACK MAINTENANCE”
  28. Make sure the correct Store # is selected.
  29. Enter a ‘.’ to create a new chargeback or to edit an existing chargeback, select the ‘??’ to select the chargeback you wish to edit.
  30. Enter the Vendor that the return is going to.
    1. Permission required information will only be prompted if the “Vendor” record is flagged that the vendor is permission required.
  31. Credit Memo #/Credit Date – Enter in the Credit Memo # if you have already received it, otherwise leave this blank and enter the information when it is received.
  32. AP Processed Date – This only needs to be entered if you are using the integrated AP module.
  33. Comments: – Enter any comments for this return.
  34. Enter “A” at the prompt to add an item to the return.
    1. SKU* – Enter the SKU or look up the item by description.
    2. Quantity* – Enter the Quantity that is to be returned.
    3. Reason* – Enter the “Reason Code” for the return or select the “??” and choose one. (You can select the “Maint” option from the bottom left of the pop up window to add additional reason codes.)
    4. Select the PO/INVOICE # from the displayed popup window. If blank then you will be able to manually enter the information.
      1. Our PO – Enter in the PO the item was ordered on.
      2. Vendor Inv # – Enter in the invoice the item was received on and that you are getting credit on.
  • Inv Date – The date of the Invoice
  1. Qty – Quantity return on this invoice. (You could have multiple lines of invoices if the total returned is greater than the quantity ordered on a single invoice).
  2. Retail – Should fill in automatically, this is what you are selling it for.
  3. Inv Cost – The cost on the invoice.
  • Extended – The Invoice cost extended out for the quantity.
  • Select Enter until back at the prompt to “A” to add additional items.
  1. Keeping selecting “A” until you have entered all items to include on this Chargeback, once done select “Enter” again to get to the bottom line prompt.
  2. =Save to save the document for later, L=LineItems to modify a line item, M=Modify to modify all/any information, F=Fees to add additional fees such as handling or shipping, P=Post & Print to post the chargeback to you inventory and print a copy. (Inventory will not get reduced until the Chargeback has been “Posted”.)


  1. Return Permission
  2. a) If the vendor requires permission to return something, you should now print the permission requests. Vendor maintenance is where it is specified whether a vendor requires permission.
  3. Inventory Adjusted
  4. a) To determine when the inventory will be adjusted, go to Returns Parameters (SU-2-6) and select ‘Consolidated’ or ‘Chargeback’. Consolidated will adjust the inventory when you create chargebacks from the pending returns. Chargeback will adjust the inventory when the chargebacks are printed.


Performing a Physical Inventory


Overview

Physical inventory consists of initializing the master file, recording quantities on hand (QOH) onto worksheets, checking the worksheets, and posting the counts to the master file.


Initializing the master file clears out any old worksheets and saves the current QOH values. Counts can be recorded on the worksheets manually or through a programmable scanner. Various reports are available to help check the worksheets. Posting updates the master file QOH counts.


Posting assumes the worksheet count is the count at the time of initialization. The new QOH counts are set to the worksheet counts minus any changes in the master file QOH since  initialization. This allows you to continue to sell and receive inventory between initialization and posting.


Worksheets are identified by store, date, and sheet number. (Ignore any references to a Location Code, keep its value blank.) This uniquely identifies each set of worksheets. The worksheets can be created three different ways: by pre-loading it from the master file, by pre-loading it from a portable Densei scanner, and by manually creating it. When old worksheets become a year old, they are automatically deleted at the next initialization.


Worksheets may be Open, Committed, or Posted. Open worksheets can have their counts modified. Only counts from committed worksheets will be included in the posting. Items from open worksheets will not be included.


The menus have three sections, separated with a blank line: initialization, edit cycle, and posting. Interlocks require completing one section before proceeding to the next.

Initializing

Make sure you’ve set the correct Inventory Method: A, B, or C (GM-SU-02-03). Use method A if you want to initialize a set of worksheets from the master file, method B if you’re going to create most of your worksheets from items scanned with the Densei scanner and method C if you’re going to manually create all your worksheets. Methods A and B also allow manual creation of worksheets for any adjustments you may need to make for items already on other worksheets. Each method has slightly different menu options for the inventory.


Regardless of the method, current master file QOH counts are saved so any changes before posting can be used to adjust the worksheet count.


You must initialize (GM-24-01-01) before you can do anything else. Enter the date you want to use as the inventory date. This date identifies this inventory, so the same date must be used throughout the inventory.

Counting & Verifying (Edit Cycle)

As explained above, method B allows counting items with a special Densei scanner. You then create worksheets from the scanned items. You can commit the worksheets as you create them, or leave them open and commit each one manually at a later time. Special reports help you monitor the status of all items scanned. Only items in the master file can be included in any worksheets; you’ll be notified of any scanned items that are missing.


You can modify the count on any open worksheet, but once it’s committed you can only change a count by entering an adjusting count for the same item on another open worksheet. Do not try to make adjustments through the inventory adjustments menu between initialization and posting; they won’t have any effect.


Various reports help you monitor and confirm the counts before you perform the irreversible stop of posting. You can run the reports as often as you want to verify and refine the inventory count.


Printing Reports

Print non-committed sheets

Lets you see which worksheets won’t be included in the posting if done at this time.

Master file status report

The other reports look at the inventory from a worksheet viewpoint, but this one lets you look at the inventory status of items from the viewpoint of the master file. Various options help you check on the progress of the inventory.


Print Adjustments / Valuation

This report shows you the cost/price valuation of the worksheet items, open and committed, at this point in time, along with the difference between the old master file QOH counts and what they’ll be if you post the current worksheets.


Utilities

You can add new worksheets at any time up to posting. The same item can be on more than one worksheet; the counts are added together. If you’ve committed a worksheet and discover an error in the count, you can manually create a worksheet and record a compensating count, positive or negative, for the item, so when they’re added together they provide the correct count.


You can delete any worksheet at any time prior to posting.

You can print any worksheet at any time.


For inventory method B, you can also print status reports on the intermediate file holding the Densei scanned data before it goes to a worksheet.


Posting the Counts

Once you’ve confirmed that you have the correct counts in committed worksheets for all the master file items you want updated, you can perform the irreversible posting step. This is where the master file QOH values are actually changed. For each item, the worksheet counts are added together and the difference between the QOH at initialization and the current QOH is subtracted for the new QOH value. For example, if the item count at initialization was 10, the worksheet counts total 8, and 3 items were sold between initialization and posting, the new QOH will be 5 (the counted 8 minus (the original 10 minus the current 7)).


Corrections after Posting

Corrections during inventory, between initialization and posting, must be made on worksheets. Corrections between inventories are made through the inventory adjustments menu (GM-24-02). Enter the SKU, the adjustment amount, and the reason code for why the adjustment was made. An inventory adjustment report (RP-01-21) lets you review and monitor these adjustments.


Printing Barcode Labels

You can print tags from the MF Maintenance menus, from Receiving, or from the TAG account’s main menu. You can have as many different types of tags as you want; each will be identified by a unique tag type (TAGS-25). Each tag type includes a header tag format and a detail tag format. When you print several sets of tags at once, the header tag helps you find the beginning of each set of tags. The detail tags are the ones you attach to the merchandise.


Each Tag Type specifies the type’s Code, the Header and Detail Tag formats (TAGS-24), how many Header Tags to print at the beginning of each run, and where to print the tags. An item’s tag type must be specified explicitly at the TAGS menus, while Receiving and MF Maintenance pick up the tag type according to the following priority.


The Label Code specified in the SKU definition (GM-MF, SKU) – or if it’s null, the Tag Default specified in the Class definition (GM-SU-01-02) – or if’s null, the Tag Type used in the last print job.


Whenever you’re asked to enter a tag type, you can enter ?? to get a list of what types are available.


Global Inventory Procedures

  1. Preparation
    1. Check Equipment
    2. Prep Areas
    3. Clean MF
    4. Setup Inventory Parameters
  2. Close Doors
  3. Initialize Inventory
  4. Edit Cycle
    1. Scan
    2. Upload
    3. Create Worksheets
    4. Check for Errors
    5. Make Corrections
    6. Commit Worksheets
    7. Report Differences & Valuation
    8. Audit
  5. Open Doors
  6. Start Receiving
  7. Reconcile
  8. Post Worksheets to MF
  9. Adjustments after Posting

Software Overview

Each inventoried module, GM, Text and Trade requires it’s own inventory initialization and worksheet(s). The main menu to perform all of the inventory steps is (module)-21-1.

The inventory steps include interlocks to prevent you from trying to take a step out of sequence.

  • The steps in the preparation phase are used to prepare the store for inventory counting.
  • The steps in the initialization phase are executed once to set everything up.
  • The steps of the edit cycle are started with one Edit/Enter/Commit Worksheets step, after that any step can be repeated in any order as necessary.
  • The posting phase only contains the posting step, the final step of the inventory process, normally done once.

Preparation

This phase involves all the steps prior to performing the physical count.

Check Equipment

It is very important to make sure that all of the equipment to be used in the inventory process is functioning properly.

  • Be sure that all scanners can hold a charge and scan.
  • Locate all of the connection cables and/or cradles to prevent last minute hold ups.

Prep Areas

  • The system uses numbered inventory count sheets for manually entering and tracking the physical counts. We recommended that each fixture or shelf section should have a separate location number and that the location numbers should be used as your sheet numbers. All areas of the store should have a sheet/location, including the warehouse, all storage areas, register areas and offices.
  • It is recommended that each sheet/location should have up to approximately 50 different ISBN/SKU’S. (You don’t want too many items if there was a problem uploading)
  • Arrange all inventories in the sales floor and back office areas so that they are orderly, easy to access, and allow easy foot traffic through the area.
  • All inventory items on location that have been received into the system need to be scanned.
  • Clearly mark all items that have not been received to prevent them from being counted. These items include returns to vendors and items not yet received.
    • It’s a good practice to receive all items prior to counting.

Clean the Master File

Prior to inventory is a good time to clean up the Master File and purge old inventory items. There are tools located in TX-SU-1-27-5, TR-SU-1-22-5 and GM-SU-1-23-1 to help with cleaning the MF.

Test Upload

Scan some items and upload them to the server to familiarize yourself with the process. This will give you some time to iron out any problems before you count. You will want to clear the DC file of any test uploads by going to (module)-21-1-31

Setting up Inventory Parameters

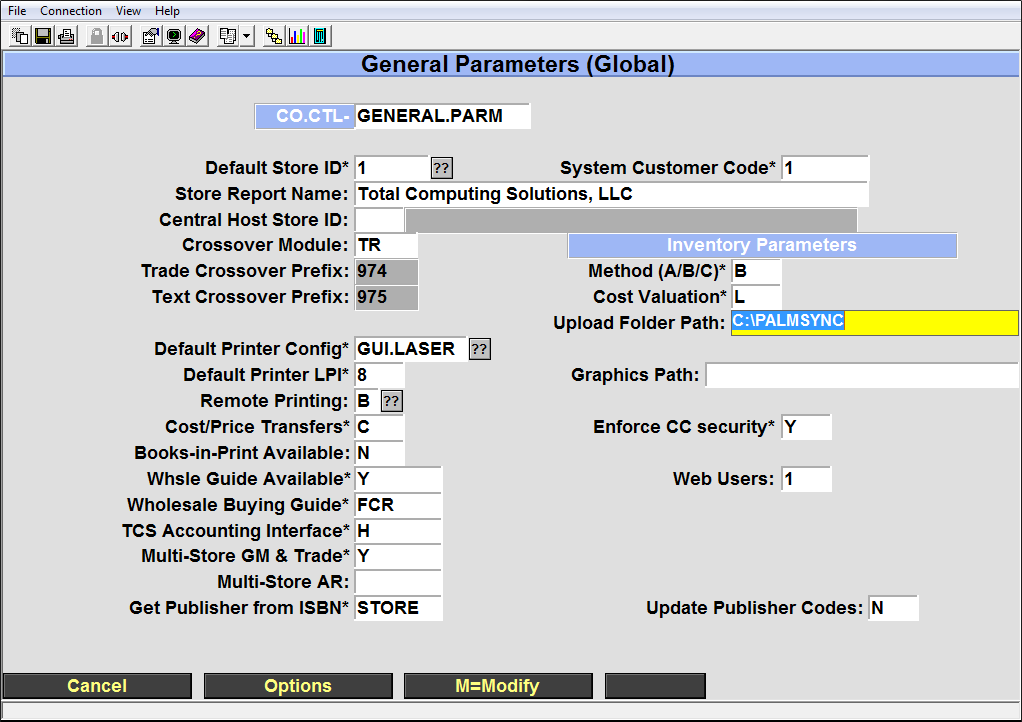
Inventory parameters are set once and then left alone unless you are changing the way you are going to use worksheets. The main inventory control parameter, in (Module)-UU-22, sets how you enter your physical counts in the worksheets. You can use any of these methods:

Your Upload Folder Path will be different than the one shown. If you need assistance please call support for assistance.

  1. Have the system create worksheets for all master file items for writing and keying in the counts.
  2. Create worksheets from SKUs and counts recorded into a portable terminal and uploaded to the system (scanners).
  3. Create worksheets by keying in each SKU and count from the keyboard.
  4. Inventory Worksheets created from Tricoder Scanner.

The Physical Inventory menu screen options will vary depending upon the inventory method that you choose.

Initializing Inventory

Once the parameters have been set you can initialize your inventory. This will create a “Set ID” that consists of the store, inventory date, and location code you enter. This ID helps keep worksheets from the same module together and separate from other inventories.

Immediately afterwards, if not before inventory has been initialized, close the store to begin your inventory count.

Edit Cycle

The edit cycle consists of counting inventory, uploading the counts into the system, creating worksheets, checking for and fixing any errors and committing the worksheets.

The following steps should be completed by this point:

  • Finish Receiving
  • Separate or mark all items not to be counted i.e. items not received into the system
  • Clean the MF
  • Close the doors 2
  • Initialize inventory

Scanning

When scanning your inventory there are a few guidelines to follow:

  • Scan by sections (fixtures) top to bottom, left to right. If there are any errors, scanning in a uniform way will allow you to find the areas where these errors occurred.
  • Upload data frequently. This will help in locating items with errors and keep worksheets to a manageable size.

o Refer to your scanner’s guide for the specific steps involved in uploading data.

Uploading

Please refer to any scanner specific guides on how to upload scanned data to the system.

Depending on which inventory method you choose please proceed to the correct portion of the manual to continue.

  1. Have the system create worksheets for all master file items for writing and keying in the counts.
  2. Create worksheets from SKUs and counts recorded into a portable terminal and uploaded to the system (scanners).
  3. Create worksheets by keying in each SKU and count from the keyboard.
  4. Inventory Worksheets created from Tricoder Scanner.

Method A: Inventory Worksheets Created From the Master File

Make sure the inventory has been Initialized prior to proceeding with these steps.

Create Worksheets from MF Menu 21.1.2

This process will create worksheets for all items currently in your inventory, worksheets will be sorted according to the options selected here.

Enter ‘A’ for worksheets with all adopted ISBN’s for the specified term in academic dept, course, and section order – followed by worksheets containing any other ISBN’s that match the initialize limits.

Enter ‘B’ for worksheets containing all ISBN’s within the initialize limits, sorted by the ISBN’s first location code, author, and title.

At the sort prompt, enter ‘Y’ to begin a new worksheet each time the primary sort order value changes. Enter ‘N’ to fill each worksheet regardless of such changes. This only applies to worksheets that are automatically created. The sort order value in Text may be academic dept. (option A) or new or used location codes (option B). Trade and GM uses the value you select.

Print All Worksheets Menu 21.1.3

Once you have created you worksheets you will need to print them. The default wksht set and selected term will display. You will need to enter the beginning sheet number and the ending sheet number that you wish to print. The first sheet number and the last sheet number will be filled in for you. Leave these as they are to print all of the worksheets or you may change them to print out selected sheets.

Using the printed sheets, count the inventory in your store, be sure to count all the items in all locations in a logical process to avoid missing items.

Edit/Enter/Commit Worksheets Menu 21.1.4

When you have completed counting, the worksheet counts need to be entered in to the system.

Enter in the Sheet number; the system quantities will be entered as default. Modify these quantities as needed. You can save the sheet when you are finished making the changes. After you have spot checked the section/sheet you will need to commit the worksheet by entering the ‘C=Commit’ button, this will lock the worksheet from any future changes.

Post Inventory to Master File 21.1.10

Post is the final step in the inventory process. The following steps should be completed before you post the worksheet sets to inventory:

  • All items are scanned
  • All scanned data should be uploaded and added to worksheets
  • All worksheets need to be committed
  • Reconcile

Once you are ready to post the worksheets go to (module)-21.1.8 and post the worksheet set. Each post is module specific so be sure to post in every module where inventory was initialized. After posting inventory the process is complete.

Method B. Create worksheets from SKUs and counts recorded into a portable terminal and uploaded to the system (scanners).

Make sure the inventory has been Initialized prior to proceeding with these steps.

Create Worksheets

When using scanners, data is uploaded into the Data Collection file (DC). The system takes the counts uploaded into the DC file and creates worksheets which allow you to view and/or edit the counts. It will also check for any errors and notify you of problems.

Module-21-1-2

Check for Errors

After a worksheet has been created, you will see something similar to this screen. I included an invalid item so that you may recognize an error if one should appear.

Module-21-1-2

Make Corrections

If any errors occur, contact TCS for advice on how to handle the issue.

Modify and Commit Worksheets

After a worksheet is created you can view and edit items on that worksheet by going to (module)-21.1.3) and selecting „M‟ to modify. When a worksheet is ready to be committed enter a „C‟ to commit the worksheet. After a worksheet has been committed it is no longer possible to edit the worksheet.

Module-21-1-3

Report Differences & Valuation

The Difference & Valuation report located at (module) 21.1.6, lists any changes to the price and quantity.

Module-21-1-6

Once any issues in the Differences & Valuation report have been addressed you may:

  • Open your doors
  • Start Receiving as usual

Post Inventory to Master File 21-1-8

Post is the final step in the inventory process. The following steps should be completed before you post the worksheet sets to inventory:

  • All items are scanned
  • All scanned data should be uploaded and added to worksheets
  • All worksheets need to be committed
  • Reconcile

Once you are ready to post the worksheets go to (module)-21.1.8 and post the worksheet set. Each post is module specific so be sure to post in every module where inventory was initialized. After posting inventory the process is complete.

Method C: Create worksheets by keying in each SKU and count from the keyboard.

Make sure the inventory has been Initialized prior to proceeding with these steps.

This process is known as the Manual Entry Method. This method is best if you are using a mobile workstation such as a laptop or desktop computer on a mobile cart.

Enter/Edit/Commit Worksheets 21-1-2

The Wksht Set is a combination of the store number and the date inventory was initialized, DO NOT change the numbers. The Sheet is the worksheet that you are working on, you can see all the open sheets with the ‘??’ or you can enter in a new sheet number or you can enter a ‘.’ to let the system assign the next sequential number. It is recommended that the sheet and shelf number be the same.

Each sheet should have only one section, even if that section or shelf location only has a single item.

Enter or Scan the first item and then enter the quantity for that item, Textbooks will have New and Used quantities while General Merchandise will only have the New quantity.

Once the quantity has been entered scan or enter in the ID of the next item, continue until all items in the section have been entered. Once that is done select ‘=Save’ or hit enter to save the worksheet. ‘X=Cancel’ will cancel any entries or changes that you made. ‘M=Modify’ will take you back to the items so that you can modify them. ‘C=Commit’ will lock the sheet so that no further changes can be made, Do Not commit the sheets until after they have been spot checked and verified.

Print Non-Committed Worksheets 21-1-3

Enter in the beginning and ending sheets numbers and then select ‘R’ to run and print the report to see all of the sheets that have NOT been committed.

Post Inventory to Master File 21-1-8

Post is the final step in the inventory process. The following steps should be completed before you post the worksheet sets to inventory:

  • All items are scanned
  • All scanned data should be uploaded and added to worksheets
  • All worksheets need to be committed
  • Reconcile

Once you are ready to post the worksheets go to (module)-21.1.8 and post the worksheet set. Each post is module specific so be sure to post in every module where inventory was initialized. After posting inventory the process is complete.

Method D: Inventory Worksheets created from Tricoder Scanner.

After inventory has been initialized from option 1 (see page 7), you may begin to upload your inventory

Tricoder Input Menu-21.1.2

If there are any errors in the upload you will get a message to let you know how many. Under the validation row an item with ‘Valid’ is a good item, and item with ‘Not found’ is an item that caused the error in the upload.

You may select the ‘M=Modify’ option to edit the SKU/ISBN number or enter ‘space’ to delete the record.

Once all of the errors have been corrected select ‘P=Post’ to save to the DC (Data Collection) file.

Create Worksheets from DC Menu-21.1.3

Next choose Create Worksheets from DC (module-21-3). You can wait until all worksheets have been uploaded or you may create the worksheets after each upload. (We recommend creating the worksheets after each upload so that you can make sure everything is correct. You may also have someone start spot checking the worksheets if they have been created.)

Answer ‘N’ to both prompts.

You should get a message indicating the worksheets that were created and the number of items that were uploaded to the worksheets.

Edit/Enter/Commit Worksheets Menu 21.1.4

Now you can go in to (menu-21-4) Edit/Enter/Commit Worksheets and edit or modify the worksheet as needed. Once all editing is completed you may commit the worksheet. Committing the worksheet will lock it and prevent any further editing. The ‘Status’ will remain ‘O’ open until it has been committed.

Repeat menu options 2 – 4 for each location until you have finished inventory for the store.

Post Inventory to Master File 21-1-8

Post is the final step in the inventory process. The following steps should be completed before you post the worksheet sets to inventory:

  • All items are scanned
  • All scanned data should be uploaded and added to worksheets
  • All worksheets need to be committed
  • Reconcile

Once you are ready to post the worksheets go to (module)-21.1.8 and post the worksheet set. Each post is module specific so be sure to post in every module where inventory was initialized. After posting inventory the process is complete.

Printing Reports

Once all of the locations have been uploaded and the worksheets have been created, you need to run each of the report options. Check the information for each report and look for discrepancies from your inventory that is not acceptable.

We strongly advise all users to run all report after entering your counts and before you run the process to post your inventory.

The following are examples of a few of the reports

Print Non-Committed Worksheets

This report will print all of the worksheets that have not been committed.

Master File Status Report

You may run a report checking the Master File inventory status. The report will list the SKUs/ISBNs and their worksheet IDs and status in separate Non-worksheet, Uncommitted, Unposted and Posted reports.

Enter in the beginning and ending SKU/ISBN to include on the report, leave blank for all.

Enter in the beginning and ending Classes to include on the report, leave bland for all.

Non-Worksheet SKUS – Enter ‘Y’ for a list of SKU/ISBNs not included in any worksheet.

Uncommitted SKUs – Enter ‘Y’ for a list of SKUs/ISBNs from ‘O’pen worksheets.

Committed/Unposted SKUs – Enter ‘Y’ to include SKUs that have been Consolidated, but haven’t yet been Posted.

Posted SKUs – Enter ‘Y’ to include the SKUs that have been Posted.

Enter an ‘A’ to sort by Author or ‘W’ to sort by Worksheet.

Print Non-Consolidated Counts

Consolidate & Print Valuation

Select the sheets to include, leave blank for all

Select your preferred sort order. ‘D’ for department, ‘C’ for class or ‘S’ for SKU.

Select if you wish ‘N’ew, ‘U’sed or ‘B’oth.

Enter a ‘Y’ to include counts that are zero.

Consolidated Worksheet Detail

This report uses the data created when you ran the Consolidated Report. It includes the worksheets and the individual counts per worksheet.

If you want to limit the report to just those items that have adjustments enter a ‘Y’.


Scanpal Usage Guide

Simple Overview

The overall process is listed below with more details following.

  1. Charge your scanners and verify that they will scan items. It’s also a good idea to do a test upload of the scanned data to the PC it connects to.
  2. You will follow the steps listed below once you start your inventory. Repeat them as necessary until it’s time to post your counts.
    1. Collect data. Be sure to enter the correct header information
    2. Upload the scanned to the SmartLane register (hosted customers) or the correct directory on your host (self hosted customers)
    3. Create your worksheets
    4. Run your reports
    5. Repeat steps 1-4 until everything is counted and reports look good.
  3. After everything appears to be correct you will post your inventory. This completes the inventory process and is irreversible.

Using the ScanPal

Upon powering on the unit you will be greeted with this main screen.

  • Collect Data is where all of the data collection settings and functions are located. You can specify stores, locations, the type of merchandise and many other settings here.
  • Upload Data is used to sync the gathered information to your PC.
  • System Utilities provides additional functions specific to the device itself as well as options on viewing or deleting data.

This guide will go through each screen step by step and explain all of the options and functions of that screen.

Collect Data

Collect Data contains the primary settings and functions for performing the counting process.

  • Header allows you to set the general settings to be used while scanning.
  • Scan data will scan the barcode and prompt you for a quantity
  • Location, Module, and Employee allow a temporary override of the settings specified in the header. You may quickly and temporarily change these for the next scan.

Header. These settings allow you to specify the store number, the name of the employee gathering the data, the location, module and class of the textbooks being scanned.

Scan Data. Scanning barcodes and quantities is done in this screen. The barcode may be scanned as well as manually entered. The default quantity is set to one, although this can be changed in the utilities section. The counter keeps track of the number of barcodes scanned, not the total inventory quantity.

If you need to check any data that was scanned you can go to Utilities, Browse Data to review and make changes.

Upload data.

There are a number of items that need to be setup before data can be uploaded. Check through this list to make sure that everything is ready before attempting to upload any data.

First Time Setup

  1. Please contact TCS Support to set up the ScanPal environment.

Transfer Steps

  1. Power on the scanner and from the main menu select “Upload Data”
  2. Connect the scanner to the PC
  3. Double click on the “Scanpal Upload – Shortcut” located on the desktop. If this shortcut does not exist then you will need to contact TCS support.
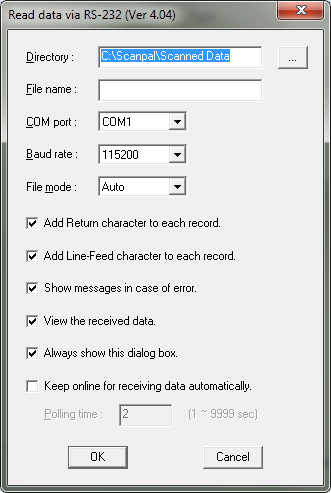
  4. Review the program window that opens to make sure all settings are correct
  5. Select “OK” to transfer the data to the PC
  • Directory: This is where the scanned text files are to be saved. This should be C:\Scanpal\Scanned Data but can be changed.
  • File name: You may specify a name for the file. If you specify a name please select New Name or Overwrite in the “File mode” field. It is recommended that you leave this blank and use the “Auto” file mode.
  • Enter the COM port the device is plugged into.
  • Leave Baud rate alone
  • File mode:
    • Overwrite will overwrite the previous file unless you specify a unique name
    • Append will merge all data
    • New Name is used when creating a new name
    • Auto will generate a sequential number for each file. Recommended
  • NEVER uncheck any check boxes unless directed by a TCS support technician to do so.


Transfer Data to the Data Collection File

New and existing customers will need to check the upload location in the system.

  1. Go to POS-UU-22 and verify that the Upload Folder Patch is:
    1. Typically C:\Palmsync for self hosted users
    2. C:\TCSDB\CUST\POS\HOST.SCANNED.DATA for hosted customers

Add Data to the DC File

  1. Minimize all windows until you are at the desktop
  2. On the desktop, double click the “Upload to Server – Shortcut”. Leave this open.
  3. On the desktop, double click on the “Scanner Data – Shortcut”.
    • There should be text documents containing your inventory counts in this folder
  4. Copy the text files in Scanner Data into the “Upload to Server” window.
    • These files will disappear once they have been added to the DC file on self hosted systems.
    • For hosted customers they will disappear once the SmartLane main menu option 7 – Send Inventory Scanned Data option is ran.
  5. The inventory data is now ready to be added to a worksheet.

Utilities

Utilities allows you to change the device settings, browse and manipulate scanned data, run tests and view the status of the scanner.

  • System Settings is a password protected section that should not be altered unless directed by a member of the TCS support team.
  • Browse Data allows you to view the data scanned, edit it or delete it by individual record. Editing in this interface is not recommended, it is simpler to edit the data in notepad.
  • Delete Data allows you to delete the last record scanned or all data. All data is automatically deleted when it is uploaded.
  • Reading Test displays the barcode type and character length of a scanned barcode.
  • Set Date & Time adjusts the date and time on the device.
  • Download Program
  • Memory & Battery displays the remaining free space and remaining battery power.

Scan Sheet Example

SP2:Str:1,Emp:CC,Loc:,Typ:GM (GM, TR, N, U)
4001134009,41
404427,218
4044227703,126
4044255903,328
4044273603,208
4044256003,130
4044256003,248
4044255903,322


Adding GM Items to the Web

The following are instructions on how to add GM items to the website, create catalogs and assign images to an item.

Adding Items to Web

The primary way to display items is via a catalog. An example of some catalogs could be Electronics, Mens Apparel, Women’s Apparel, Prints and Frames, etc. all containing items that pertain to that theme.

An item can be assigned to as many catalogs as you would like. For example a Nike men’s t-shirt could belong to a Nike catalog, a t-shirt catalog and Men’s Apparel.

The only other way for items to appear on the website is via a search. If an item is flagged to show on the web, but does not appear on a catalog, then a search is the only way for that item to be accessible to your customers.

The recommended process is to first create your catalogs and then go to each item that will appear on the web and assign their image, alternate titles, special web pricing, etc.

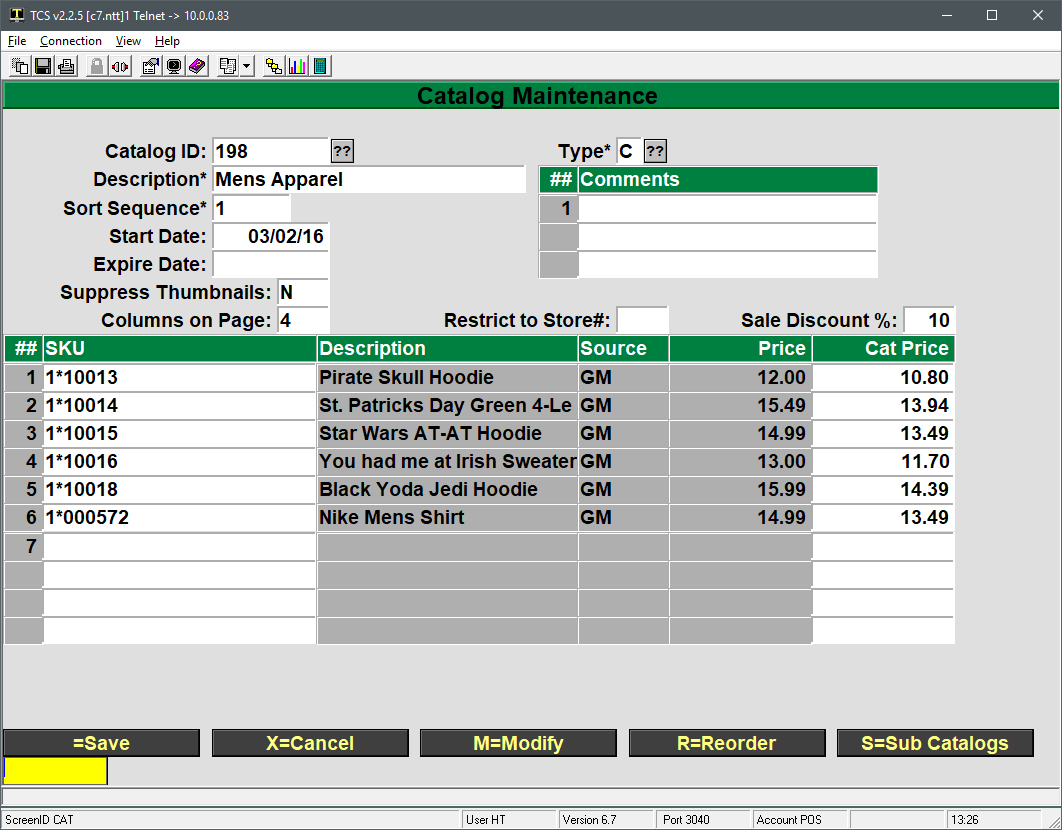
Creating Catalogs

Catalogs are maintained in POS-26-2. Please note that many of the fields on the screen and their functions are under development and may not be functional or require a specific value.

  1. The Catalog ID is the record ID for the catalog
  2. Description is what will appear on the menu bar of the website
    1. Catalogs will automatically show up on the website once they are created.
  3. Sort sequence is the order in which catalogs are listed on the site menu
    1. A catalog with Sort Sequence 1 will appear first, sequence 2 will be second, etc.
    2. If two catalogs have the same sort sequence then the site will list them alphabetically
  4. Start and Expire Date allow you to specify when the catalog should or should not appear on the site.
    1. If you don’t want a catalog to appear on the site, but would like to keep it for reference or future use, then give it an expire date of -1 and it will no longer appear on the site.
  5. Suppress Thumbnails is currently under development and should be left blank.
  6. Columns on Page allows you to set the number of columns displayed when showing the catalog items.
    1. This may be overwritten by site themes which will render it unusable.
  7. Type is to set the type of catalog. The default normal catalog is ‘C’ but you can set a catalog to any type. The system will maintain certain catalogs ( BEST.SELLERS, SALE.ITEMS, NEW.ITEMS), if you wish to manually maintain these catalogs yourself then you will need to set the ‘Expire Date’ on these to an historical date and then create a new catalog with the correct description and set the ‘Type’ to correspond to catalog you are creating.
    1. C=Catalog
    2. H = Home Page
    3. F = Featured Catalog
    4. N = New Items Catalog
    5. B = Best Sellers Catalog
    6. S = Sale Items Catalog
    7. R = Recommended Items Catalog
  8. Restrict to Store is for multi store environments and allows you to restrict the catalog to the store number you enter.
  9. Sale Discount allows you to apply a percentage discount to every item listed in the catalog.
    1. It only applies to items current on the catalog. If you add items later then you will need to go back to the Sale Discount field, enter the percentage and press Enter to update the newly added items.

Adding Items to a Catalog

If items are already flagged to appear on the web then they can be added to the catalog through Catalog Maintenance by typing their SKU into the SKU field. This would be the process if the web product has been in use for some time and most items are already setup to display on the website.

New customers will need to change their GM items to appear on the web. By default all or no items are flagged to appear on the web (POS-26-4-1, GM, Use Web Flag field), so the next step is to flag the specific items you want to be available on the website. If there is a large group of items, such as all items in a particular class, then TCS staff can flag those in mass to appear on the web.

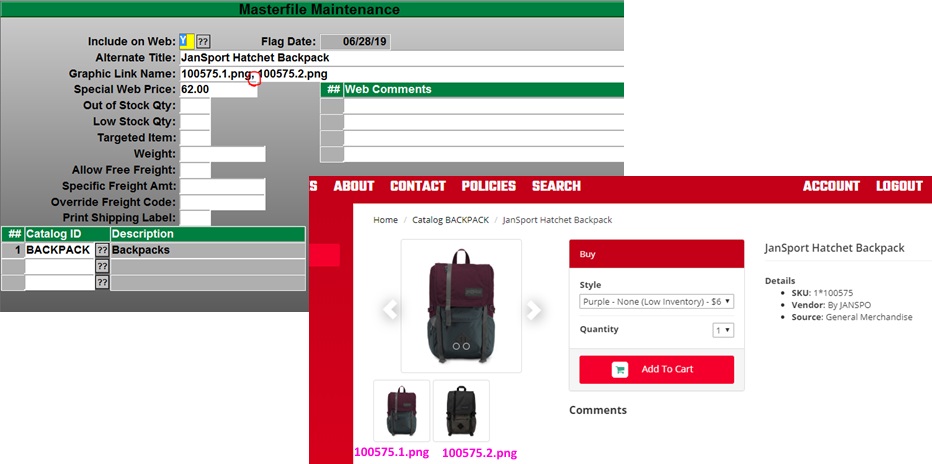
Adding an item, assigning images, customizing item page information and descriptions are all done through the GM, MF record of the item.

To get started log to the GM module and then enter MF at the menu, look up an item you would like to add and make note of the W=Web option. By choosing that we can get to the web maintenance part of the item record and add it to the website.

  1. The include on Web field must be set to a Y or an A to flag it to appear on the website.
    1. Y will have it appear as long as it meets the low and out of stock requirements. If it drops below the out of stock threshold then it will no longer appear.
    2. A marks the item as always available for purchase, regardless of stock levels. This can be used for special orders and other scenarios.
    3. N for Never would be used if, by default, all GM items are web enabled
    4. NQ for No Zero QOH is under development and should not be used
  2. Alternate Title: provides the option to specify a description other than the main description of the MF item. Whatever is entered here will override the GM description for the item when it displays on the web.
  3. Graphic Link Name: maps the GM item to the image uploaded (image uploading covered below). The name entered must be exact including case and include the image file’s extension (common file types are .jpg, gif and .png)
    1. Additional images may be added using a comma to separate the image names. The first image is the default image for the item, additional images will be in the order that they are arranged in the field but must all be separated with a comma.
  4. Special Web Price: is an override price for the item if it is sold on the web vs. rung up at the register.
  5. Out of Stock Qty and Low Stock Qty: are item specific overrides to the low and out of stock levels specified in the web general parameters (POS-26-4-1)
  6. Targeted Item: allows you to weight the item more heavily in search results on the site.
  7. Weight: can be used to specify a shipping weight.
  8. Allow Free Freight: flag as Y for free freight.
  9. Specific Freight Amt: will set a shipping cost for the item.
  10. Override Freight Code: can be used to ship the item a specific way regardless of what is chosen by the customer at checkout.
  11. Print Shipping Label: is for live fright customers only and is currently under development.
  12. Web Comments: is used for additional product info and appear at the bottom of the page. HTML markup can be used for formatting as well.
  13. Catalog ID: is a listing of catalogs that the item is currently assigned to. You can also assign the item to a catalog by entering the catalog ID in this field.

Save the record once all desired fields have been filled out. Please note that while changes are made live immediately, your browser session may have cached the catalog information and may take up to 10 minutes to update. You can typically force an update by pressing CTRL+F5 to request a non-cached version of the page.

Managing Images

Images must be uploaded for each item and the image name, including the file extension, must be included in the GM, MF, web screen shown above.

Points of Interest for Images

  1. Supported image formats:
    1. .jpg and .gif are supported on all versions of the website. .png is supported in version 3.x
  2. Image sizes
    1. When uploading an image the site will automatically generate scaled down medium and small versions for thumbnails and other views.
    2. Images should not be much larger than 1024 pixels in width. Images that are too large may not upload or will take a considerable amount of time to load for your customers.
  3. Use human friendly naming conventions.
    1. Many cameras will name images with something like 01012017_0001.jpg which is a month, day, year and counter format. Rename your images to something more meaningful to make them easier to work with.
    2. Avoid special characters in image names. A dash (-) or underscore (__) are the only special characters that should be used.

Uploading Images

  1. Log into the site with an administrative account
    1. Accounts can be elevated to admin status by going to POS-26-21, bring up the account and change the Account Type to A. If the account does not exist then you can create the user id here and set the account type to ‘A’. After you create the account you will need to go to the website and on the logon screen select the ‘Forgot Password’ option to have a temporary password sent to you.
    2. The user will need to log out and back in on the website to apply that change.
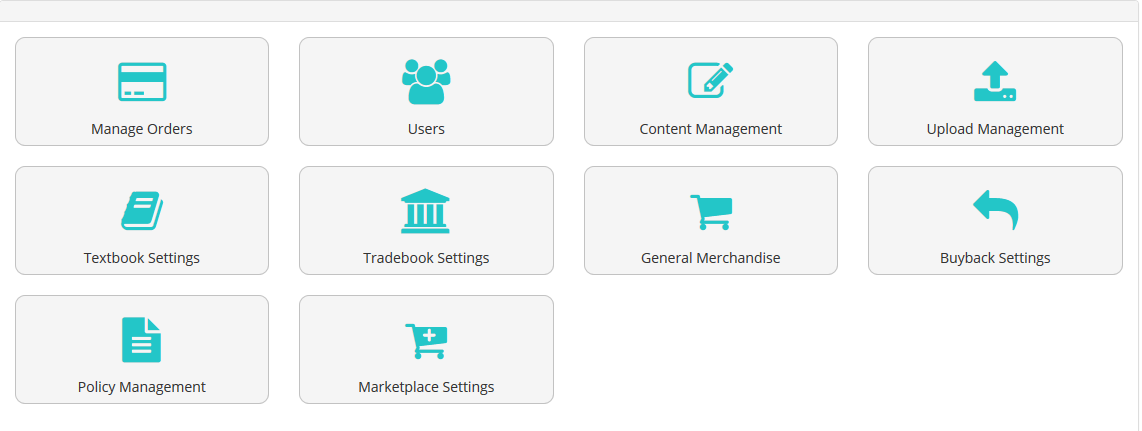
  2. Go to Site Administration on the landing page.
  3. Click on the Upload Management icon
  4.  Here you can either select the option to Upload New Files or Manage Files in the table beneath.
    1. Upload New Files
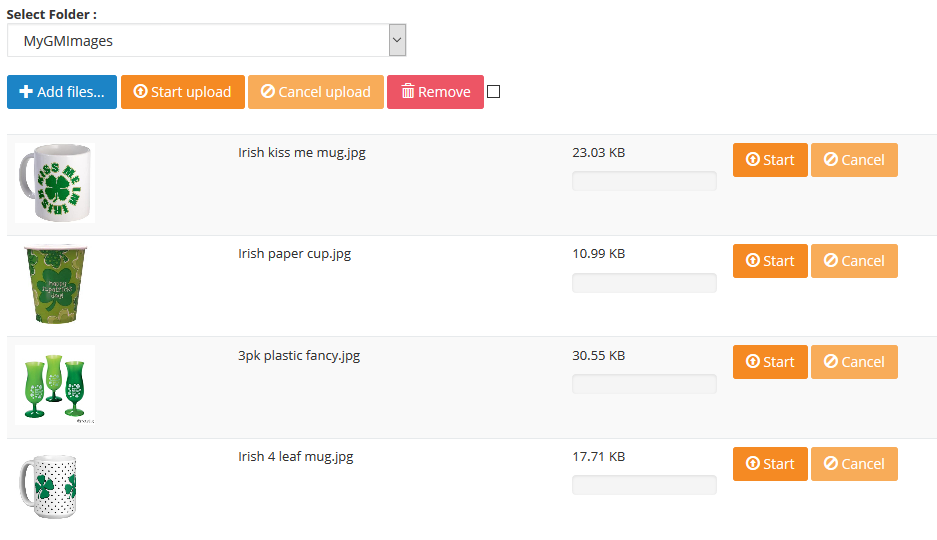
      1. Click on the Add files… button which will display a window to browse to and select your images.
      2. Multiple images can be uploaded by holding shift or ctrl when selecting images.
        • Click on the Open button once all items are selected.
      3. A list of images will appear similar to the image above.
        • Take a look at the size of each image. Anything in the KB range or low MB range (e.g. 1.05 MB) is fine. Anything over 10MB you will want to consider resizing to a smaller size.
        • All images can be uploaded by clicking on the Start upload button beneath the drop down.
        • Individual images can be uploaded by clicking on the Start button on their line.
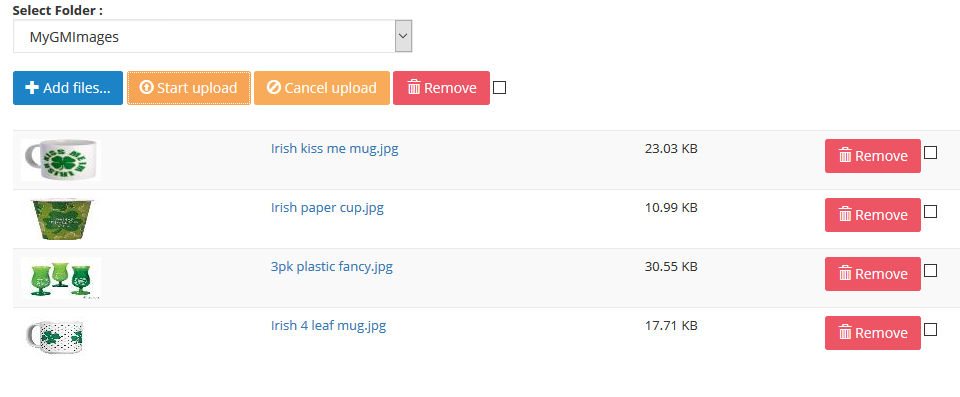
      4. A progress bar will display for the entire upload along with a progress bar for each image being uploaded. Once each item is done uploading it will then have a Remove option in case you want to back out.

Manage Images

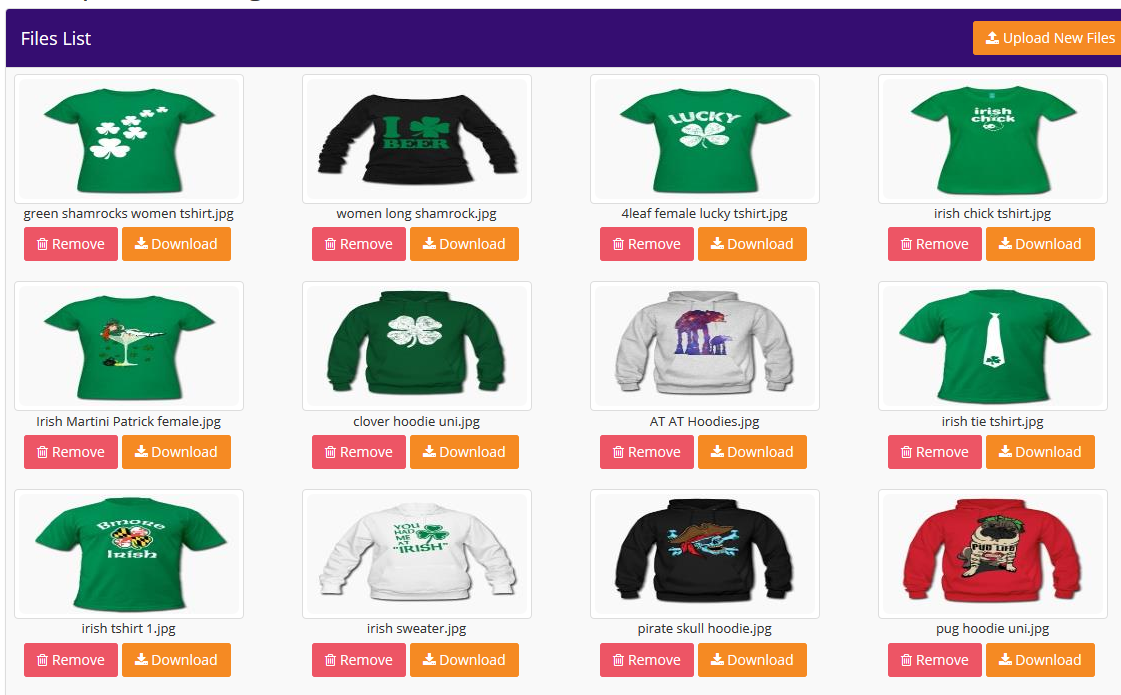
Images that have already been uploaded can be viewed by going to Account, Site Administration, Upload Management and then clicking on the Manage Files on the right hand side of the table.

Here you can view the image names, remove an image, download a copy or continue on to upload more images by using the Upload New Files on the top right.


Inventory Procedures – Tricoder

  1. Preparation
    1. Check Equipment
    2. Prep Areas
    3. Clean MF
    4. Setup Inventory Parameters
  2. Close Doors
  3. Initialize Inventory
  4. Edit Cycle
    1. Scan
    2. Upload
    3. Create Worksheets
    4. Check for Errors
    5. Make Corrections
    6. Commit Worksheets
    7. Report Differences & Valuation
    8. Audit
  5. Open Doors
  6. Start Receiving
  7. Reconcile
  8. Post Worksheets to MF
  9. Adjustments after Posting

Software Overview

Each inventoried module, GM, Text and Trade requires it‟s own inventory initialization and worksheet(s). The main menu to perform all of the inventory steps is (module)-21-1.

The inventory steps include interlocks to prevent you from trying to take a step out of sequence.

  • The steps in the preparation phase are used to prepare the store for inventory counting.
  • The steps in the initialization phase are executed once to set everything up.
  • The steps of the edit cycle are started with one Edit/Enter/Commit Worksheets step, after that any step can be repeated in any order as necessary.
  • The posting phase only contains the posting step, the final step of the inventory process, normally done once.

Preparation

This phase involves all the steps prior to performing the physical count.

Check Equipment

It is very important to make sure that all of the equipment to be used in the inventory process is functioning properly.

  • Be sure that all scanners can hold a charge and scan.
  • Locate all of the connection cables and/or cradles to prevent last minute hold ups.

Prep Areas

  • The system uses numbered inventory count sheets for manually entering and tracking the physical counts. We recommended that each fixture or shelf section should have a separate location number and that the location numbers should be used as your sheet numbers. All areas of the store should have a location, including the warehouse, all storage areas, register areas and offices.
  • It is recommended that each sheet/location should have up to approximately 50 different ISBN/SKU’S. (You don’t want too many items if there was a problem uploading)
  • Arrange all inventories in the sales floor and back office areas so that they are orderly, easy to access, and allow easy foot traffic through the area.
  • All inventoried items on location that have been received into the system need to be scanned.
  • Clearly mark all items that have not been received to prevent them from being counted. These items include returns to vendors and items not yet received.
    • It’s a good practice to receive all items prior to counting.

Clean the Master File

Prior to inventory is a good time to clean up the Master File and purge old inventory items. There are tools located in TX-SU-1-27-5, TR-SU-1-22-5 and GM-SU-1-5-1 to help with cleaning the MF.

Test Upload

Scan some items and upload them to the server to familiarize yourself with the process. This will give you some time to iron out any problems before you count. You will want to clear the DC file of any test uploads by going to (module)-21-1-31

Setting up Inventory Parameters

Inventory parameters are set once and then left alone unless you are changing the way you are going to use worksheets. The main inventory control parameter, in (Module)-UU-22, sets how you enter your physical counts in the worksheets. You can use any of these methods:

Your Upload Folder Path will be different than the one shown. If you need assistance please call support for assistance.

  1. Have the system create worksheets for all master file items for writing and keying in the counts.
  2. Create worksheets from SKUs and counts recorded into a portable terminal and uploaded to the system (scanners).
  3. Create worksheets by keying in each SKU and count from the keyboard.
  4. Inventory Worksheets created from Tricoder Scanner.
  5. Sheet# is Location should typically be Y

The Physical Inventory menu screen options will vary depending upon the inventory method that you choose.

Initializing Inventory

Once the parameters have been set you can initialize your inventory. This will create a “Set ID” that consists of the store, inventory date, and location code you enter. This ID helps keep worksheets from the same module together and separate from other inventories.

Immediately afterwards, if not before inventory has been initialized, close the store to begin your inventory count.

Edit Cycle

The edit cycle consists of counting inventory, uploading the counts into the system, creating worksheets, checking for and fixing any errors and committing the worksheets.

The following steps should be completed by this point:

  • Finish Receiving
  • Separate or mark all items not to be counted i.e. items not received into the system
  • Clean the MF
  • Close the doors
  • Initialize inventory

Scanning

When scanning your inventory there are a few guidelines to follow:

  • Scan by sections (fixtures) top to bottom, left to right. If there are any errors, scanning in a uniform way will allow you to find the areas where these errors occurred.
  • Upload data frequently. This will help in locating items with errors and keep worksheets to a manageable size.
  1. Select option 1 from the main screen for Data Collection
  2. Select option 1 for Sample Program
    1. It will prompt to scan an item, scan an item’s barcode
    2. It will prompt for quantity, enter the quantity
      1. Step through until your location is complete
    3. Once a location is complete go to the PC to upload and being the upload process

Upload and Create Inventory Worksheets from Tricoder Scanner.

After inventory has been initialized from option 1 (see page 7), you may begin to upload your inventory

  1. Go to MODULE-21-1-2 to bring up the Tricoder Input screen
  2. Select the Store, Module, Employee (optional) and Location
    1. Location will become the sheet number if the Sheet# is Location is flagged as a Y in uu-22. This is the standard option.
    2. Do not re-use the same location number as it will overwrite the previous sheet.
  3. Press Enter after the location field and wait, the screen will be unresponsive until the upload is complete.
  4. On the TriCoder main menu select the Data Upload option and answer Yes/Press the F1 key.
  5. Once it finishes upload press Enter on your keyboard in the Tricoder Input screen. It should display something similar to the screenshot below.
  6. On the Tricode it will display End of Transmit, Del File [Y/N]. Respond with Yes and confirm.
    1. If the file isn’t deleted off of the TriCoder then the old data will be uploaded again on the next upload.

If there are any errors in the upload you will get a message to let you know how many. Under the validation row an item with ‘Valid’ is a good item, and item with ‘Not found’ is an item that caused the error in the upload. Not Found means that the SKU scanned was not found in the system. Verify from another host connection that the MF record exists when you enter the scanned SKU. Sometimes the TriCoder may not be configured to scan the correct check digits and will need to be configured to do so.

You may select the ‘M=Modify’ option to edit the SKU/ISBN number or enter ‘space’ to delete the record or manually correct the SKU.

Once all of the errors have been corrected use the V=Validate option to re-check that the SKU is valid. Once SKUs are valid select ‘P=Post’ to save to the DC (Data Collection) file.

Next choose Create Worksheets from DC (module-21-3). You can wait until all worksheets have been uploaded or you may create the worksheets after each upload. (We recommend creating the worksheets after each upload so that you can make sure everything is correct. You may also have someone start spot checking the worksheets if they have been created.)

Answer ‘N’ to both prompts.

You should get a message indicating the worksheets that were created and the number of items that were uploaded to the worksheets.

Now you can go in to (menu-21-4) Edit/Enter/Commit Worksheets and edit or modify the worksheet as needed. Once all editing is completed you may commit the worksheet. Committing the worksheet will lock it and prevent any further editing. The ‘Status’ will remain ‘O’ open until it has been committed.

Repeat menu options 2 – 4 for each location until you have finished inventory for the store.

Once all of the locations have been uploaded and the worksheets have been created, you need to run each of the report options 5 – 8. Check the information for each report and look for discrepancies from your inventory that are not acceptable.

Once all of the reports have been checked and you are satisfied that the information is correct, then you will need to Post Inventory to Master File (module-21-9).