Overview
Special Orders are used for items not in stock. Three major processes are involved: Placing the Special Order, Receiving the Special Order, and Picking up the Special Order by the customer. The following document shows how Special Orders work with the TCS Retail software.
Placing Special Orders
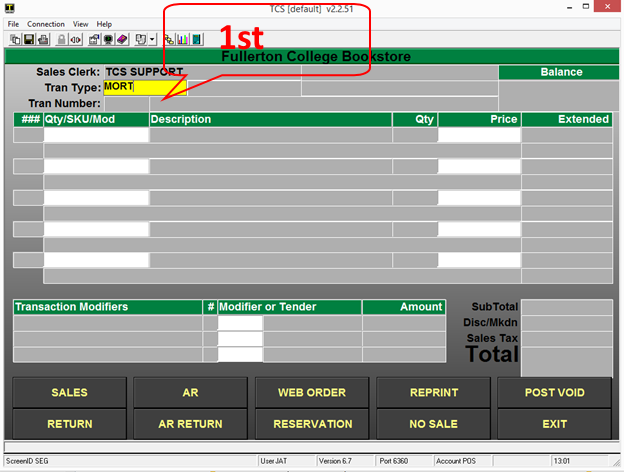
- In Cash Register Screen in POS, enter a regular Sale transaction type.
- Hit the Special Orders function key you have set up (To set this up read Special Order Entry POS Modifiers on page 4).
- Enter the information to go on the Special Order. If a deposit is entered, this amount will be added to the Balance Due.
- Optional Step: For GM or TRADE create a Pending Order. For Text items, add them to a Manual PO.
- Finish the Sales transaction.
- Print off a copy of the receipt for the customer and a copy for ordering personnel.
- Log to the module where the item exists (GM, TRADE or TEXT).
- Place the Order. (Cancel if you discover an order is not necessary).
- Optional: Print special order tags to tag items with person’s information.
Receiving Special Orders
- Enter a receiving log as normal.
- If there are any outstanding Special Orders in the master file, a comment will be automatically added to each line item with special order quantities.
- Optional Step: For GM or TRADE name, phone, address, title, author, special order number, date. You must have a Special Order tag code setup (SPO tag type).
- Optional: Place special order tags on items.
- Notify customer that item has arrived.
Picking Up Special Orders
- Customer picks up special order items.
- Customer takes items to the cashier.
- Do a regular Sale transaction.
- For the line items enter the Special Order Pickup Modifier. (To set this up go to Special Order Pickup Modifier on page 6).
- This will take you into Special Order maintenance. Put in the quantity being picked up. The program will automatically add these items to the current transaction.
- Total the transaction.
- At the tender code entry, if a deposit was made on the special order, enter the amount of the deposit. For the tender type use the Special Order tender. (To set this up go to Special Order Tender Key on page 7).
- You will be prompted once more for the special order ID–enter it.
- Use any other tender type to pay for the remaining portion of the sales transaction.
- When all items are picked up, the special order will be flagged with a “P” status as “picked up”.
Setup Issues
In order for Special Orders to work, the following items need to be configured:
Special Order Entry POS Modifier
This needs to be configured in the POS system and setup on the POS function keys. First configure the modifier. A sample SPO modifier would be similar to the following screen:
(POS-2-2)
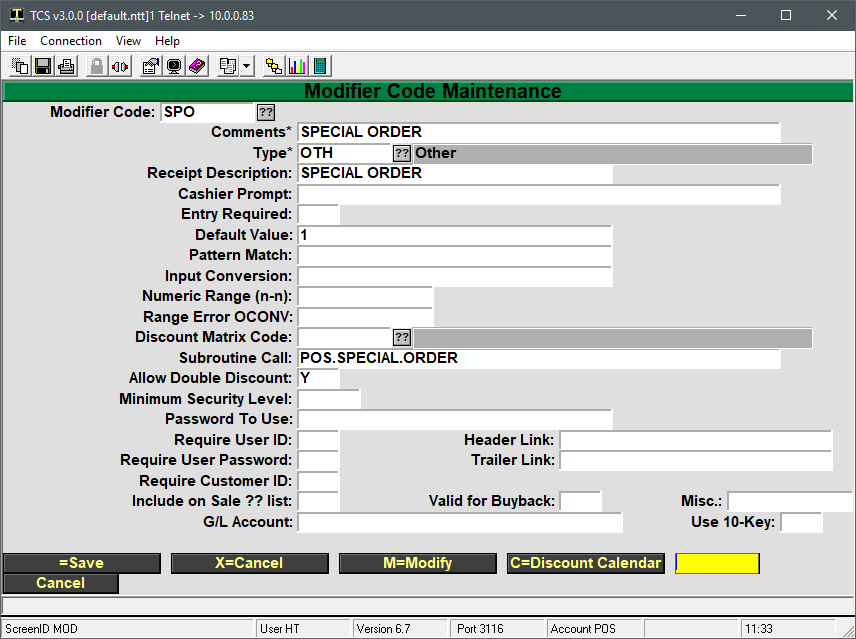
In summary, the Subroutine Call is the most important part of this modifier. This is what executes the Special Order Maintenance program. The Subroutine Call should be set to POS.SPECIAL.ORDER.
Special Order Entry Function Key
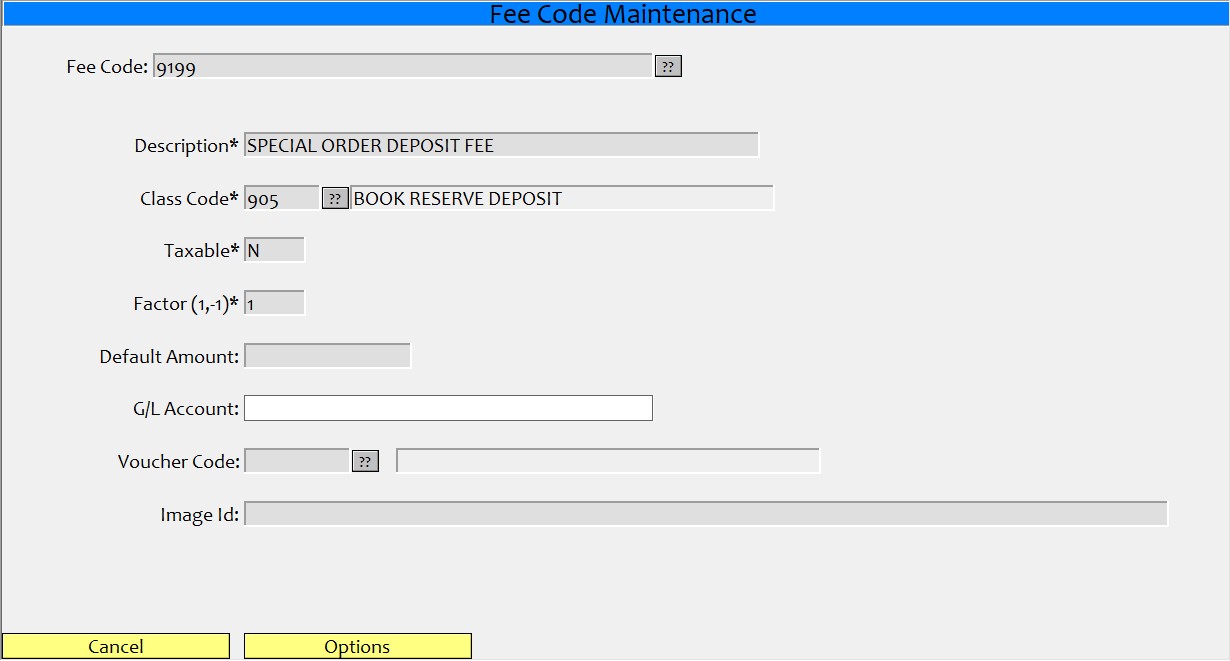
Because of accounting issues involved, if the customer puts a deposit down on Special Order items, this deposit must be accounted for much in the same way as vouchers. A fee code must be used to account for the money received from the customer. Because no merchandise is exchanged at this time, the fee code must be associated with a non-merchandise class and department.
Setting up a Fee Code
A sample Special Order fee code is shown in the screen below:
(Menu Path: POS 22—23)
Setting up a Function Key
Now that the Special Order modifier and fee code are set up, they just need to be added to the keyboard or touch screen layout. Special Orders may be entered without a function key code. However, because of the data needed to start a Special Order, it is much easier to set a function key with the data needed. For example, if my modifier to start Special Orders was SPO and the fee code was 9199, then in the Sales Entry screen, for a line item I would need to key in the following: 9199|SPO. This is much easier done with a function key set to 9199|SPO.
The FEE|SPO function can be added to a touch screen menu in POS-3-22 or to a keyboard layout in POS-3-21. Simply find an empty position in the touch screen or keyboad layout and set the Value field to be the “feecode”|SPO.
Special Order Pickup Modifier
Once items have been placed on Special Order, received, and the customer is ready to pick them up, you will need to do another sale transaction so the customer can pay the remaining due on the items ordered. Instead of manually scanning all the items to be picked up and manually setting the picked up quantities, this can all be done through the cash register.
The key to doing this is by setting up another modifier for Special Order Pickups. The following is a sample modifier with the necessary routines to do this:
(Menu Path: POS 2—2)
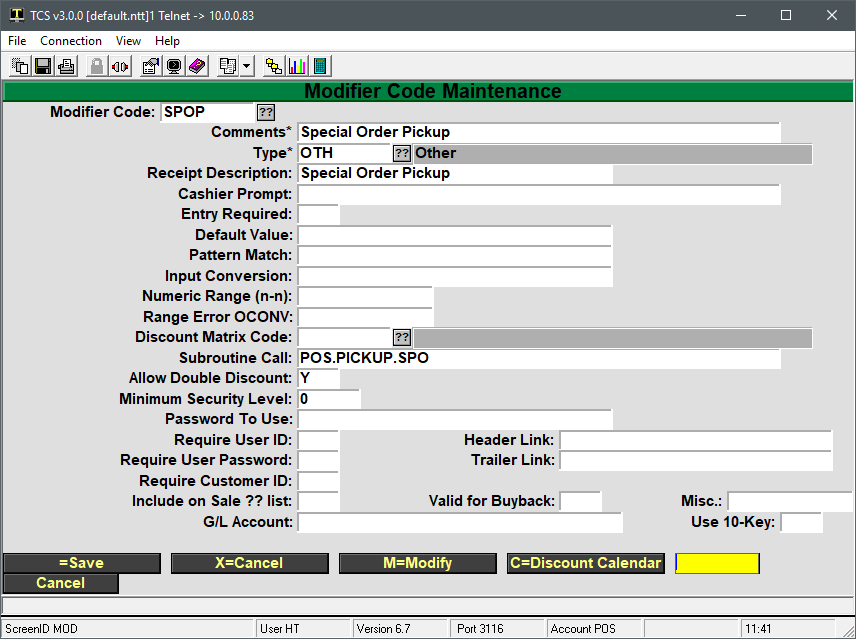
The most important for this modifier is the Subroutine Call to POS.PICKUP.SPO. This program is what handles picking up Special Orders.
Special Order Pickup Function Key
Because this modifier can be used alone, it is not as difficult to use as the Special Order Entry modifier. Therefore, you may choose not to set it up as a function key. In order to use this modifier in POS Sales Entry, simply key in |SPOP. If you do choose to set it up as a function key, then you will need to add it to a touch screen code in POS-3-22 or a keyboard layout in POS-3-21.
Special Order Tender Key
If a deposit was made at the time the Special Order was placed, then that deposit needs to be credited to the customer. This is done in the form of a tender. In order to do this, a Special Order Credit tender code must be setup. The following screen shows a sample tender code:
(Menu Path: POS 2—4)
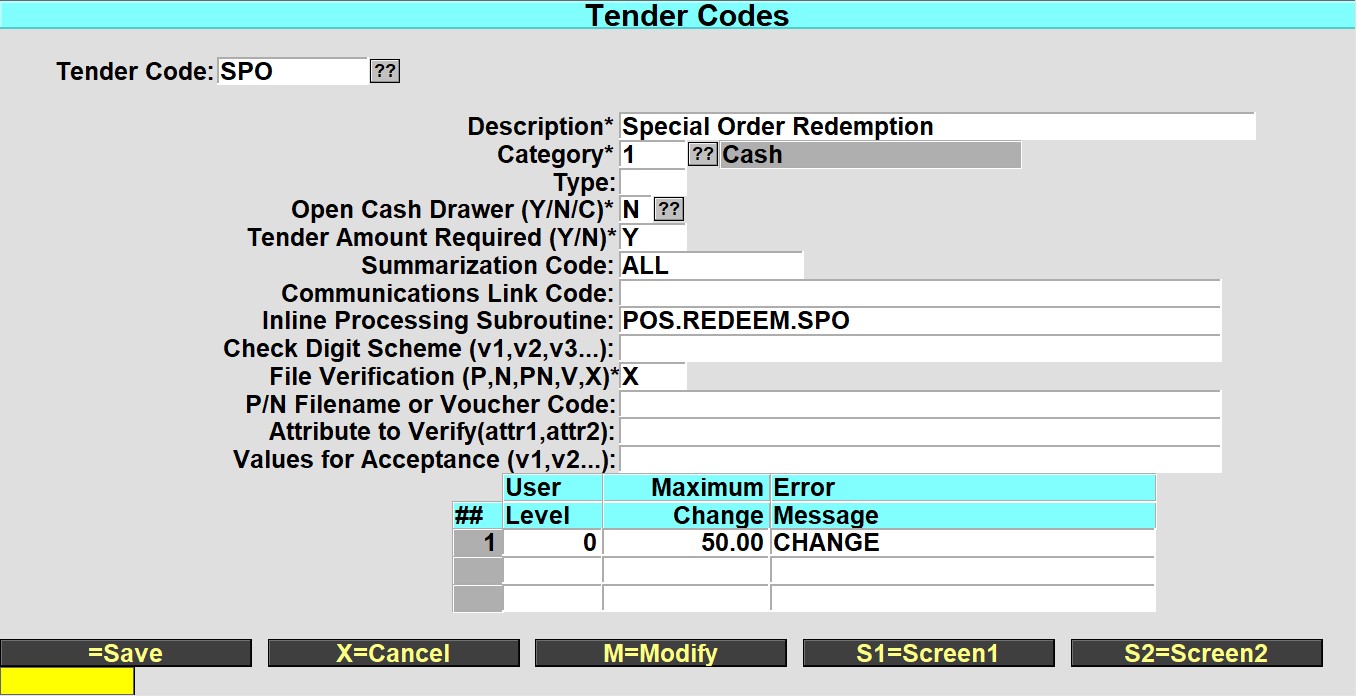
Once again, for details on Tender Code Maintenance, see your POS documentation. The important part of this tender code is the Inline Processing Subroutine, POS.REDEEM.SPO.
Screen and Field Definitions
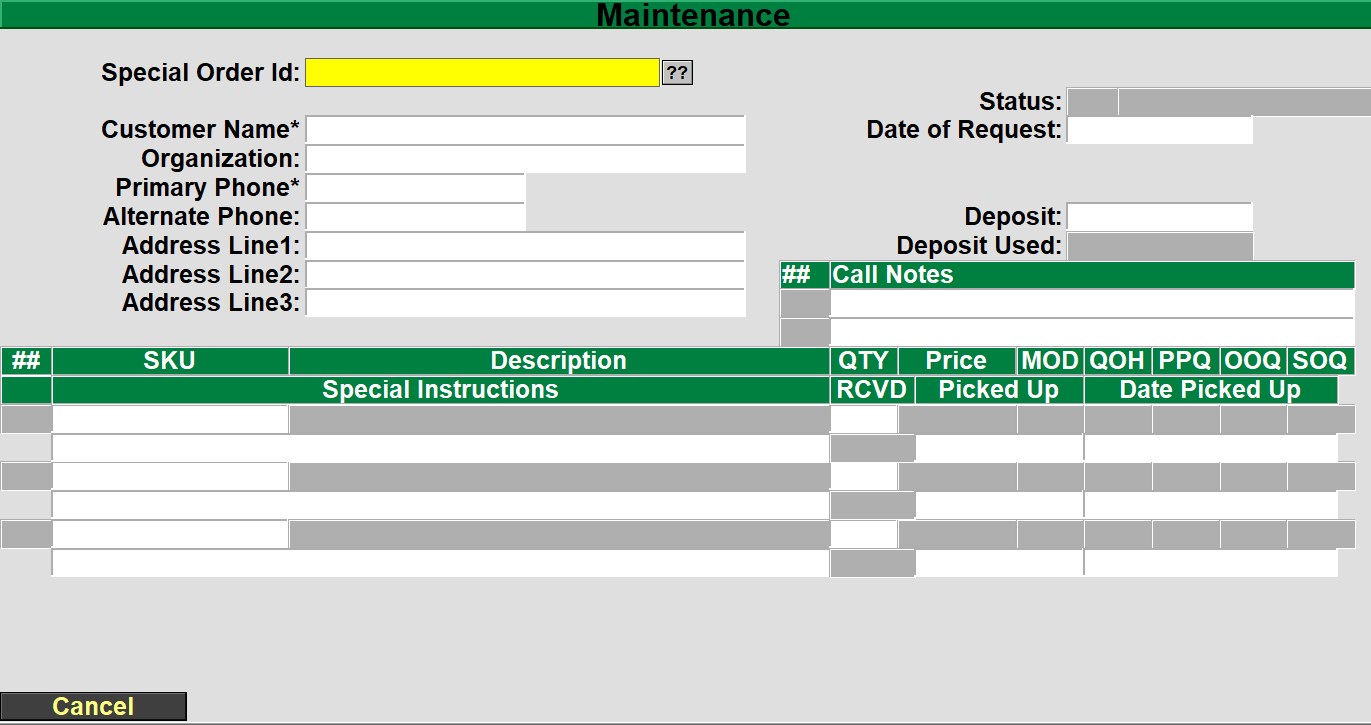
The following is the Special Order Maintenance/Entry screen. This is the screen that will be used when special orders are placed and when they are picked up.
(Menu Path: POS 24—1)
Field Definitions
Customer Name: Enter the name of the customer that is making the order. This name will appear on the Special Order Tag when the book is received.
Organization: Enter the company or organization if applicable. Only for reference in this screen.
Primary Phone: Enter the primary phone number where the customer may be reached. This phone number will appear on the Special Order Tag for quick reference when receiving and notifying customers.
Alternate Phone: Enter an alternate phone number where the customer may be reached if not able to be reached at the primary number.
Address Lines: Enter the address of the customer. This may be if notifying customers by mail instead of by phone. Also may be used for delivery of items.
Status: Display field only. This shows the status of the order. This is usually ‘O’= Open, ‘C’ = Customer Cancelled, ‘S’ = Store Cancelled, ‘P’ = Customer has picked up item.
Date of Request: Date information was first entered into this screen, or the date the customer made the request. This does not mean a PO has been made.
Deposit: Enter the amount of any deposits made. You may set up a default deposit required in POS General Parameters. If this is set, you are required to enter a certain percent of the total.
Call Notes: Enter any special instructions to be displayed and used when calling the customer to pick up the item.
Item Information: Enter the SKU/ISBN for the item to be placed on order. All standard cross-references work here, by entering author/title, title, etc. The item information is displayed and you are prompted to enter the quantity to be placed on order. The other fields show quantities already on order, on hand, and on pending order.
Qty Received: This number is entered through receiving. When an item is received, the number of items received are added here.
Qty Picked Up: This may be automatically updated to be the same number as items received by choosing the ‘P’ option at the ‘Options’ prompt. You may also manually enter here the number of items picked up by the customer if different than the items received.
Date Picked Up: This is automatically added in by choosing the ‘P’ option at the ‘Options’ prompt, or by adding a ‘Qty Picked Up’ amount. Default is the current date.
Enter any special instructions for each item on the second line of each item.
Update Options
<>=Save: Saves the item out to disk. You will then be prompted to place the item on Pending Order.
<X>=Cancel: Cancels any changes made to the order. If it is a new order, it will not be saved to disk.
<M>=Modify: Modify the current order. Make changes to items, names, etc.
<C>=Customer Cancelled: Cancels the order and sets the status to ‘C’.
<S>=Store Cancelled: Cancels the order and sets the status to ‘S’.
<P>=Picked Up All: Automatically update Qty picked up, Picked up Date and the status will be set to ‘P’.
Master File Special Order Links
In Master File inquiry, we will show the following numbers:
SPO On Order: Number of items currently on pending order or on a purchase order somewhere.
SPO Rcvd: Number of items received through the receiving log. Decrements the SPO On Order number.
SPO Picked Up: Number of items picked up by customer. Decrements the SPO Rcvd number. This number then is only a sum of active SPO’s where the total picked up does not equal the total put on special order. This is useful for accounting for an item in stock that is not out on a public shelf, because it is on reserve for special order.
Special Order Reporting
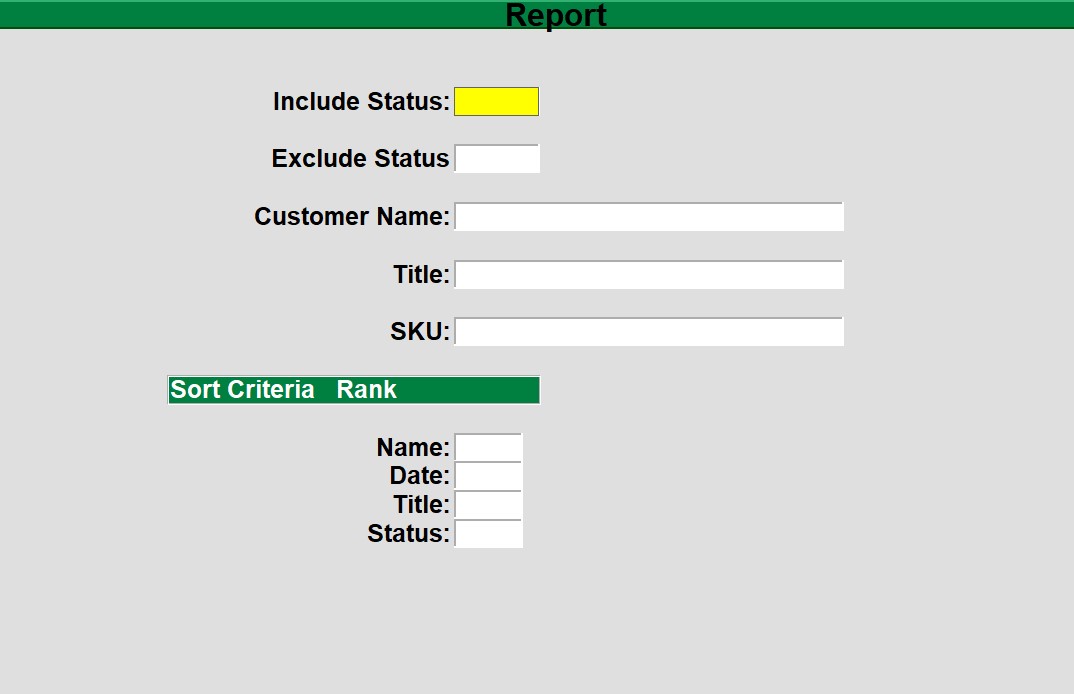
There is a report used to track special orders. The following is the screen and field definitions:
(Menu Path: POS 24—21)
Field Definitions
Include Status: Enter one or more special order statuses separated by commas or leave this field blank to display all statuses.
Exclude Status: Enter one or more statuses to be excluded from the report or leave it blank if there are no statuses to exclude.
Customer Name: Enter a customer name if you only want to display one customer. You may enter part of the customer’s name, but remember that this could result in a report including other customers who share the same letters.
Title: Enter a title or item description if you are interested in a specific item. You may enter part of the title or item, but remember that this could result in a report including other items which share the same letters.
SKU: Enter a SKU if you only want to report on a specific SKU.
Sort Criteria or Rank, Enter 1,2,3,4 in the fields to indicate the order that you would like to sort the results in. You can also leave these fields blank and the report will sort in the default order.

