Special Orders

Overview

Special Orders are used for items not in stock. Three major processes are involved: Placing the Special Order, Receiving the Special Order, and Picking up the Special Order by the customer. The following document shows how Special Orders work with the TCS Retail software.

Placing Special Orders

  1. In Cash Register Screen in POS, enter a regular Sale transaction type.
  2. Hit the Special Orders function key you have set up (To set this up read Special Order Entry POS Modifiers on page 4).
  3. Enter the information to go on the Special Order. If a deposit is entered, this amount will be added to the Balance Due.
  4. Optional Step: For GM or TRADE create a Pending Order. For Text items, add them to a Manual PO.
  5. Finish the Sales transaction.
  6. Print off a copy of the receipt for the customer and a copy for ordering personnel.
  7. Log to the module where the item exists (GM, TRADE or TEXT).
  8. Place the Order. (Cancel if you discover an order is not necessary).
  9. Optional: Print special order tags to tag items with person’s information.

Receiving Special Orders

  1. Enter a receiving log as normal.
  2. If there are any outstanding Special Orders in the master file, a comment will be automatically added to each line item with special order quantities.
  3. Optional Step: For GM or TRADE name, phone, address, title, author, special order number, date. You must have a Special Order tag code setup (SPO tag type).
  4. Optional: Place special order tags on items.
  5. Notify customer that item has arrived.

Picking Up Special Orders

  1. Customer picks up special order items.
  2. Customer takes items to the cashier.
  3. Do a regular Sale transaction.
  4. For the line items enter the Special Order Pickup Modifier. (To set this up go to Special Order Pickup Modifier on page 6).
  5. This will take you into Special Order maintenance. Put in the quantity being picked up. The program will automatically add these items to the current transaction.
  6. Total the transaction.
  7. At the tender code entry, if a deposit was made on the special order, enter the amount of the deposit. For the tender type use the Special Order tender. (To set this up go to Special Order Tender Key on page 7).
  8. You will be prompted once more for the special order ID–enter it.
  9. Use any other tender type to pay for the remaining portion of the sales transaction.
  10. When all items are picked up, the special order will be flagged with a “P” status as “picked up”.

Setup Issues

In order for Special Orders to work, the following items need to be configured:

Special Order Entry POS Modifier

This needs to be configured in the POS system and setup on the POS function keys. First configure the modifier. A sample SPO modifier would be similar to the following screen:

(POS-2-2)


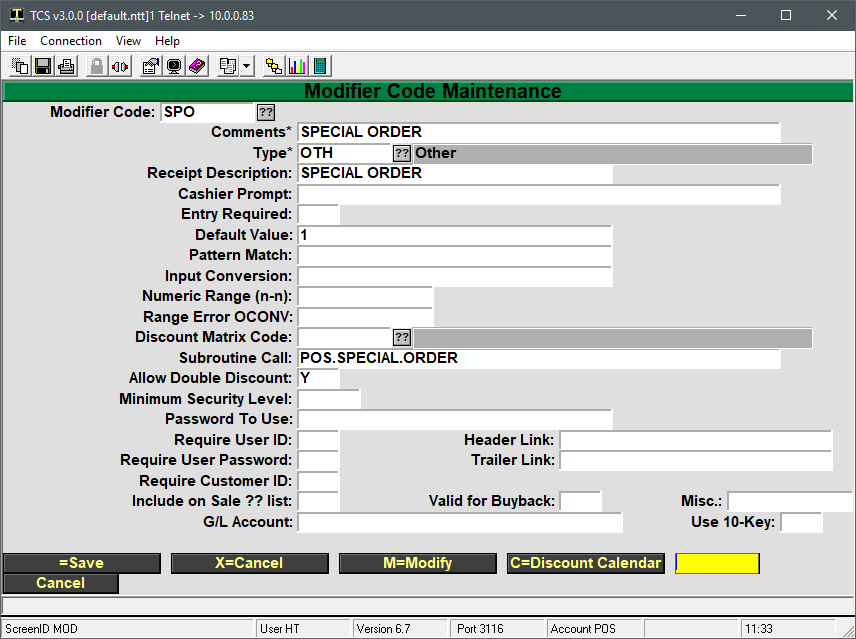
In summary, the Subroutine Call is the most important part of this modifier. This is what executes the Special Order Maintenance program. The Subroutine Call should be set to POS.SPECIAL.ORDER.

Special Order Entry Function Key

Because of accounting issues involved, if the customer puts a deposit down on Special Order items, this deposit must be accounted for much in the same way as vouchers. A fee code must be used to account for the money received from the customer. Because no merchandise is exchanged at this time, the fee code must be associated with a non-merchandise class and department.

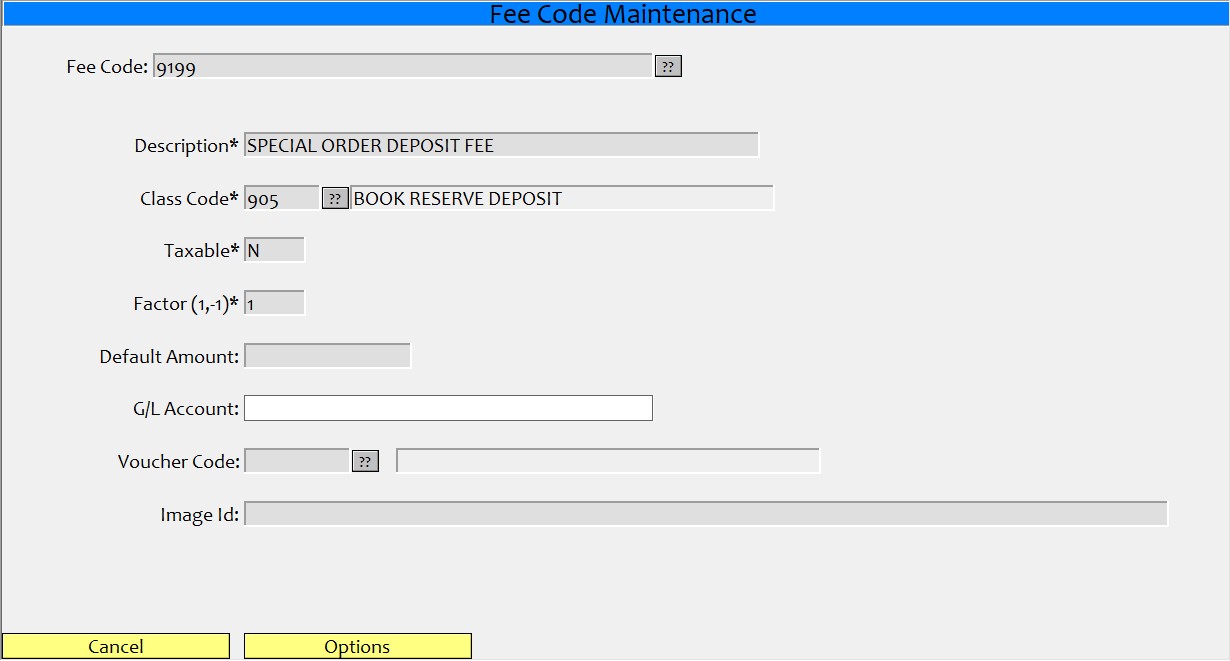
Setting up a Fee Code

A sample Special Order fee code is shown in the screen below:

(Menu Path: POS 22—23)

Setting up a Function Key

Now that the Special Order modifier and fee code are set up, they just need to be added to the keyboard or touch screen layout. Special Orders may be entered without a function key code. However, because of the data needed to start a Special Order, it is much easier to set a function key with the data needed. For example, if my modifier to start Special Orders was SPO and the fee code was 9199, then in the Sales Entry screen, for a line item I would need to key in the following: 9199|SPO. This is much easier done with a function key set to 9199|SPO.

The FEE|SPO function can be added to a touch screen menu in POS-3-22 or to a keyboard layout in POS-3-21. Simply find an empty position in the touch screen or keyboad layout and set the Value field to be the “feecode”|SPO.

Special Order Pickup Modifier

Once items have been placed on Special Order, received, and the customer is ready to pick them up, you will need to do another sale transaction so the customer can pay the remaining due on the items ordered. Instead of manually scanning all the items to be picked up and manually setting the picked up quantities, this can all be done through the cash register.

The key to doing this is by setting up another modifier for Special Order Pickups. The following is a sample modifier with the necessary routines to do this:

(Menu Path: POS 2—2)


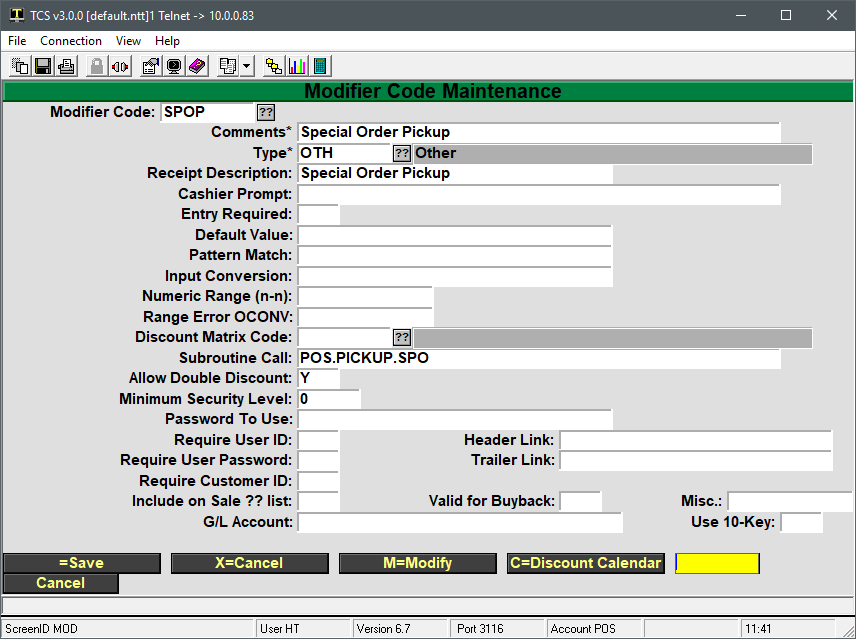
The most important for this modifier is the Subroutine Call to POS.PICKUP.SPO. This program is what handles picking up Special Orders.

Special Order Pickup Function Key

Because this modifier can be used alone, it is not as difficult to use as the Special Order Entry modifier. Therefore, you may choose not to set it up as a function key. In order to use this modifier in POS Sales Entry, simply key in |SPOP. If you do choose to set it up as a function key, then you will need to add it to a touch screen code in POS-3-22 or a keyboard layout in POS-3-21.

Special Order Tender Key

If a deposit was made at the time the Special Order was placed, then that deposit needs to be credited to the customer. This is done in the form of a tender. In order to do this, a Special Order Credit tender code must be setup. The following screen shows a sample tender code:

(Menu Path: POS 2—4)


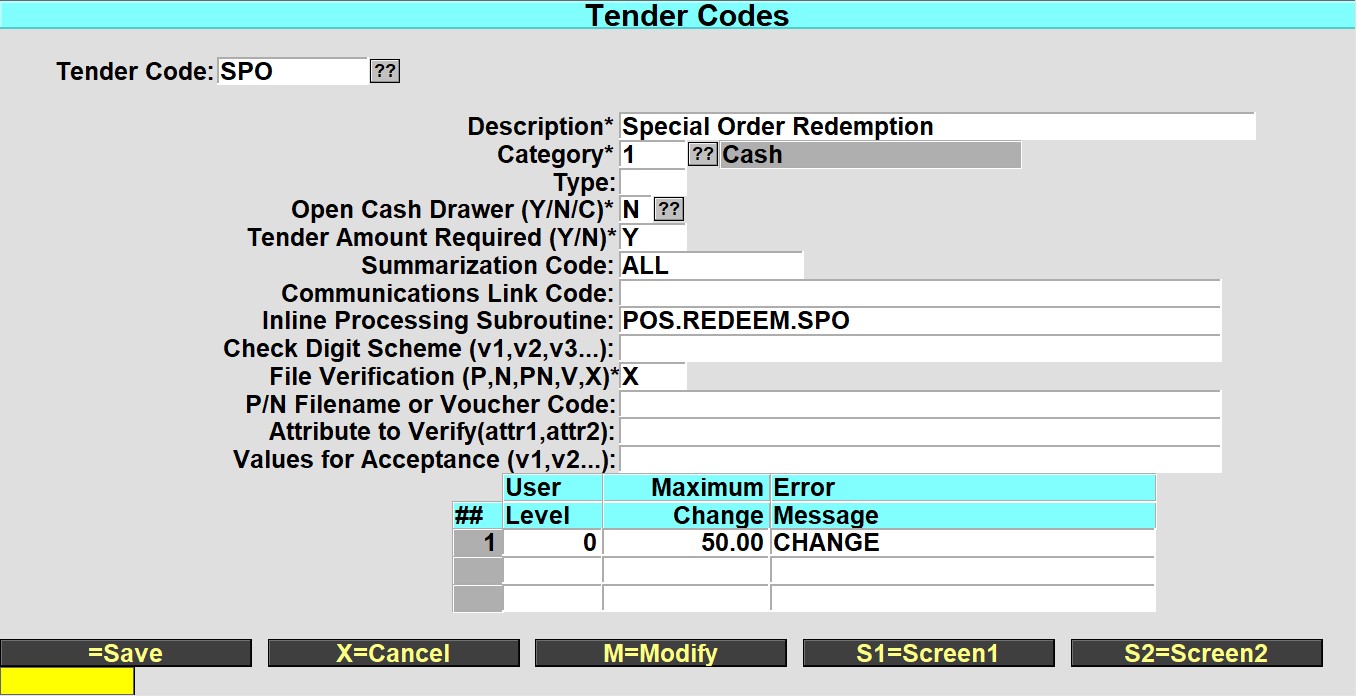
Once again, for details on Tender Code Maintenance, see your POS documentation. The important part of this tender code is the Inline Processing Subroutine, POS.REDEEM.SPO.

Screen and Field Definitions

The following is the Special Order Maintenance/Entry screen. This is the screen that will be used when special orders are placed and when they are picked up.

(Menu Path: POS 24—1)
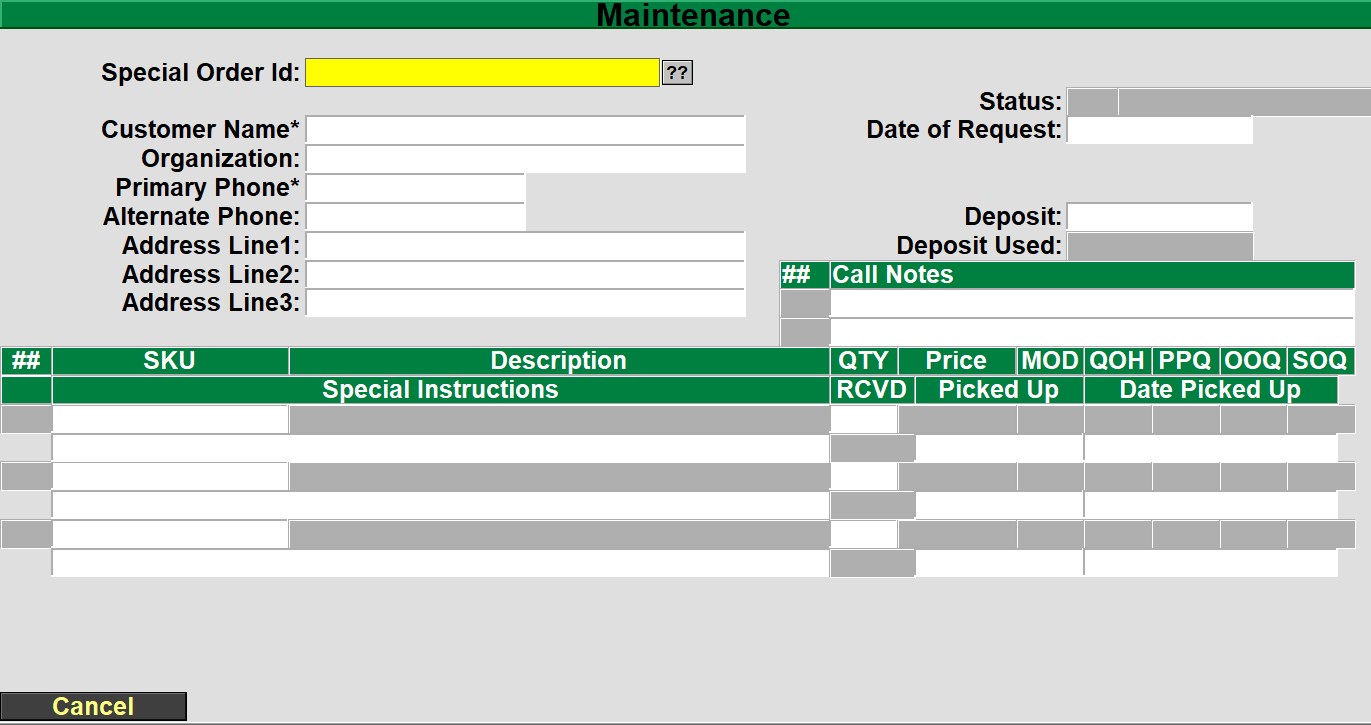
Field Definitions

Customer Name: Enter the name of the customer that is making the order. This name will appear on the Special Order Tag when the book is received.

Organization: Enter the company or organization if applicable. Only for reference in this screen.

Primary Phone: Enter the primary phone number where the customer may be reached. This phone number will appear on the Special Order Tag for quick reference when receiving and notifying customers.

Alternate Phone: Enter an alternate phone number where the customer may be reached if not able to be reached at the primary number.

Address Lines: Enter the address of the customer. This may be if notifying customers by mail instead of by phone. Also may be used for delivery of items.

Status: Display field only. This shows the status of the order. This is usually ‘O’= Open, ‘C’ = Customer Cancelled, ‘S’ = Store Cancelled, ‘P’ = Customer has picked up item.

Date of Request: Date information was first entered into this screen, or the date the customer made the request. This does not mean a PO has been made.

Deposit: Enter the amount of any deposits made. You may set up a default deposit required in POS General Parameters. If this is set, you are required to enter a certain percent of the total.

Call Notes: Enter any special instructions to be displayed and used when calling the customer to pick up the item.

Item Information: Enter the SKU/ISBN for the item to be placed on order. All standard cross-references work here, by entering author/title, title, etc. The item information is displayed and you are prompted to enter the quantity to be placed on order. The other fields show quantities already on order, on hand, and on pending order.

Qty Received: This number is entered through receiving. When an item is received, the number of items received are added here.

Qty Picked Up: This may be automatically updated to be the same number as items received by choosing the ‘P’ option at the ‘Options’ prompt. You may also manually enter here the number of items picked up by the customer if different than the items received.

Date Picked Up: This is automatically added in by choosing the ‘P’ option at the ‘Options’ prompt, or by adding a ‘Qty Picked Up’ amount. Default is the current date.

Enter any special instructions for each item on the second line of each item.

Update Options

<>=Save: Saves the item out to disk. You will then be prompted to place the item on Pending Order.

<X>=Cancel: Cancels any changes made to the order. If it is a new order, it will not be saved to disk.

<M>=Modify: Modify the current order. Make changes to items, names, etc.

<C>=Customer Cancelled: Cancels the order and sets the status to ‘C’.

<S>=Store Cancelled: Cancels the order and sets the status to ‘S’.

<P>=Picked Up All: Automatically update Qty picked up, Picked up Date and the status will be set to ‘P’.

Master File Special Order Links

In Master File inquiry, we will show the following numbers:

SPO On Order: Number of items currently on pending order or on a purchase order somewhere.

SPO Rcvd: Number of items received through the receiving log. Decrements the SPO On Order number.

SPO Picked Up: Number of items picked up by customer. Decrements the SPO Rcvd number. This number then is only a sum of active SPO’s where the total picked up does not equal the total put on special order. This is useful for accounting for an item in stock that is not out on a public shelf, because it is on reserve for special order.

Special Order Reporting

There is a report used to track special orders. The following is the screen and field definitions:

(Menu Path: POS 24—21)
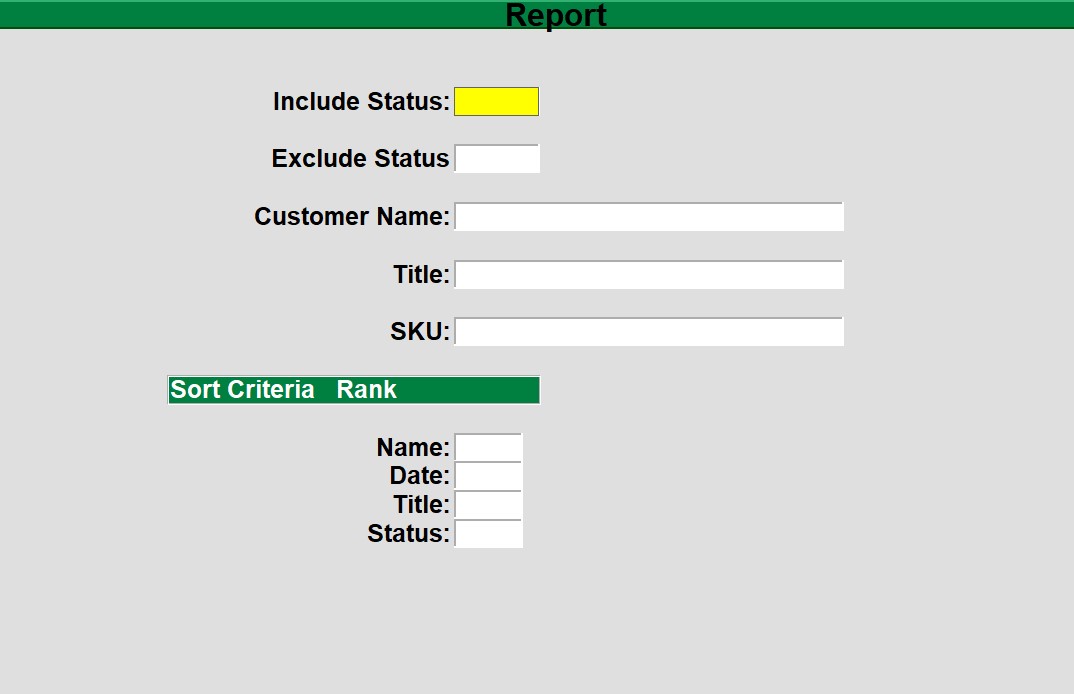
Field Definitions

Include Status: Enter one or more special order statuses separated by commas or leave this field blank to display all statuses.

Exclude Status: Enter one or more statuses to be excluded from the report or leave it blank if there are no statuses to exclude.

Customer Name: Enter a customer name if you only want to display one customer. You may enter part of the customer’s name, but remember that this could result in a report including other customers who share the same letters.

Title: Enter a title or item description if you are interested in a specific item. You may enter part of the title or item, but remember that this could result in a report including other items which share the same letters.

SKU: Enter a SKU if you only want to report on a specific SKU.

Sort Criteria  or Rank,  Enter 1,2,3,4 in the fields to indicate the order that you would like to sort the results in. You can also leave these fields blank and the report will sort in the default order.


Report: Class Summary by Class

Below is an overview of the Class Detail by Date by Class report. General information on what fields are available, what they do and what data is presented in the report.

Path: POS-RP-1-3-3

Purpose: This report is used to display high level information of class dollar amounts per day.

Output: Store, Report Group (optional), Description, Sales, Returns, Markdowns, Discounts, Class Net, Cost Quantity.

Over a one day date range this report looks very similar to other class reports. Just like those reports though, the multiple days is what makes the report unique.

This screenshot shows a single day with the “Sort by Report Code” field set to a Y. The Y for this field triggers the optional Report Group column. If this field is a N then the column is removed.


In this example we have six days worth of data. The format of this report remains the same, the numbers simply include more days.


Unique Field Options

Sort by Report Code: Allows you to override the numerical listing of class codes into their class report group. This is essentially an override of the default numerical sorting of class codes.

Creating a class Report Category is found in POS-22-3-5. Once a category has been created you can assign it to the classes belonging to that report category in POS-22-3-2.

Note: the most common fields are covered in the Reports: Best Practices and Procedures article. Only special usage scenarios or options are covered in this article.


Report: Class Detail by Class by Date

Below is an overview of the Detail by Transaction Number report. General information on what fields are available, what they do and what data is presented in the report.

Path: POS-RP-1-3-2

Purpose: This report is used to display high level class dollar amounts per class.

Output: Class, Class Description, Sales, Returns, Net Sales, Markdowns, Discounts, Class Net, Cost, Quantity and Margin.

At first glance the data is very similar to the Class Detail by Date by Class report if you only run it for one date.


However, the format changes when you run it for multiple dates. The focus is on the class data, then by date. So class 100 is all grouped together across the date range, totaled for the date range, and then class 101 is reported for the date range, etc.

This example is for a six day span.


Unique Field Options

There are no unique fields in this report.

Note: the most common fields are covered in the Reports: Best Practices and Procedures article. Only special usage scenarios or options are covered in this article.


Report: Class Detail by Date by Class

Below is an overview of the Class Detail by Date by Class report. General information on what fields are available, what they do and what data is presented in the report.

Path: POS-RP-1-3-1

Purpose: This report is used to display high level information of class dollar amounts per day.

Output: Class, Class Description, Sales, Returns, Net Sales, Markdowns, Discounts, Class Net, Cost, Quantity and Margin.


What makes it unique from the other class reports is the formatting when it spans multiple days. The focus is on the date, then the class totals. So the report displays the first date with all class totals, then the next day with its class totals, etc.

The screenshot below shows data on two days.


Unique Field Options

There are no unique fields in this report.

Note: the most common fields are covered in the Reports: Best Practices and Procedures article. Only special usage scenarios or options are covered in this article.


Report: Consolidated by Register

Below is an overview of the Consolidated by Register report. General information on what fields are available, what they do and what data is presented in the report.

Path: POS-RP-1-2

Purpose: This report is used to display a high level summary of the transactions done on each register. The total amount of money done, total markdowns, cost of goods sold, gross margin of goods sold, etc. for the date range specified.

Output: Register, Quantity, Sell Price Extended, Item Discount Total, Item Markdown Total, Transaction Discount Markdowns, Net Sales, Tax Total, Trans Total, Tender Total, Net Cost Extended and Gross Margin.


Unique Field Options

A/R Invoice: Allows you to specify an AR Invoice number to view the other transaction details.

Note: the most common fields are covered in the Reports: Best Practices and Procedures article. Only special usage scenarios or options are covered in this article.


Reports: Best Practices and Procedures

Below is a list of the most common report fields and what they do. The purpose of this article is to avoid having to specify “the Store field restricts the report to the specified store” on every single report article.

There is also a best practices on the more optimal ways of running reports. This includes how to report on multiple class or department codes, what to do when you get a “0 records listed” response as well as other things.

Common Practices

  • Populate as few fields as possible to get the information you need.
    • Data presented in a report is information that meets every single field criteria.
    • If you get a response of “0 records to display” then consider widening your parameters. Filling out every single field will rarely work.
    • e.g. If you specify: “Store 1, Register 101, Beginning Date 8/1/18, Ending Date 8/1/18, Department 90, Class 101, SKU 9781234567890, Tran Type RT, WEB Transactions N, History file N” you probably won’t get anything.
      • If you remove the tran type criteria, or the department and class fields (you’re specifying the item anyways) then you may get some results.
  • Multiple criteria can be entered into most fields by separating them with a comma.
    • e.g. If you want to report on class numbers 101,102 and 103 you will enter them as 101,102,103
  • There is currently no way to report on “everything except” unless you enter every valid option.
    • e.g. If you want to report on every class other than 101 you would have to enter every class code except 101, into the Class field.

Common Fields

  • Store: Entering a value for Store restricts the report to only display results for the specified store.
    • Note that some items are not store specific, e.g. Class codes or fee codes are store agnostic.
  • Register: Entering a value for Register restricts the report to only display data on the specified register.
    • Multiple registers can be entered by separating them with a comma. e.g. 101,102,103 will report on all three registers.
  • Beginning Date: A “start date” that limits the data to not include information before this date.
    • e.g. A transaction search with a start date of 7/1/18 will not include any transactions prior to July 1st, 2018.
  • Ending Date: Specifies the “stop date” in the data, nothing after this date will be displayed.
    • e.g.A transaction search with a stop date of 7/1/18 will not include any transactions done on 7/2/18 or after.
    • To report on a single day make the beginning and ending date the same.
  • Department: Restricts the report to include data that falls under the specified department
  • Class: Restricts the report to data that includes items that fall under that class
  • SKU: Enter a SKU, ISBN, Fee Code, etc. to only report on data that includes this item
  • Detail: Is used to display as much information as possible for that data being reported on.
    •  For example, a report against transaction data with Detail flagged will display every line item in the transaction, the cost, quantity and total for every transaction for the date range specified.
    • The majority of reports are either Detail or Summary, but there are a few exceptions that will report the detailed information and include a separate summary section at the bottom. One example would be inventory valuation reports that will list all of the inventory items and then include summary totals for each inventory class.
  • Summary: The summary flag will combine and summarize the data reported on various break points.
    • For example, a transaction report with Summary flagged will simply report the transaction total instead of every single line item, their cost, and the total for the date range specified.
  • History: Almost always a N.
    • This is not a “include History as well” flag.This is a hard switch, meaning it reads from the History ONLY and will not report on current data.
    • Data can be moved to history to separate it from current data without throwing it away.
    • Once it has been moved to history then the History field would have to be a Y to read it from the History file.
  • Web: Almost always an N or empty. Entering a Y will restrict the report to ONLY web transactions similar to the History field only reporting on the History file.


Report: Detail by Trans Number

Below is an overview of the Detail by Transaction Number report. General information on what fields are available, what they do and what data is presented in the report.

Path: POS-RP-1-1

Purpose: This report is used to display detailed information on every transaction that meets the selection criteria.

Output: Register, Transaction #, Date, Time, Cashier Code, Transaction Type, Post Void status, Scanned Items, Item Descriptions, Quantity, Sell Price Extended (qty * price), Item Discounts, Transaction Discounts, Tax Total, Transaction Total and Tender Code.

Unique Field Options

A/R Invoice: Allows you to specify an AR Invoice number to view the other transaction details.

Note: the most common fields are covered in the Reports: Best Practices and Procedures article. Only special usage scenarios or options are covered in this article.


POS Menu List

Below is a list of all menu options inside of the POS module. The numbering of the list reflects the path numbering of the menu options. For instance, maintaining the Tax Tables in POS-2-3-1 is in section 2 – Transaction Parameters, 3 – Tax Tables, 1 – Tax Tables. At first glance it can be a little jarring to see the list go from 5 to 21 but it was necessary to keep the options true to the screen layout.

  1. Cash Register
  2. Transaction Parameters >

    1. General Parameters
    2. Modifiers
    3. Tax Tables >

      1. Tax Tables
      2. Import Tax Tables
    4. Tender Codes
    5. Transaction Types
    6. Discount Matrix
    1. Modifier Descriptions
    2. Credit Card Parameters
    3. Tender Categories
    4. Tax Exemption Reason Table
    5. Error Message Maintenance
    6. Price Table Maintenance
  3. Hardware Parameters >

    1. Register Parameters
    2. Hardware Configuration Codes
    3. Receipt Header
    4. Receipt Trailer
    5. Gift Receipts
    1. Function Key Definitions
    2. Touch Screen Codes
  4. History >

    1. History Parameters
    2. Run History Process
    3. Purge Processed Sales Records (DIS)
  5. Credit Cards & Communications >

    1. TotaLink Credit Cards
    2. Gratuity Processing
    3. ICOMM Credit Card Reports >
    4. CourseWorks >
    5. Create CC Adjustments from STD
    6. Element Vault Maintenance
  6. SmartLane Registers >

    1. Host Background Control
    2. Transfer Control & Status
    3. Send POS Parameters
    4. Send PLU and Data Files
    5. Send Specific Item
    6. List Send Log
  1. Global SKU Inquiry
  2. Data File Maintenance >

    1. Cashier Maintenance
    2. SKU Maintenance
    3. Department & Class Maintenance >
      1. Department Maintenance
      2. Class Maintenance
      3. Class Category Maintenance
      4. Distribution Code Maintenance
      1. Calendar
    4. Delete SKUs Marked For Deletion
    5. Catalog Maintenance
    6. Food Services >

      1. Meal Maintenance
      2. SKU Maintenance
      3. Meal Plan Parameters
      4. blank
      5. Meal Category Codes
      1. Reset Meal Plans
      2. Import Meal Plan Customers
      3. Food Service Reports >

        1. Meal Usage
    7. GateKeeper
    1. Negative Account Maintenance
    2. Positive Account Maintenance
    3. Fee Code Maintenance
    4. Cross Reference Rebuild >

      1. Title/Description Xref
      2. Author/Manufacturer Xref
      3. ISBN & UPC Xref
      4. 1-3 Above
      5. Rebuild MFX
      1. Pref Customer Xref
      2. Voucher Xref
      3. Employee Xref
      4. Special Orders Xrefs
    5. Vouchers & Coupons >

      1. Maintain Voucher Records
      2. Voucher History Inquiry
      3. Move Vouchers to History
      1. Voucher Parameters
      2. Maintain Coupon Parameters
    6. Loyalty >

      1. Enter/Maintain Customers
      2. Pref Customer Report
      1. Loyalty Type Maintenance
      2. Print Mailing Labels
  3. End of Day Functions > Reconciliations & End of Day

    1. Employee
    2. Register
    3. Register History
    4. Register Report
    5. Employee Report
    6. Daily Register Counts
    7. Employee Audit
    1. Check for Gaps
    2. Remote Close Registers
    3. Back Office Post Void
    4. Post Unposted Transactions
    5. Modify Tenders on STD
    6. Re-Open Closed Day
    7. Download Host AR Data
    8. Nightly Resize & Backup
    9. General Ledger >
      1. Create G/L Distribution
      2. Print G/L Distribution
      3. Create G/L Journal Entry
      1. Maintain Distribution Codes
      2. Create G/L Journal Entry for Quickbooks
  4. Special Orders >

    1. Maintenance
    1. Report
  5. Food Service >

    1. Meal Maintenance
    2. SKU Maintenance
    3. Meal Plan Parameters
    4. Meal Category Codes
    1. Reset Meal Plans
    2. Import Meal Plan Customers
    3. blank
    4. blank
    5. Food Service Reports >
      1. Meal Usage
  6. Mail Order & E-Commerce >

    1. Order Entry
    2. Catalog Maintenance
    3. General Parameters
    4. Campus Webstore Parameters >
      1. General Parameters
      2. Freight Tables
    5. Email Parameters
    6. Web Tags>
      1. Web-Tag Category Maint
      2. Web-Tag Tag Maint
    1. Mail Order Open Items Detail
    2. Customer Listing
    3. Fedex List
    4. Print Pickslips
    5. e-Mail List
    1. Customer Maintenance
    2. Customer Inquiry
    3. Purge Completed Orders
    4. Merge Identical Customers
    5. Mail Labels
    6. Web Order Status
    1. Zip Zone Table
    2. Rate Table – Weight
    3. Rate Table – Purch Amt
    4. Tracking – STD
    5. Tracking – Confirmation
  • Rentals >

    1. Item Master Maintenance
    2. Serial Number Maintenance
    3. Drop Off – Serial
    4. Item Retirement
    5. Move S/N to Regular Inventory
    6. Specify Tag Printer
    1. General Parameters
    2. Condition Codes
    3. Email Notices >
      1. Email Pre-Notice
      2. Email Past Due Notice
      3. Email Charged Card
    4. Utilities >

      1. Post STD to Serial#’s
      2. Customer Information
      3. Recalculate Quantity
      4. Rental Updates
      1. Update Rental Prices
      2. Rental Purchase Processing
    5. Customer Inquiry
    6. Reports >

      1. Rental Items Due
      2. Rental Items Past Due by Cust Name
      3. Rental Items Past Due
      4. Rental Items CC Charged
      5. Master List
      6. Daily Rentals
      7. Daily Returns
      1. Rental Items Available
      2. Rental Items Sold – Serial
      3. Rental Items Sold – Dynamic
      4. Rental Items Retired
      5. Rental Inventory
      6. Daily Dropoff
      7. Daily Rentals and Returns
      8. Physical Inventory Valuation
RP – Report Menu
PM – Printer Mgt
QB – Query Builder
TI – Transaction Inquiry
GI – Global MF Inquiry
BG – Backgrounds
UM – User Menu
UU – User Utilities
SM – System Menu


POS Report Menu List

POS Reports Menu(RP)

Below is the layout of the Reports menu in the POS module in an ordered list. The purpose of this page is to allow for a searchable list of reports. This is a constant work in progress, so some details may not be available at this time.

Clicking on a report name will navigate to a page with an example of what the report looks like, a brief summary of what the report will report on as well as explanations of the fields used to generate the report. Please note that every field definition is not listed for every single report, instead the most common fields are covered in the Reports: Best Practices and Procedures article. Only special usage scenarios or unique field options are covered in the individual report articles.

The numbering of the list reflects the path numbering of the reports. For instance, the Tender/Register Summary Report (RP-2-21) is down in section 2; Tender Reports, option 21 for Tender/Register Summary. At first glance it can be a little jarring to see the list go from 5 to 21 but it was necessary to keep the options true to the screen layout.

      1. Sales Reports >

        1. Detail by Trans Number
        2. Consolidated by Register
        3. Class Reports Menu >

          1. Class Detail by Date by Class
          2. Class Detail by Class by Date
          3. Class Summary by Class
          4. Class Summary by Register
          5. Item Disc/Mkdn by Class
          1. Class Comparison – Net
          2. Class Comparison – Returns
        4. Time Interval Sales Menu >

          1. Store Sales by Store by Register by Date
          2. Store Sales by Store by Date by Interval
          3. Employee Sales by Employee by Time
          4. Employee Sales by Time by Employee
          5. Sales $$ by Time Interval
          6. 7-Day Sales Report
        5. Special Sales Reports Menu >

          1. Gross-to-Net Sales
          2. Departmental Sales
          3. Sales and Returns by Department
          4. Sales by SKU/ISBN
          5. Sales by Transaction Discount Code
          6. Serial Number Search
          1. Maintain Flash Dates
          2. Update and Print
          3. Print Flash Data
          4. Akademos Sales Detail
        6. A/R Reports Menu >

          1. Invoices
          2. Payments
          1. POSCONNECT Error Report
        1. Transaction Detail (Inquiry)
        2. Fee Detail
        3. Fee Summary
        4. Item Disc/Mkdn Detail
        5. Movement/Ranking Menu >

          1. Build Ranking File
          2. Run Ranking Reports
          3. Build Movement File
          4. Run Movement Report
        6. E-Book Trans Detail
      2. Tender Reports >

          1. Tender Detail by Reg# by Tran#
          2. Summarized by Register
          3. Summarized by Store
          4. Detail with Account Information
          5. Summarized by Cashier Code
          1. Tender/Register Summary
          2. Consolidated Register Summary
          3. Sales Tax Summary
          4. Register Parameter Screen
          5. Credit Card Detail
      3. Inventory Reports >

          1. Daily Sales Detail
          2. With Sales in Last Seven Days
          3. Inventory Movement Report
          4. Inventory Movement by Time
          5. Same SKU in Multiple Modules
      4. Data File Listings >

        1. Department List By Dept Code
        2. Class Reports >
        3. Vendor Order Address List
        4. Sales Entry Messages
        5. Catalog QOH Report
        1. Cashier Listing
        2. Employee Listing
      5. Employee Reports >

        1. Transaction Detail by Employee
        2. Transaction Summary by Employee
        3. Employee Time
        4. Employee Sales By Employee By Time Interval
        5. Employee Sales By Time Interval By Employee
        6. Percent Employee Sales
      6. Miscellaneous Reports >

        1. Voucher Special Order Report
        2. Gift Card Report
        3. Cap & Gown Report
        4. Miscellaneous Voucher Report
        5. Departmental Vouchers
        6. Suspended Transactions Report
        7. Discount Summary
        1. Tax Report From POS.STD
        2. Tax Report From POS.TES
        3. Supervisor Authorizations
        4. Percent of Trans. per Register
        5. Neg Accounts Listing
        6. A/R Customer Report
    1. Buyback Reports >

      1. Dollars Spent Report
      2. Buyback Audit Report
      3. Buyback Detail Report
      4. Transaction Inqiry
    2. Register Errors
    3. User Audit


Custom Reports Through Query Builder

The TCS Query Builder is a very powerful tool for users of SmartSuite to customize or create new reports that more specifically meet their needs.

The Basics

Verbs Can be either SORT or LIST. List is random and SORT is ordered.
Filename The SmartSuite system is comprised of several data files unique to each module.
Dictionaries Each data file has its own unique set of dictionaries that define how data fields are represented.
Selection Criteria The rules you define to limit the volume of data to be included on a report.
Sort Criteria The rules you set to define how the data will be sorted.
Output Criteria The columns that will be included on a report.


Nearly 100% of the reports in SmartSuite utilize the same rules that the Query Builder does. We just add a more complex screen for your parameters and do a few more technical things.

The best way to create a query is to start from an existing one. If you don’t have an existing one then choose one of the system reports and see how we did it. Try to run a report that contains similar data to what you would like to create. For example, if you are going to create a report to display sale information, then use a Sales report as a reference. This way you can see what filename we are pulling sales data from and can use that same filename in your query.

You can see our query string by running the report but instead of selecting terminal, or printer, etc. choose the option to show the Command String.

Here’s a simple command from POS-RP-04-21 (Cashier Listing).

This has a Verb (SORT), a Filename (POS.EM), and Output Criteria (NAME.15 SECURITY.LEVEL.8 MISC.INFO.40. There is also a HEADING.

Screen Elements

Here’s an example of a query created by an end-user for doing a sales export.

ID This can be alpha or numeric. It is just the name you want associated with the report and is assigned by the user.
Used By Can be left blank or filled in with the name of the person who will be the primary user of the report. (When you enter “??” in the ID field the list is sorted by Used By and then by Desc.)
Verb Use either SORT or LIST
Filename Enter “??” to view a list of all of the files for the database you are logged into (POS, TEXT, GM, etc.) This is where it is easier to use the Command String to see what file to use. After some experience you become familiar with our naming convention and the file names will make sense.
Selection Criteria Enter valid dictionary items. If you click on “??” you will see a complete list of the dictionaries for the file selected. Here is a list of the POS.EM file (employee master).

If you enter “Y” in the Prompt column then when you run the report you will be prompted for the value you want to use. Dates can be entered just like in our screens.

The “??” works the same in each area, so the explanation will not be repeated.

The “?” provides most of the information provided in this document.

Sort Criteria The report above is going to be sorted by DATE and then by KEY. Since it is using the SalesTransactionDetail file (POS.STD) the key is store*date*register*transaction.

Output Criteria This varies in that the 2nd column is for BREAKS. A Break is usually used to provide subtotals. It can also be used to create a logical break on the report. Break options include:

T Total the column

Y Break with no total

P When breaking start a new Page

D Only show the detail lines

U Underline the total

L Suppress and blank lines following a total or other break

Breaks can be combined to cause multiple effects.

Include Record IDs Frequently the ID to a file is cryptic and the data you are viewing is redundant to the ID (just formatted better); in this case enter an “N”. If you want to see the record IDs, then enter a “Y”.

Detail Lines If your primary interest is summary data then enter “N” for detail lines. The 1st time you run the report, or as you are developing it, leave this a “Y” to have a better feel for the data.

Column Headings This is almost always a “Y” but they can be turned off for exporting/importing.

Sample Size When developing the report, you may not want to wait very long for you to see what you will get. Enter number here and as soon as that number of detail records is reached the report will print (or display). We usually start with 10 and move up to 100 if necessary.

Grand Total Enter any wording you want to appear on a grand total line. The Mod: field is used to Underline any totals.

Heading This optional field will cause a heading to print at the top of the report.

There are 3 primary modifiers that can be used in defining a heading. They include:

L Create a Line Break

T Insert the Time & Date

P Insert the Page Number

Here’s a sample:


When you choose the Run option you will be prompted for any of the inputs you specified and then you will select where to print the report using the same options as all other SmartSuite reports.