Automatic Reports via Background Processor

Introduction

The Background Process allows you to set up recurring processes that either process data or creates reports. For Hosted accounts these reports can only be emailed. Self-hosted accounts can have reports emailed or printed on a designated printer. The process can be set up to run just once or repeatedly on a prescribed schedule.

If the process has dates or other parameters to be entered these can be set up as part of the process.

Job Parameters

In order to facilitate setting up a report you can select Run in Background from the Output Destination box. This will work with nearly all of your background processing needs.

Here is how this would work if you were to schedule POS report POS-RP-2-21 (Tender Register Summary).

  1. Do everything that you would normally do to run the report but select Run in Background instead of the Terminal or a Printer.

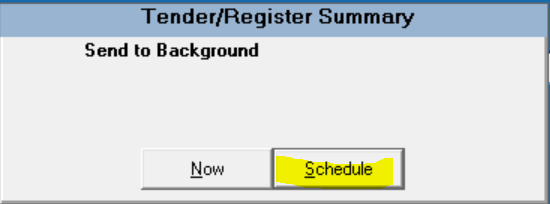
After selecting Run in Background the following box will appear. Select “Schedule”.

After selecting Schedule you are then prompted for a name to call this process. Enter a brief code, do not enter spaces.

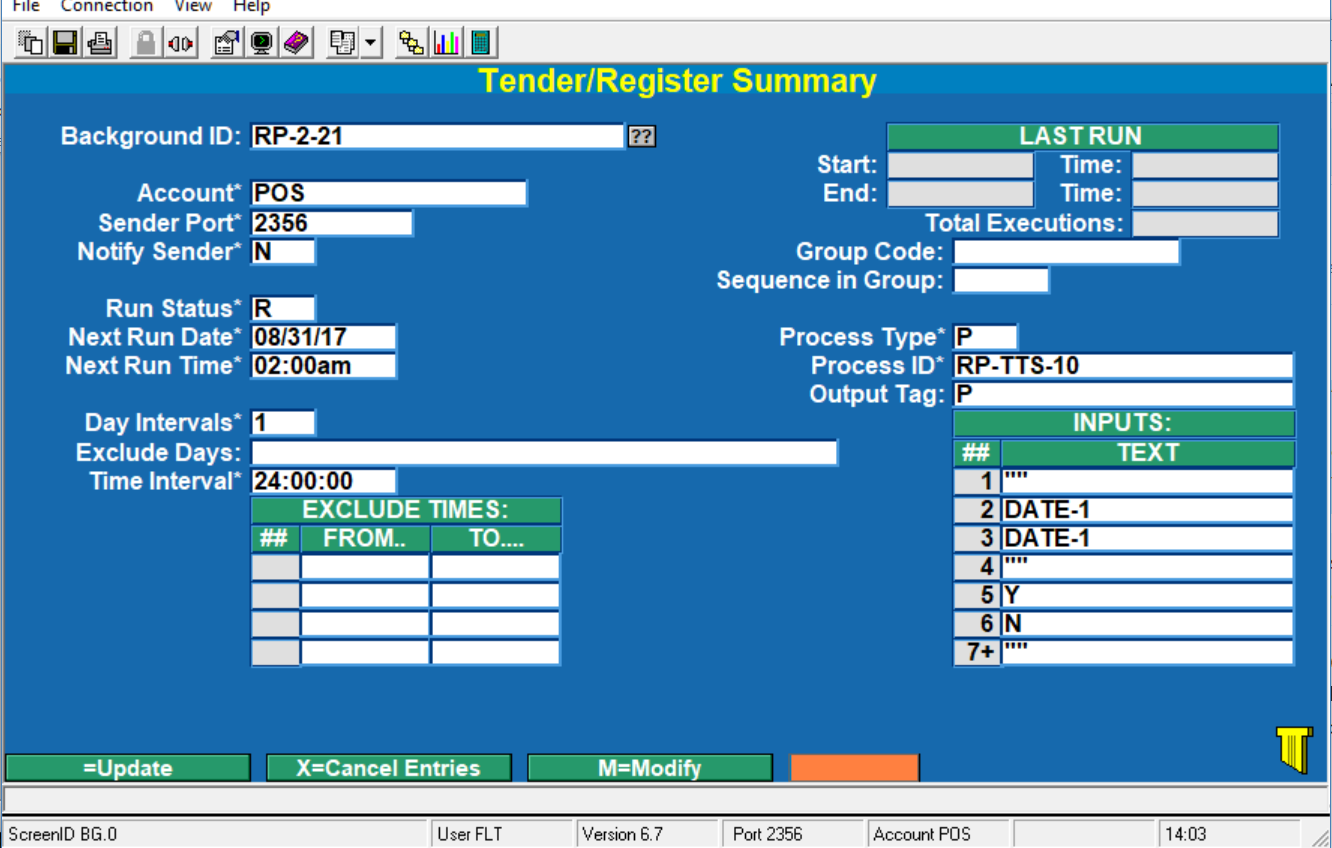
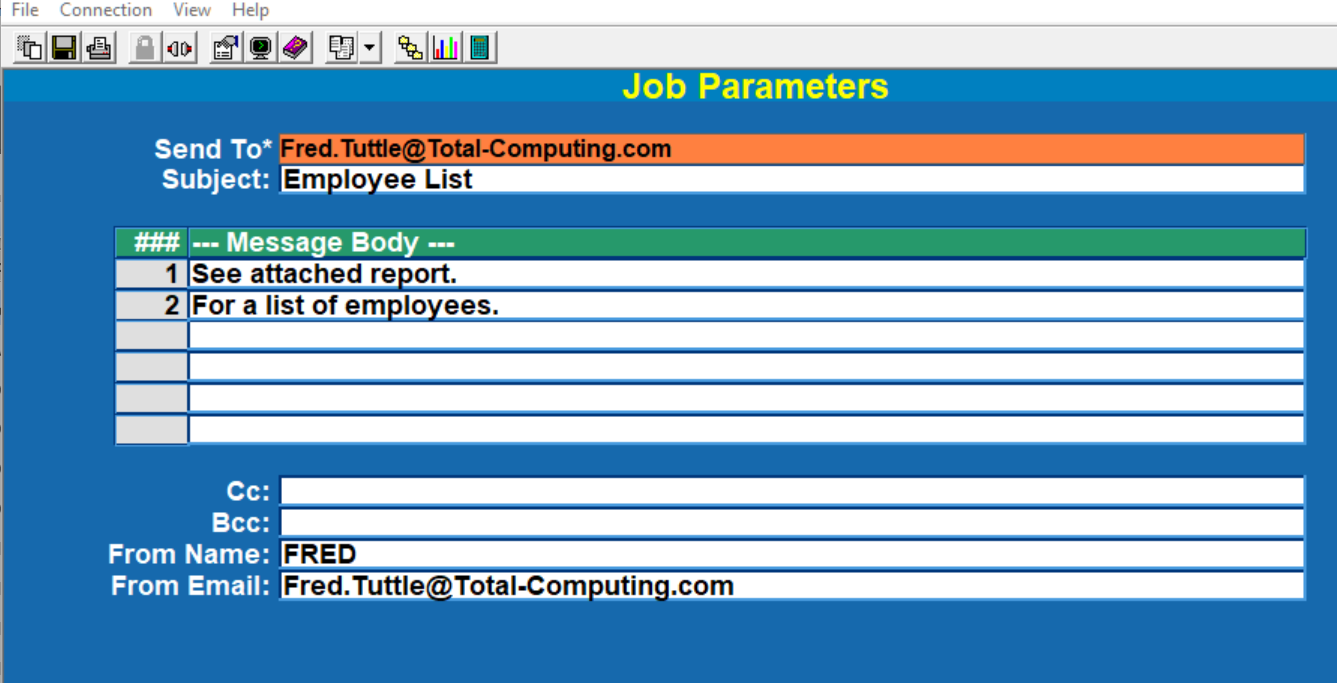
When you have chosen a name/code to call this process the following screen appears. This is the Job record that will be used to run this process on the schedule you specify.

This is the record that is created. Once you saved it you will be able to access through BG-01.

Field Definitions

  • Account This is the Account that the process will run from. It is strictly informational.
  • Sender Port Not used
  • Notify Sender Not used
  • Run Status R=run at scheduled time and intervals, I=run immediately (great for testing), and X=Stop from running. If this is set to “I” then it will switch to “R” once it has run.
  • Next Run Date The next date this process is set to run.
  • Next Run Time The next time this process is set to run.
  • Day Intervals This is how frequently you want to run the process.
    • 1 = daily, 7 = weekly, 14 = every two weeks, etc.
  • Exclude Days Enter the days that you do not want this process to run. Options include SUN, MON, TUE, WED,THUR,FRI, and SAT.
  • Time Interval This is how frequently in a given Day Interval you want this process to run. 1:00:00 is hourly, 24:00:00 is once per Day Interval.
  • Exclude Times Time ranges that you do not want the process to run.
  • Group Code This allows you to create groups so that processes run in the order you want.
  • Sequence in Group Where in this group the process will run.
  • Process Type There are three options based on the kind of process is going to run. Valid types include “T” for TCL/Command Line, “P” for Procsub (this is the majority of processes), and “TD” for TCL/Command Line with data being supplied by the INPUTS in this process.
  • Process ID Each menu option on the system takes you to another Menu, a Data Entry Screen, or a Process. Always use a Process. Nearly all process have a set of inputs that is used to define parameters for that process.
  • Output Tag This parameter is used to define printer and email options. It is discussed in detail below.
  • LAST RUN This box has the last run date and starting time, and the date that the last run ended and the time that it ended. Most processes take a minute or two at the most.

INPUTS: This is a list of any values as they will be needed by the process. In this particular example we have “” (press enter) three separate times. And then the word DATE twice. Since you are probably familiar with this report this values would look familiar. Other values on the next screen include Y, N, D, N, etc.

When DATE is used there are three options:

DATE This is today’s date. Use this if the scheduled run date is for the current date.

DATE+n This is today’s date + n days.

DATE-n This is today’s date – n days.

It is recommended that you run a process a at lease an hour prior to midnight and some time after midnight.

Output Tag

The Output Tag is used to indicate if the process is to be printed or emailed.

If Printed (Self-Hosted users only) enter a “P” in the field. If emailed enter “E” in the field.

Printer Output Tag

When selecting Printer the following appears.
*NOTE: Printer output is only available for self hosted systems. Customers running on the hosted environment will need to use the email output.

Select your printer options.

Email Output Tag

When selecting Email the following appears. Enter the fields as they best match your requirements. If you have already entered the fields and just want to make some adjustments then after entering “E” your prior settings appear (as in this example).

You can have multiple email address by separating them with a comma.

Managing Backgrounds

The background process is managed by selecting option “BG” at the bottom (or common section) of the screen. This is available in all modules and can be ran by entering BG into the menu selection field even if you do not see a button on screen.

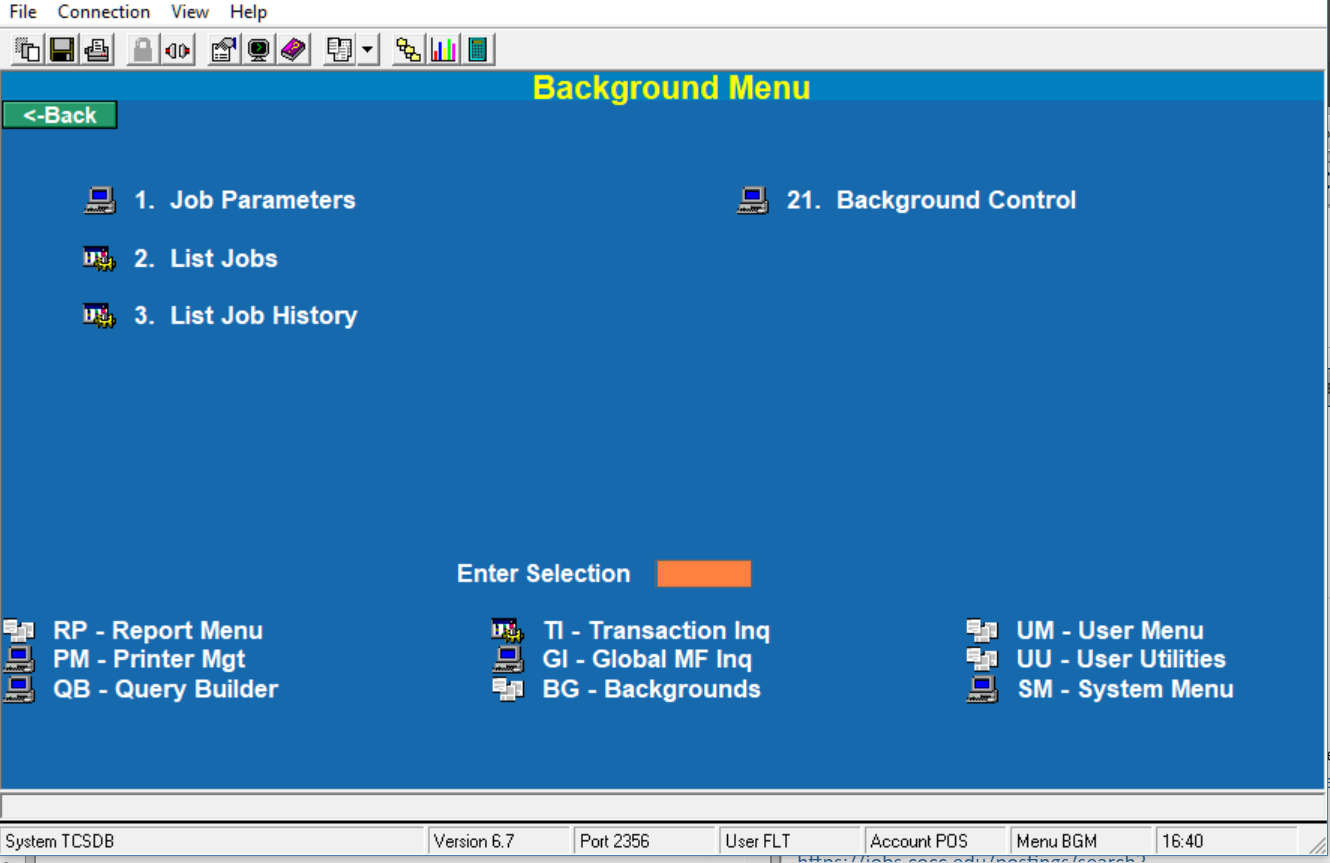
When you select BG the following menu is displayed.

  1. Job Parameters was discussed in the prior section.
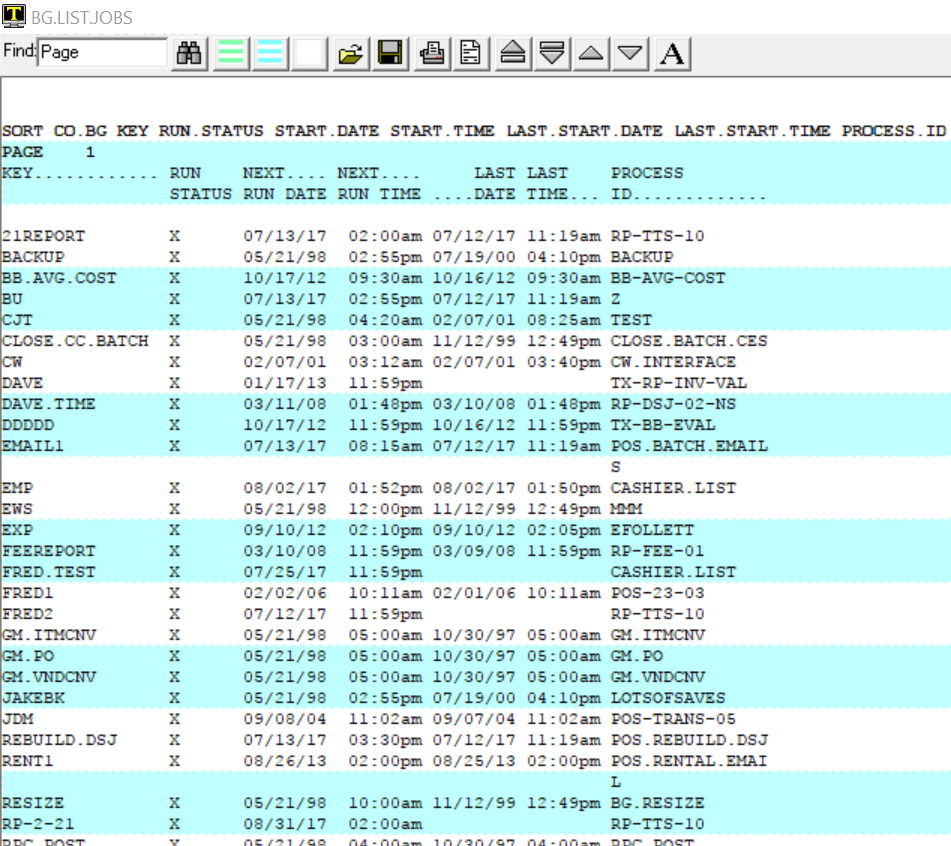
  2. List Jobs will give you a report of all of the jobs that have been setup on your database. You will notice on the following list that there are many different jobs that can be set up.

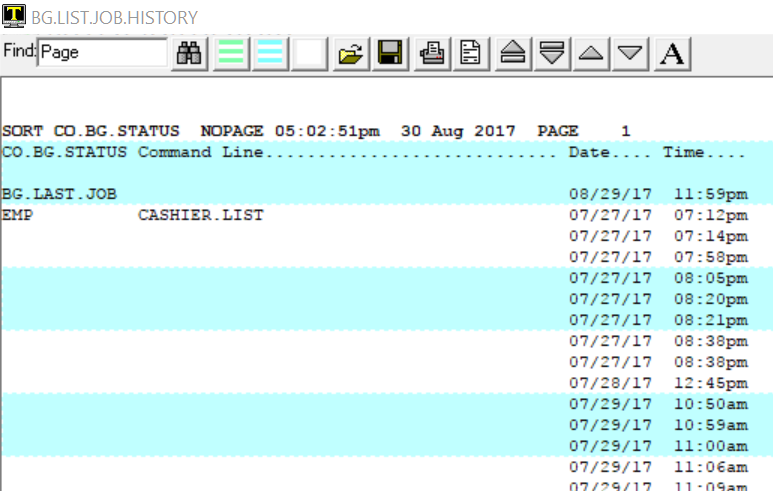
  1. List Job History shows a list of the last 50 times that a job was processed.

21. Background Control is where you start and stop phantom jobs. The only job that you should stop is BG.PROCESSOR. All other phantoms are controled by their own process.

To Stop a Job click on the row that has BG.PROCESSSOR on it then click on Stop a Job.

To Start a Job simply click on Start a Job.

After you do either one of these you may experience a short pause. This is caused by the system monitoring the process to make certain that it was started or stopped.

Email Notification

Self-Hosted users may choose to have reports print to a specific printer or sent via email. Hosted users are limited to reports that are emailed only.

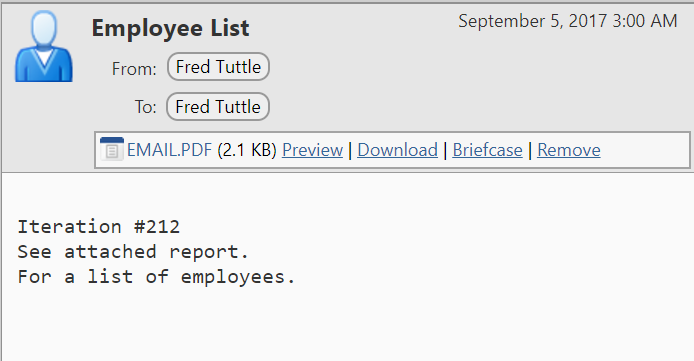
When an email is sent it will have the Sequence/Iteration number of the report included in the body of the email. The email will look similar to this.

The EMAIL.PDF attachment is the report that was scheduled to run. This is the 212th iteration of this Employee List.


POS Training

Screen Look and Feel

The cash register is the heart of the TCS system. It is used for sales, returns, buybacks, mail order transactions, and others.

From the Main Menu, select the Cash Register option to get to the Sales Entry screen (POS-1). Some logins can be designed to skip this step and automatically logon to the Cash Register.

The screen can be divided into three main parts; Upper, Main Sales Entry, and Tender / Totals.

Upper – The Upper portion of the Cash Register screen contains all the information about the transaction itself. The Sales Clerk field defaults to the individual logging onto the register. The Tran Type field determines the type of the transaction. The Tran Number field is a sequential counter for that specific register. The Store field defaults to the store number. The Date defaults to the current date. The Register number is a unique identifying number for that register. All of these components are vital in identifying each individual transaction, and are printed on the register receipt.

Main Sales Entry – This is where all of the individual items are entered into the register. Items can be scanned in using the register scanner or entered manually using the keyboard. Many of the programmable function keys of the keyboard will be used in this area.

Tender / Totals – This is where all your tenders will be entered. You will also see the sub-total, tax, and total amounts here.

Exiting

  1. Use the ‘EXIT’ key to exit out of the Cash Register screen. You may exit out of and return to the cash register screen as many times as you wish. Exiting does not close out your register or zero out any totals. When you return to your register screen, you will be able to continue with your normal sequence of transactions.
  2. To get back to the Cash Register screen, follow the directions for ‘Logging On’.
  3. Make sure you use the EXIT key only while the cursor is at the ‘TRAN TYPE’ field. If you use the EXIT key while in the middle of a transaction, it will act like the ‘TRANSACTION ABORT’ key and will nullify any information you have entered during your present transaction. Transaction Types

The following are the commonly available transaction types with a brief description. Other transaction type may also be available. Special transaction types can be protected with a security level and/or either the user’s password or a special password.

For a complete list for your system, select the ?? Either at the register’s Tarn Type field or at Transaction Type Maintenance (POS-2-5).

Open – This is used to open the register. Until the register has been opened, no transactions can be run on the register.

SA – This is used for most Sale transactions. Since this is usually set as the default Tran Type there is no function key setup. At the end of each transaction, the cursor will default back to the Tran Type field. AR sales have their own sales Tran Type.

RT – This is used for most Return type transactions. To use this Tran Type, either type in the RT code or press the function key labeled Return. AR Returns have their own Tran Type.

AR – This is used for all Accounts Receivable / University Charge type transactions.

ARRT – This is used for Returns of Accounts Receivable / University Charge type transactions.

ROA – This is used for Accounts Receivable / University Charge payments made at the cash register (Received on Account).

BB – This is used in conjunction with our TEXT module. The Buy Back transaction type will assist you in buying back textbooks.

PV – This Post Void transaction will void out any previously completed transaction. Security restrictions can and should be placed on this tran type.

RR – This is used to reprint a Receipt.

NS – No Sale to open the cash drawer.

X – The X is used to get an ‘X-REPORT’. This is used when you are ready to count and reconcile your drawer. The x-report will give you all totals for sales and tenders since the last time your drawer was set back to ‘zero’ through a z-close. The x-report will not zero out any amounts.

CLOSE – The CLOSE key is used to do a ‘Z-CLOSE’ when you are ready to close out the register and do a final reconciliation of the drawer. The z-close will close out the register and zero out any totals. The z-close report will give you all the same information that the x-report does.

Tender Codes

The Tender Code determines whether the transaction will be processed by credit card, debit card, cash, check or by other means. The most common tenders are listed below with a brief description. All of these tenders have a function key assigned to them.

Multiple tenders can be used until the total amount of the amount due is paid.

CASH – Used in accepting cash as the method of payment.

CHECK – Used in accepting either a personal or business check as a method of payment.

CREDIT CARD – Used in accepting credit cards as the method of payment. The system can be setup to accept Visa, Master Card, American Express, Diners Club, as well as others.

DEBIT CARD – Used in accepting debit cards as the method of payment. Unless a “Debit Card” system has been setup at the University, this will usually not be an option. Visa type debit cards will normally be processed as a credit card unless a ‘pin’ number is required. Special setup is required to accept cards using a pin number.

GIFT CERTIFICATE – Used in accepting system-generated gift certificates as the method of payment.

ACCOUNTS RECEIVABLE – Used in most cases of Accounts Receivable / University Charge type transactions.

Entering Transactions

From the Main Menu, select the Cash Register option to get to the Sales Entry screen (POS-1). Some logins can be designed to skip this step and automatically logon to the Cash Register.

  1. The Sales Clerk field is filled in automatically by the system with the name of the person currently logged in.
  2. In the Tran Type field, enter the transaction type that you would like to use. You can see a list of transaction types by selecting “??.” Each register can have a default transaction type set. (usually Sale) If you wish to close the register, enter the transaction type that is set up to close the register; if you wish to open it, enter the transaction type that is set up to do so. Upon first entering the register (anytime after the register has been closed), the transaction type of OPEN will automatically appear.
  3. The Tran Number field is automatically filled in with a sequential transaction number. The Store field is automatically filled in with the store number from the register parameters. The Date field is automatically filled in with the register date. The Register field is automatically filled in with the register number from the register parameters.
  4. In the Qty/Sku/Mod field, you can enter a SKU, an ISBN, a quantity, a merchandise class code, or a modifier. To change the quantity, enter the new quantity then press the Quantity key. The Qty field should change to reflect the new quantity. You can select a SKU or ISBN by entering the item name, title, or other cross-reference term.
  5. The Description field is filled in automatically. If the SKU or ISBN that you enter doesn’t have a price associated with it, you must fill in the Price field with the appropriate price. The Extended field is calculated by multiplying the value in the Price field with the value in the Qty field.
  6. To move from the item entry section of the cash register screen to the tender entry section, press the Total key. When the Total modifier has been entered, the Sub Total, Sales Tax, and TOTAL fields are automatically filled in.
  7. In the Modifier or Tender field, enter the tender amount followed by the tender code. For three dollars in cash, you would enter “3.00” and then press the key for the tender that you wish to use. You can also enter a modifier in this field to void an item or transaction, return to the item entry section, apply a discount to the transaction, and the like.
  8. Once you have entered enough tenders to meet or exceed the total amount due, the system will tell you the amount of change that should be given to the customer. It then gives you the option to continue or reprint the receipt. Once you press [ENTER] to continue, you will be returned to the Tran Type field to begin a new transaction.

Scanning Items

Scan in the item with the hand-held scanners. You may scan a manufacturer’s bar code, or a system generated bar code. To scan, press trigger on scanner while holding over bar code. Try not to move the scanner around too much while scanning for better scanning results.

Manually Entering Items

By SKU

Enter in the item number. When you manually enter the number, the number must match exactly as it is in the Master File. The system will not accept only part of the number.

By Description

Enter in any part of the description of the item. The system will match exactly the description you tell it to. For example, if you type in “SHAM”, it will pick up ‘Shampoo’ as well as ‘Shamrock’, but will not pick up ‘Shmp’(as an abbreviation for Shampoo).

If a ‘List Box’ is displayed, you may scroll through the list until you find the item you are looking for. If you do not find the item, you may want to try under a different description. When you have located the item in a list box, choose the corresponding number to the left of the item.

Modifying Items / Transactions

Changing Quantities

Enter in the quantity amount of the item being purchased.

Press the ‘QUANTITY’ key to accept the amount entered.

Continue entering items or press Total to complete the transaction.

Applying Discounts

There are several different keys defined to apply a percentage discount or a dollar amount discount.

Changing Tax Status

Use the keys defined to modify the tax on an item or for the entire transaction.

Price Changing

Press the ‘PRICE CHANGE’ key if the price displayed is incorrect, or if there is a special sell price for the item.

Enter in the new price of the item as indicated by the prompt in the bottom left hand corner of the screen. When the new prompt displays, it will show as a markdown at the line item level, but will reflect the correct pricing at the sub-total line.

Complete the transaction as you would any other transaction.

The ‘PRICE CHANGE’ key will only work for the line item most recently entered. If you need to change the price of a line item other than the one that you have just entered, you will not be able to use this key.

Precautions should be used to password or set security levels on this key to prevent unauthorized use.

Canceling items

To cancel the last lined entered:

Press the ‘CANCEL LAST LINE’ key when you want to cancel the last line item entered in the sales entry screen.

Resume entering in items or press total to complete the transaction.

You may only cancel the last line item only once. Though you may use the ‘Cancel Last Line’ key multiple times throughout the transaction, you can only use it once per line.

To cancel any line:

Press the ‘CANCEL ANY LINE’ key.

Enter in the line number of the transaction you wish to cancel.

The ‘Cancel Any Line’ key may be used multiple times during any transaction.

Other Register Functions

Global Inquiry

Press the ‘ITEM INQUIRY’ key to look up an item.

Scan or manually enter in the item in question.

Press the enter key to exit out of the item.

Press the enter key to return to the Cash Register screen.

The item inquiry key can be used at any time while in the cash register screen. When you return to the cash register screen, you will return to the point you left. You may use the item inquiry key as many times during a transaction as you wish.

Gift Certificates

Purchasing a Gift Certificate:

  1. Press the ‘Gift Cert Purchase’ key.
  2. Enter in the information in the field on the display. (fields are optional except the value field – enter in the value of the gift cert) It is recommended that you fill in the “Purchased By” and “Purchased For” fields.
  3. As you fill in the amount of the gift certificate on the actual gift certificate, you must write down the voucher number on the gift certificate! The voucher number is automatically given to you when you press the ‘Purchase Gift Certificate’ key. The number is located towards the top left hand corner of the screen with the prompt of “Voucher Number:”
  4. After you have filled in all the necessary information for the gift certificate, and only after you have written the amount and voucher number on the gift certificate, press “Enter” to ‘Save’ the gift certificate to the system.
  5. Continue on with your transaction as you would any other transaction.

NOTE:

You may purchase multiple gift certificates per transaction (if they are buying 2 $20.00 gift certificates, you will be processing two different gift certificates in the system and they will have two separate ‘voucher numbers’.

Only sell a gift certificate during a “SALE” transaction since that is what you are doing – you are ‘selling’ an item to them.

Redeeming a Gift Certificate:

  1. After entering in the items the customer is purchasing and you have pressed the total key, press the “Gift Certificate” tender key.
  2. At the prompt “Enter Voucher Number”, enter in the voucher number written on the gift certificate.
  3. Validate the gift certificate through the receipt printer.
  4. Complete the transaction as you normally would.

Line Item Memo

After entering an item to purchase, you can press the “Memo” key to add a free form text message that pertains to that specific item. The text message is displayed with the previous item.

If you want the memo text printed on any receipts as well…

  1. Select each receipt header (POS-3-3)
  2. Select <R>=Receipt Detail
  3. Add a new line number under NewL
  4. Set how many spaces you want the memo text Indented.
  5. Set MEMO as the Attribute.
  6. Set Mask to L#nn, where nn plus the indented amount doesn’t exceed the number of spaces available on the receipt (typically 40).
  7. You can enter any Comments that you wish.

Suspend

  1. You can suspend any SALE transaction as long as you have not placed a Tender (form of payment) towards the transaction.
    1. Process the Sale transaction as you would any other transaction.
    2. After all items have been entered into the register, press the Suspend key.
      1. The suspend key can be pressed while in either the sales entry screen or in the tender area.
    3. At the prompt Enter the customer’s name, enter the name of the customer for whom you are suspending the transaction.
      1. Once you enter the customer’s name and press the enter key. The system will move the transaction to a separate file and you will be returned to the Cash Register screen.
  2. To get a report on your suspended transactions;
    1. From the POS Master Menu, choose the RP option for the Report Menu.
    2. Next choose option number 6 for Miscellaneous Reports, then option number 5 for the Suspended Transaction Report.
  3. You can choose to print the report to your screen (terminal) or to the printer.

Resume

  1. To resume a suspended transaction, press the Resume key when the cursor is at the Tran Type field.
    1. Choose the transaction that you want to resume from the list of transactions.
  2. Complete the transaction as you would any other transaction.

Item Exchange

While in the Sales Entry’ screen, press “Enter” to accept the default tender of “SA” for a sale transaction.

  1. Enter items as you would a normal sale transaction.
  2. To enter a ‘return’ item:
    1. Press the “ITEM EXCHANGE” button
      1. (If you have more than one of the same item being returned, enter in the amount being returned then press the item exchange button — if two items are being returned, press “2” then “ITEM EXCHANGE”)
    2. Enter the item by scanning, manually entering the SKU number, or by description.
  3. When you are through entering in items being sold or returned, press the “TOTAL” key.
  4. Complete the transaction by entering the amount tendered

Store Credit

Issuing a Store Credit

  1. A store credit can be issued any time the balance owed (the total) is a negative balance (whether through a return or exchange). If you have a negative balance after you have pressed the ‘Total” key, press the “Store Credit” key.
  2. A small window will display where you must fill in the name, address, and phone. All the fields in the window are required fields. It is recommended that you enter their name, their ‘company’ or ‘squadron’ for the address, “WP” (for West Point) for City, ST Zip, and then a phone number (any phone number will do)
  3. Press “Enter” to save the store credit to the system.
  4. Make sure you give the customer the receipt. The receipt will have the voucher number on it, and they must provide the receipt in order to redeem their store credit.

Redeeming a Store Credit

  1. After entering in the items the customer is purchasing and pressing the total key, press the “Redeem Credit” key.
  2. At the prompt “Enter Voucher Number”, enter the voucher number that is on their original receipt.
  3. Complete the transaction as you normally would.

Aborting (Voiding) a Transaction

Press the ‘TRAN ABORT’ key when you want to cancel any transaction.

The Tran Abort key can be used any time during the transaction to cancel it out. A transaction is not completed until a Tender amount and Key have been entered. Once a Tender Key has been pressed you must complete the transaction you are on. You must then use the ‘Post Void’ key to cancel out the transaction.

Special Orders

Overview

Special Orders are used when an item that is not in stock is placed on order by a customer. The order can then be added to another PO going to the same vendor, or created specifically for that customer. When the order arrives, the customer will then be notified to pick up the item. The following document shows how Special Orders work with the TCS software.

Special Orders are used for items not in stock. Three major processes are involved: Placing the Special Order, Receiving the Special Order, and Picking up the Special Order by the customer.

Placing Special Orders

  1. In Cash Register Screen in POS, enter a regular Sale transaction type.
  2. Hit the Special Orders function key you have set up.
  3. Enter the information to go on the Special Order. If a deposit is entered, this amount will be added to the Balance Due.

Special Order Maintenance

  1. There are two ways to get to the Special Order Entry screen (POS-24-1). If you wish to enter a new special order, you must access the screen by selecting the Cash Register option from the Main Menu and then entering “SPO” as the transaction type. If you are going to modify an existing special order, you can access the screen from the Main Menu by selecting the Special Orders option followed by the Maintenance option.
  2. In the Special Order ID field, enter a period to assign the next available ID number to the new special order. If you are modifying an existing order, enter the ID number assigned to that order, the name of the customer, or enter “??” to see a list of existing orders.
  3. In the Customer Name field, enter the name of the customer who is placing the order. If the customer is representing an organization, enter the name of that organization in the Organization field.
  4. In the Primary Phone field, enter the primary phone number where the customer can be reached.
  5. In the Secondary Phone field, enter any other phone number where the customer might be reached.
  6. In the Address fields, enter the customer’s address.
  7. The Date of Request field is automatically filled in with the current date. If the customer requested the items earlier, you can modify it.
  8. In the Deposit Field, enter any deposit amount that the customer will pay on the items.
  9. You can enter up to three lines of notes in the Call Notes field.
  10. In the SKU field, enter the SKU of the item that is being ordered. The Description field is filled in automatically.
  11. In the QTY field, enter the quantity that the customer wishes to order.
  12. In the Special Instructions field, enter any special instructions on the handling of the item.
  13. If the customer picks up the items, enter the number of items picked up in the Picked Up field. The Date Picked Up field is automatically filled in with the current date, but it can be modified.
  14. Repeat steps 10 through 13 for each item you would like to order.
  15. Press [ENTER] twice to save the order.
  16. If you want to create Pending Orders for the items, enter “Y.” Otherwise, enter “N.”
  17. Optional Step: For GM or TRADE create a Pending Order. For Text items, add them to a Manual PO.
  18. Finish the Sales transaction.
  19. Print off a copy of the receipt for the customer and a copy for ordering personnel.
  20. Log into the module where the item exists (GM, TRADE or TEXT).
  21. Place the Order. (Cancel if you discover an order is not necessary).

Receiving Special Orders

  1. Enter a receiving log as normal.
  2. If there are any outstanding Special Orders in the master file, a comment will be automatically be added to each line item with special order quantities.
  3. Optional: Print special order tags to tag items with person’s
  4. Optional Step: For GM or TRADE name, phone, address, title, author, special order number, date. You must have a Special Order tag code setup (SPO tag type).
  5. Optional: Place special order tags on items.
  6. Notify customer that item has arrived.

Picking up Special Orders

  1. Customer picks up special order items.
  2. Customer takes items to the cashier.
  3. Do a regular Sale transaction.
  4. For the line items enter the Special Order Pickup Modifier. (To set this up go to Special Order Pickup Modifier.
  5. This will take you into Special Order maintenance. Put in the quantity being picked up.
  6. The program will automatically add these items to the current transaction.
  7. Total the transaction.
  8. At the tender code entry, if a deposit was made on the special order, enter the amount of the deposit. For the tender type use the Special Order tender. (To set this up go to Special Order Tender Key)).
  9. You will be prompted once more for the special order id, enter it.
  10. Use any other tender type to pay for the remaining portion of the sales transaction.

When all items are picked up, the special order will be flagged with a “P” status as “Picked up”.


Mail Orders & eCommerce also known as Web Order Processing

Fluency in basic POS functions is required. This document will not attempt to train basic POS functions, except as they will apply to MO and eCommerce

The primary difference between a Mail Order and an eCommerce order is that the eCommerce order is pre-loaded by the customer over the Internet and is stored in the Suspended Transactions File while awaiting store action.

From the POSiTrak Main Menu, choose 1 or MO or choose option 26 (and then 1). Some logins can be designed to skip this step and automatically log the user onto the Mail Order Menu.

The menu is divided into four parts; Order Entry & General Parameters, Maintenance & Inquiry, Reports, and Freight.

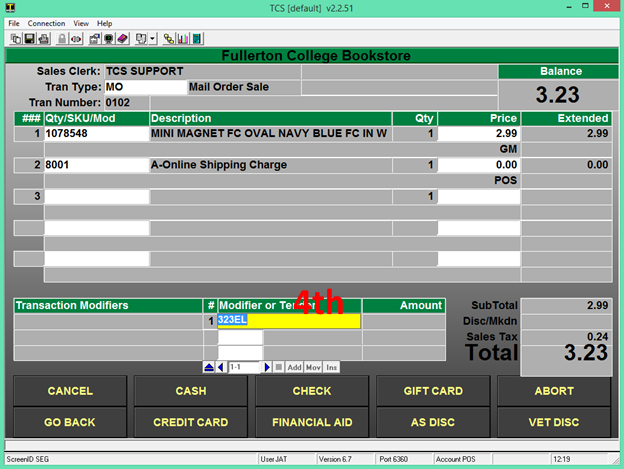
Sales are entered the same way that a regular walk-in customer is handled with only a few exceptions. The Sales Screen is divided into three parts.

  • The Upper portion of the Cash Register screen contains header information about the transaction. The Sales Clerk field defaults to the individual logging onto the register, the Tran Type field determines what type of transaction is being used and is either MO or MORT for Sales and Returns, the Tran Number field is a sequential counter for that specific register, the Store field defaults to the store number, the Date defaults to the current date, and the Register number is a unique identifying number for that register, Customer Name and Confirmation Number. All of these components are vital in identifying each individual transaction, and are printed on the Pick List and Invoice.
  • Main Sales Entry – This is where all of the individual items are entered into the register. Items can be scanned in using the register scanner or entered manually using the keyboard. Many of the programmable function keys of the keyboard will be used in this area. eCommerce and Suspended transactions will have this portion preloaded with the merchandise purchased.
  • Tender / Totals – This is where all your tenders will be entered. You will also see the sub-total, tax, and total amounts here.

Exiting

Use the ‘EXIT’ key to exit out of the Cash Register screen.

You may exit out of and return to the cash register screen as many times as you wish. Exiting does not close out your register or zero out any totals. When you return to your register screen, you will be able to continue with your normal sequence of transactions.

To get back to the Cash Register screen, follow the directions for ‘Logging On’.

Make sure you use the EXIT key only while the cursor is at the ‘TRAN TYPE’ field. If you use the EXIT key while in the middle of a transaction, it will act like the ‘TRANSACTION ABORT’ key and will nullify any information you have entered during your present transaction.

If you do not have a preprogrammed keyboard you can type |Exit. (The “|” (pipe) symbol is usually above the enter key).

Transaction Types

The following are available transaction types with a brief description.

Open

This will be used to Open the register. Until the register has been opened, no transactions can be run on the register.

MO

This is used for most Sale transactions. Since this is usually set as the default Tran Type there is no function key setup. At the end of each transaction, the cursor will default back to the Tran Type field.

MORT

This is used for most Return type transactions. To use this Tran Type, either type in the MORT code or press the function key labeled MO Return. AR Returns will not use this Tran Type

X

The X is used to get an ‘X-REPORT’. This is used when you are ready to count and reconcile your drawer. The x-report will give you all totals for sales and tenders since the last time your drawer was set back to ‘zero’ through a z-close. The x-report will not zero out any amounts.

CLOSE

The CLOSE key is used to do a ‘Z-CLOSE’ when you are ready to close out the register and do a final reconciliation of the drawer. The z-close will close out the register and zero out any totals. The z-close report will give you all the same information that the x-report does.

Tender Codes

The Tender Code determines whether the transaction will be processed by credit card, debit card, cash, check or by other means. The most common tenders are listed below with a brief description. All of these tenders have a function key assigned to them.

Multiple tenders can be used until the total amount of the amount due is paid.

CHECK

Used in accepting either a personal or business check as a method of payment.

CREDIT CARD

Used in accepting credit cards as the method of payment. The system can be setup to accept Visa, Master Card, American Express, Diners Club, as well as others.

DEBIT CARD

Used in accepting debit cards as the method of payment. Unless a “Debit Card” system has been setup at the University, this will usually not be an option. Visa type debit cards will normally be processed as a credit card unless a ‘pin’ number is required. Special setup is required to accept cards using a pin number.

GIFT CERTIFICATE

Used in accepting system generated gift certificates as the method of payment.

ACCOUNTS RECEIVABLE

Used in most cases of Accounts Receivable / University Charge type transactions.

Entering Transactions

From the POSiTrak Main Menu, select the Cash Register option to get to the POSiTrak Sales Entry screen (POS-01). Some logins can be designed to skip this step and automatically logon to the Cash Register.

The Sales Clerk field is filled in automatically by the system with the name of the employee currently logged in.

In the Tran Type field, enter the transaction type that you would like to use. You can see a list of transaction types by entering “??”. Many of the registers will be defaulted to a transaction type of Sale. If you wish to close the register, enter the transaction type that is set up to close the register; if you wish to open it, enter the transaction type that is set up to do so. Upon first entering the register (anytime after the register has been closed), the transaction type of OPEN will automatically appear.

The Tran Number field is automatically filled in with a sequential transaction number. The Store field is automatically filled in with the store number from the register parameters. The Date field is automatically filled in with the register date. The Register field is automatically filled in with the register number from the register parameters.

In the Qty/Sku/Mod field, you can enter a SKU, an ISBN, or a modifier. To change the quantity, enter the new quantity then press the Quantity key. The Qty field should change to reflect the new quantity. You can select a SKU or ISBN by entering the item name, title, or other cross-reference term.

The Description field is filled in automatically. If the SKU or ISBN that you enter doesn’t have a price associated with it, you must fill in the Price field with the appropriate price. The Extended field is calculated by multiplying the value in the Price field with the value in the Qty field.

To move from the item entry section of the cash register screen to the tender entry section, press the Total key. When the Total modifier has been entered, the Sub Total, Sales Tax, and TOTAL fields are automatically filled in.

In the Modifier or Tender field, enter the tender amount followed by the tender code. For three dollars in cash, you would enter “3.00” and then press the key for the tender that you wish to use. You can also enter a modifier in this field to void an item or transaction, return to the item entry section, apply a discount to the transaction, and the like.

Once you have entered enough tenders to meet or exceed the total amount due, the system will tell you the amount of change that should be given to the customer. It then gives you the option to continue or reprint the receipt. Once you press [ENTER] to continue, you will be returned to the Tran Type field to begin a new transaction.

Scanning Items

Scan in the item with the hand-held scanners. You may scan a manufacturer’s bar code, or a system generated bar code. To scan, press trigger on scanner while holding over bar code. Try not to move the scanner around too much while scanning for better scanning results.

Manually Entering Items

By SKU

Enter in the item number. When you manually enter the number, the number must match exactly as it is in the Master File. The system will not accept only part of the number.

By Description

Enter in any part of the description of the item. The system will match exactly the description you tell it to. For example, if you type in “SHAM”, it will pick up ‘Shampoo’ as well as ‘Shamrock’, but will not pick up ‘Shmp’(as an abbreviation for Shampoo).

If a ‘List Box’ is displayed, you may scroll through the list until you find the item you are looking for. If you do not find the item, you may want to try under a different description. When you have located the item in a list box, choose the corresponding number to the left of the item.

Modifying Items / Transactions

Changing Quantities

Enter in the quantity amount of the item being purchased.

Press the ‘QUANTITY’ key to accept the amount entered.

Continue entering items or press Total to complete the transaction.

Applying Discounts

There are several different keys defined to apply a percentage discount or a dollar amount discount.

Changing Tax Status

Use the keys defined to modify the tax on an item or for the entire transaction.

Price Changing

Press the ‘PRICE CHANGE’ key if the price displayed is incorrect, or if there is a special sell price for the item.

Enter in the new price of the item as indicated by the prompt in the bottom left hand corner of the screen. When the new prompt displays, it will show as a markdown at the line item level, but will reflect the correct pricing at the sub-total line.

Complete the transaction as you would any other transaction.

The ‘PRICE CHANGE’ key will only work for the line item most recently entered. If you need to change the price of a line item other than the one that you have just entered, you will not be able to use this key.

Precautions should be used to password or set security levels on this key to prevent unauthorized use.

Canceling items

To cancel the last lined entered:

Press the ‘CANCEL LAST LINE’ key when you want to cancel the last line item entered in the sales entry screen.

Resume entering in items or press total to complete the transaction.

You may only cancel the last line item only once. Though you may use the ‘Cancel Last Line’ key multiple times throughout the transaction, you can only use it once per line.

To cancel any line:

Press the ‘CANCEL ANY LINE’ key.

Enter in the line number of the transaction you wish to cancel.

The ‘Cancel Any Line’ key may be used multiple times during any transaction.

e-Commerce

(These options will also work for Mail Order transactions.)

Resuming online Financial Aid Transactions

Split Tenders FA Transactions.

PosConnect/AR Split Tender

See details here http://tcs-training-wp.azurewebsites.net/dwkb/colleague-split-tender-checkout/

Setup

Please contact support to setup AR or POSCONNCECT Split Tender options.

Web Customer View

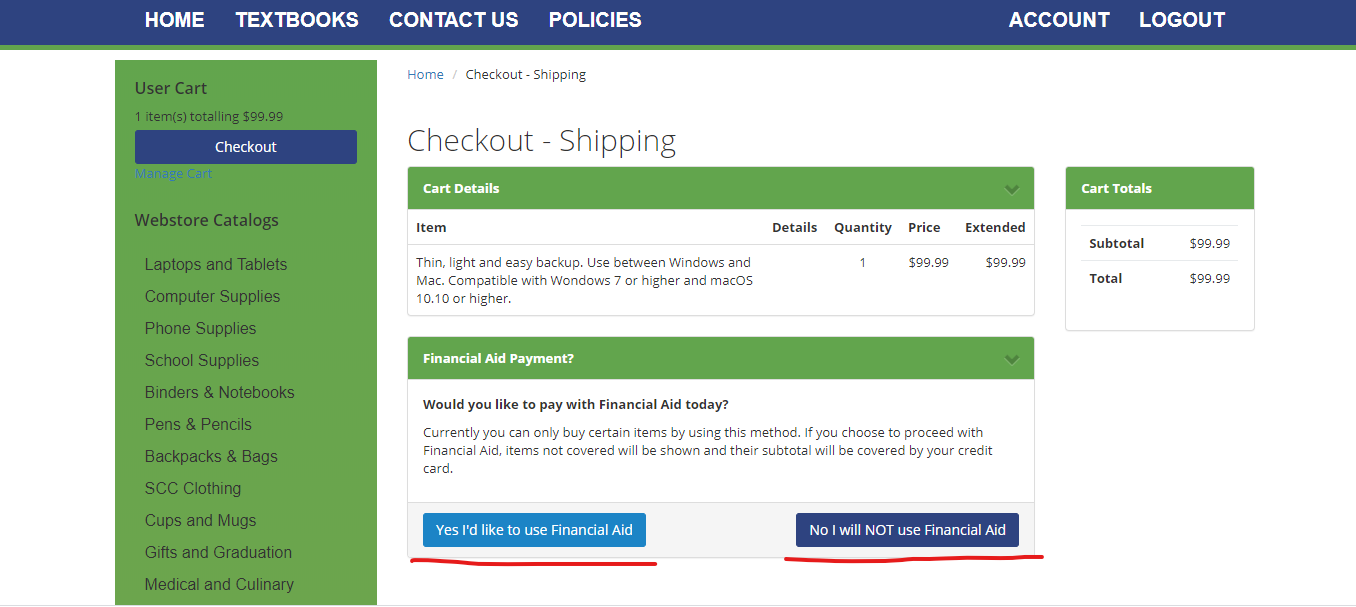
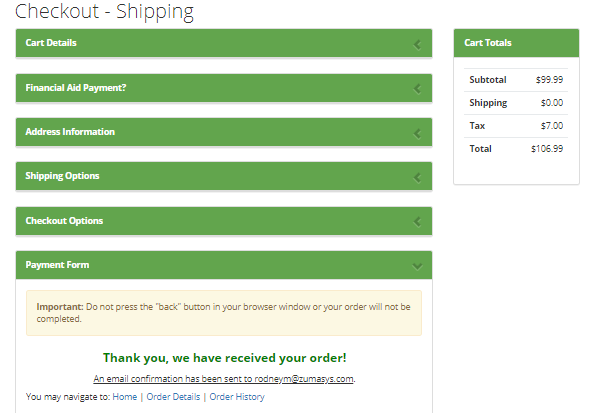
The change that you will see on the web is, as a customer, they will shop as normal. When they select the option to go to the cart the first thing they see will be the cart details and asking if the will pay with Financial Aid.

If they select ‘No I will NOT use Financial Aid’ then they will continue as normal

If they select ‘Yes I’d like to use Financial Aid’ as seen below.
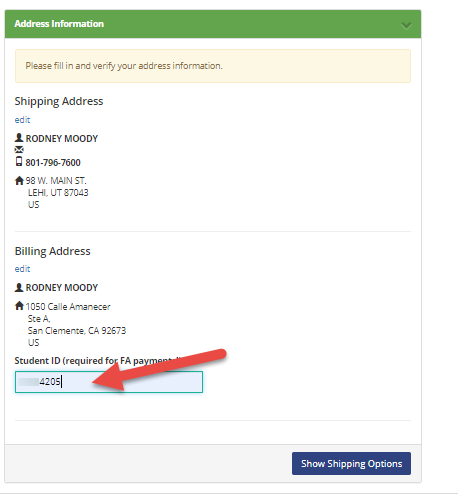
The customer will get presented with their address information to confirm/edit as needed and at the bottom of the screen they will need to enter in their student ID and then click on the ‘Show Shipping Options’.
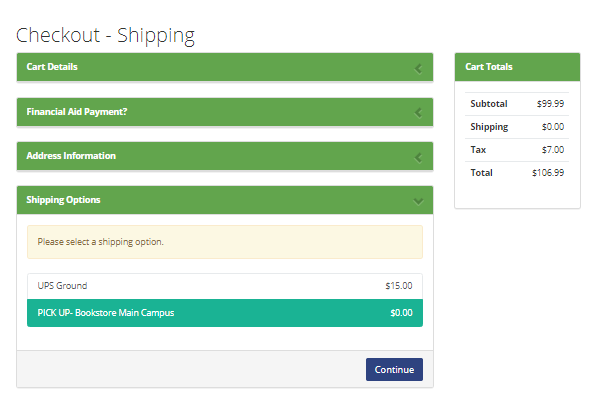
Now they will select their Shipping option from the list setup by the store.
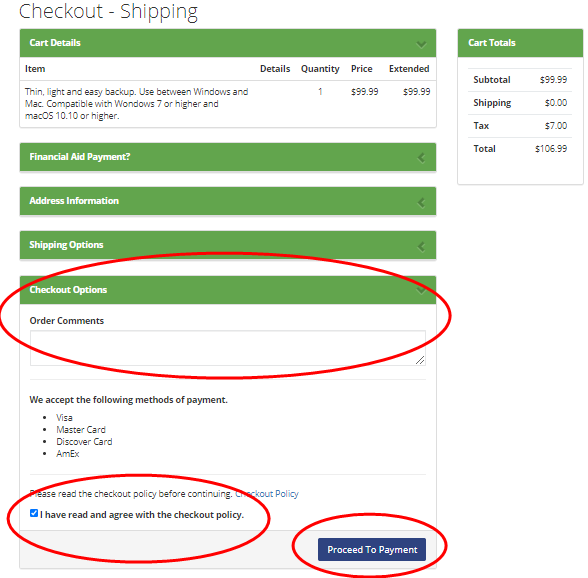
Enter in any Order Comments that are needed and then click/check the checkout policy box then ‘Proceed To Payment’.
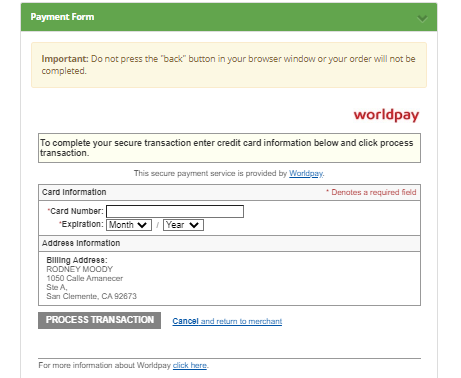
The customer will then need to enter in their credit card information, this will only be used if they order items that are not covered by the amount or type of aid the customer has.
And finally, if the customer will see a message thanking them for their order and then receive an email with the order information confirming that the order has been received.
Processing a Web Order

Once you have received your online orders you will need to resume the transactions on the system to fulfill and complete the purchases. *note that the card used to purchase the items is not changed until the resume transaction has been complete at the store. Online orders and the credit cards used for them are only verified valid and are not charged until the online order is completed in the store.

Your register must be open for the day in order to complete web transactions. Referrer to the general cash register training for Opening your register.

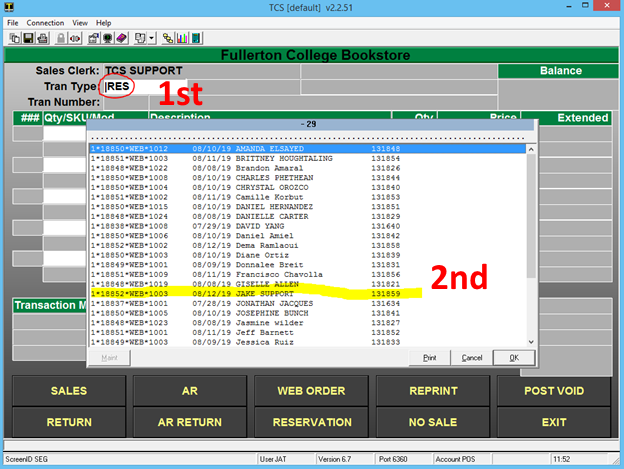
  1. Select the Transaction type Resume, Tap or Click the touch button, keyboard key or simple type |RES to bring up a listing of all pending orders on the system.
  2. Select the order you are completing from the list of suspended transactions displayed.
3. Your order will be displayed on the screen with the items the customer purchased in their online order. Review the items and remove, add or adjust and verify the contents of the order. *note that freight will display on pickup orders as a $0.00 dollar amount.

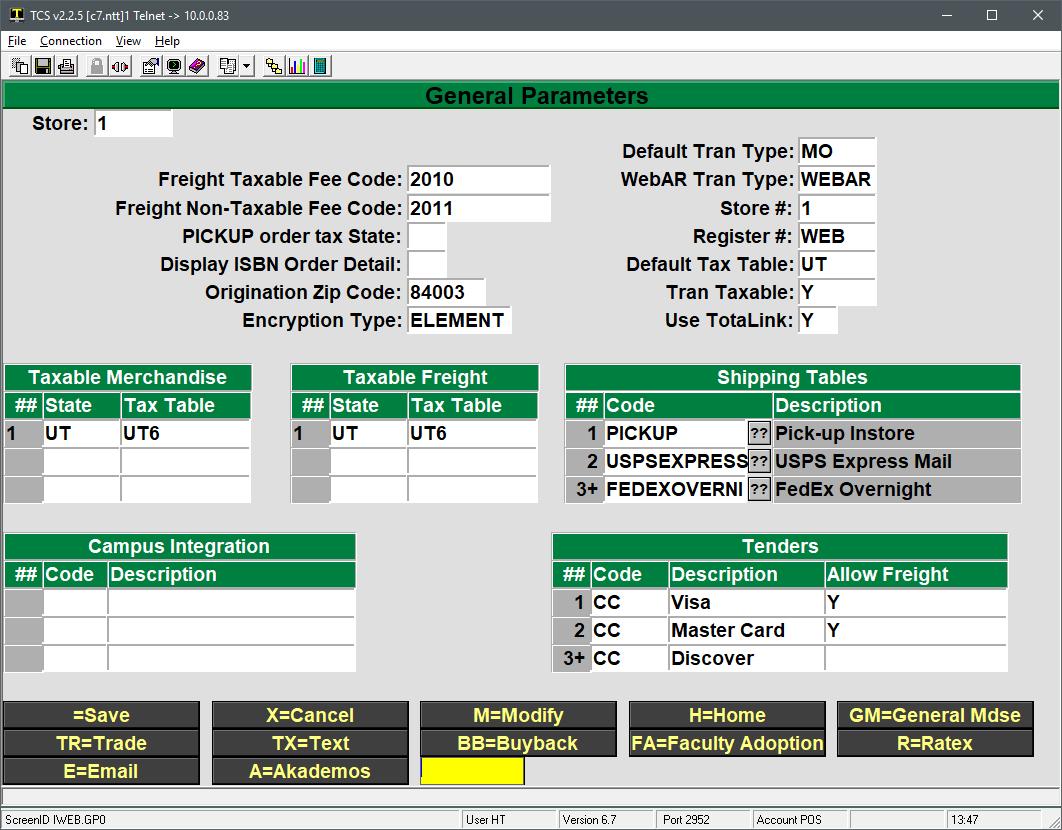
* If you modify the Freight you must use the Frieght modify option. This will be setup when the webstore and registers for processing online orders were setup (MOF) **

*If you modify the any item in the webtransaction you must use modify buttons that were created during the setup procedures.(MOM)**

*(MOM) and (MOF) are specific modifiers for online orders. Don’t you keyboard shortcuts for modifying web orders. example |LIM (line item modify) this will not work on a web transactions. 
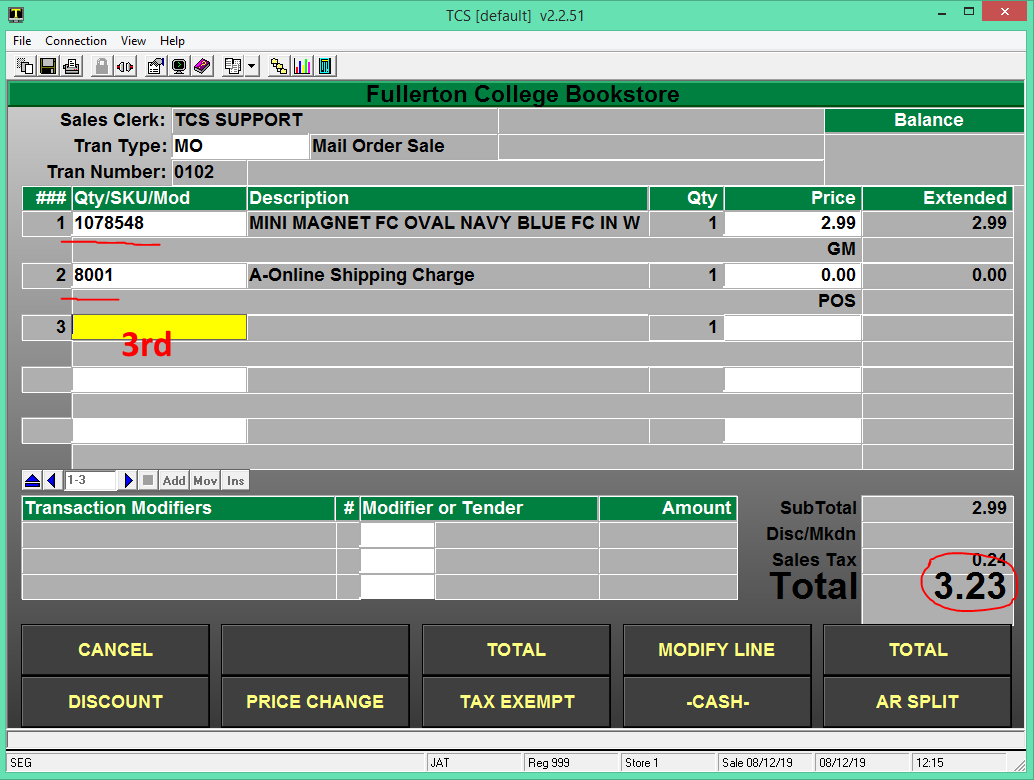
4. Totaling the online order will auto populate the tender code and transaction amount. You don’t need to do any modifications to the tender code unless the customer is using a different payment method than the one they used online to make the purchase.

  • Press enter through the tender field.

5. When the transaction is completed you will be prompted to proceed to the Next Transaction or to Reprint the current transaction.
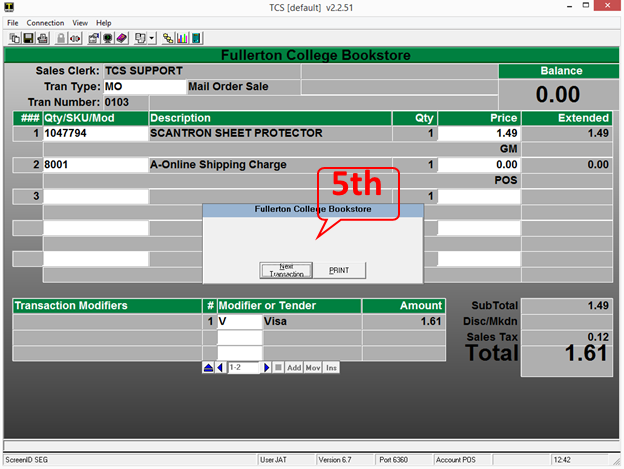
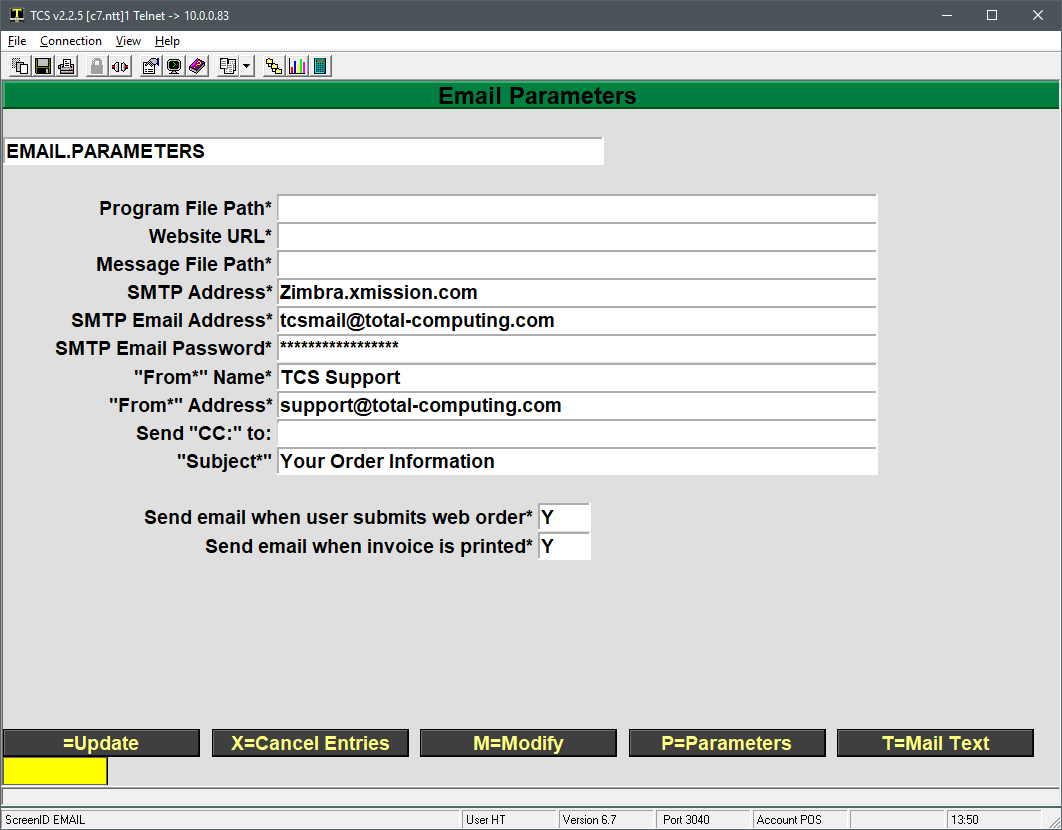
  • At this stage in the order fulfillment an email will be sent to the customer notifying them that there order has been completed. *these email setting are setup during the initial setup of the webstore

Mail Order & Online Order with Returns and Transaction Match Tender

Prerequisite

Original Transaction number, date and register. This can be in any form but all of the material is required to complete the return process.

  1. On your back office, web register or any machine that has been setup to process web transactions go into the Cash Register function and select MORT, select the mail order return button or key that is setup to perform a mail order transaction.
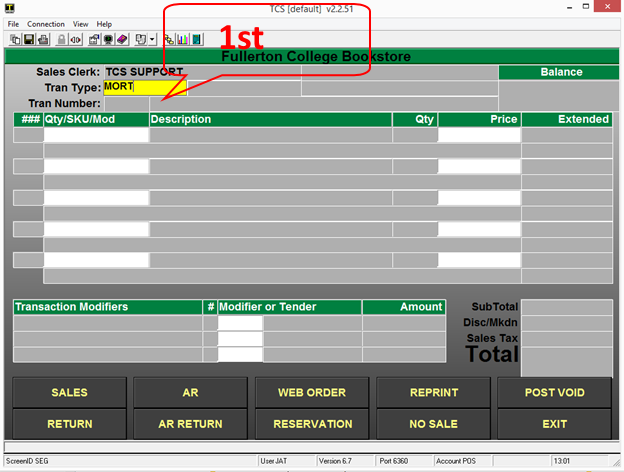


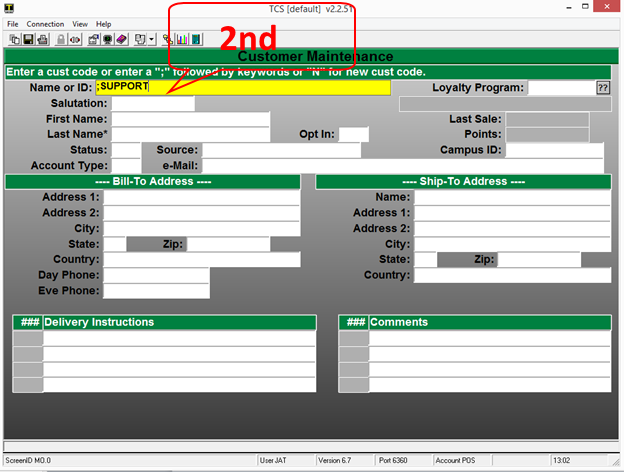
2. Input the customer ID or preform a search using the ;user’s name or portion of name.

  • You will be prompted for the customer name or ID that preformed the original transaction that you are wanting returning items against.
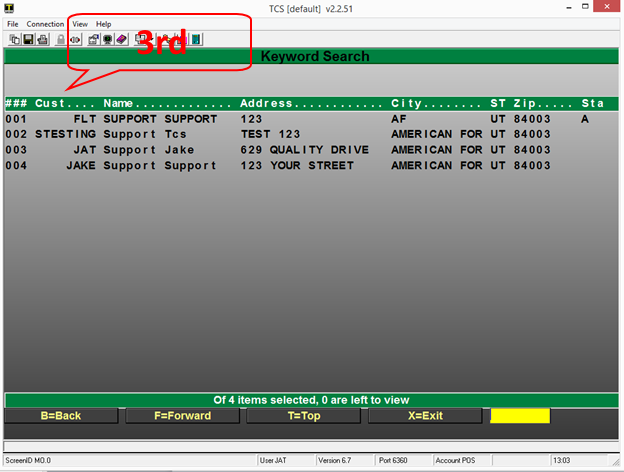
  • If you searched using the ; keyword search, select the appropriate customer to proceed to return items.
  • If you input the customer ID the search results should not display and the process should move you past the lookup and allow scanning items for the return.
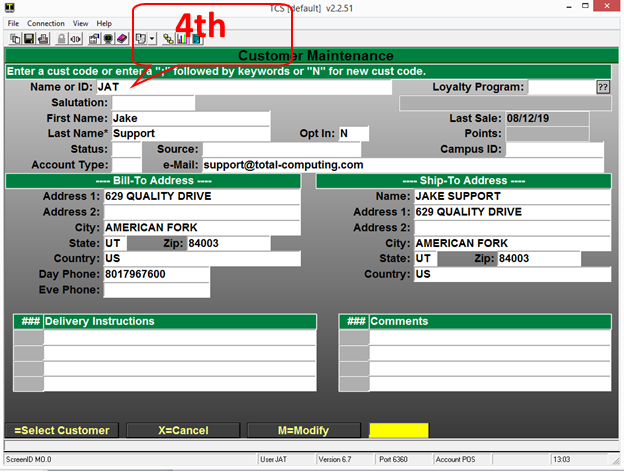
5. Once you have selected or input the correct customer all you will need to do is scan or type in the items that were on the original order into the sku field.
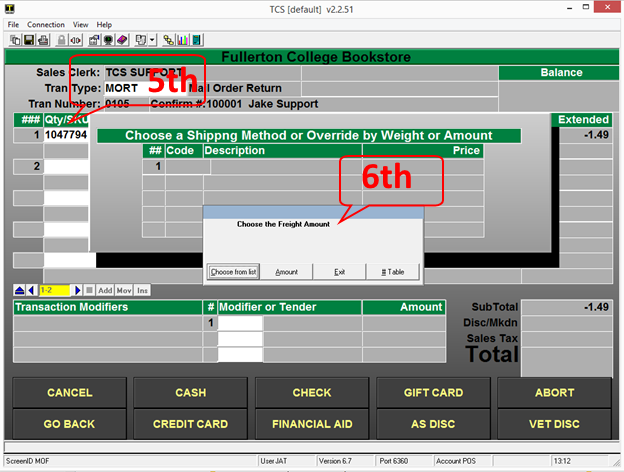
  • Once you have scanned or entered the items that you wish to return on the order and select Total you will be prompted for any shipping charges that you wish you apply to the return.
  • You can select a specific amount or select from a shipping table that you have setup or simple exit past this prompt.
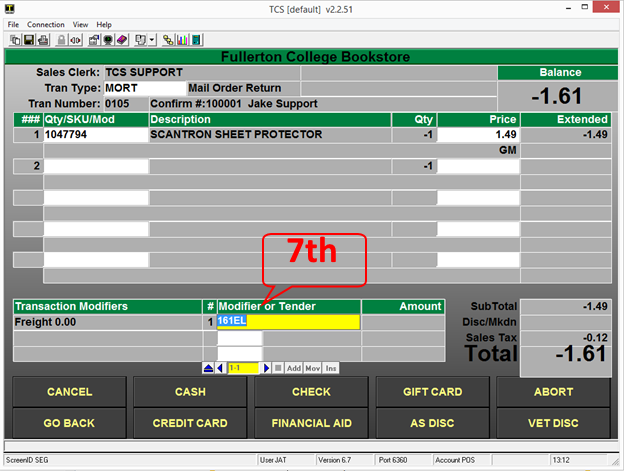
  • Once you have scanned all of the items to be returned on the online order you will just need to Total the transaction and review the transaction total.
  • The Tender and amount should auto populate based off of the original transaction.
  • You will press “Enter” to proceed to the step

*note the system will not allow the tendered amount to be greater than the original purchase amount for the order.

**do not change the default tender code unless you are giving back cash or store credit. The tender determines what the cashier is prompted for.
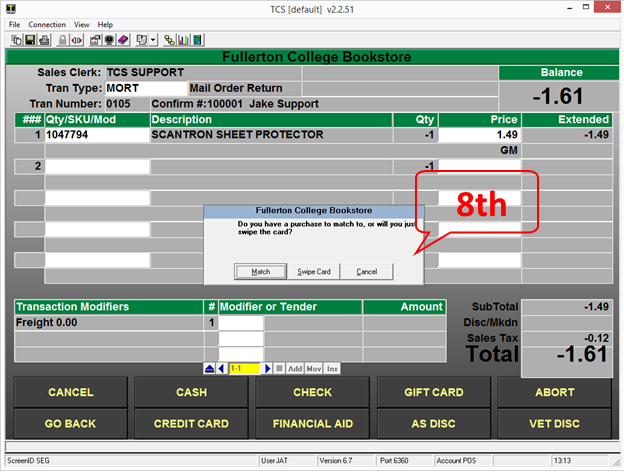
  • After you have accepted the tender and amount you will be prompted on how you would like to accept the payment return method.
    1. If the customer is present and has the credit card that they used to purchase the items you can have them swipe into your card reader their card when prompted.
    2. If you choose to refund to the original card that was used for the transaction you would select the “Match” option. You can use the “Match” option even if the customer is present with the original purchase card and the customer will not need to do anything.

*note that not all web registers are equipt with a card terminal.
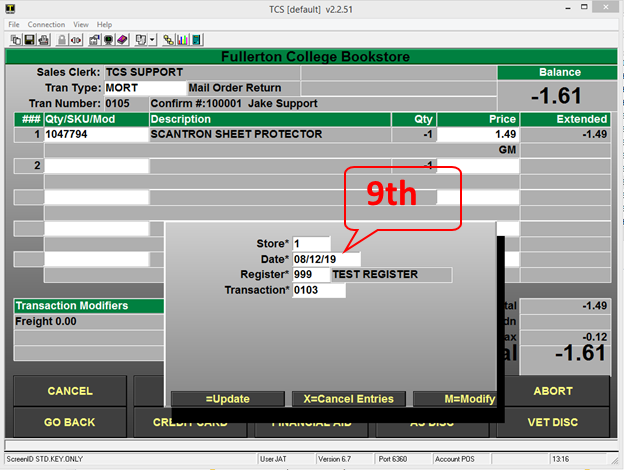
  • Input the transaction information is the only way to match a transaction against the original transaction. All of the inputs must match exactly.
  • It is important to note that even though you can have multiple Stations or Registers preforming web order usually all web registers utilize the same web register number.
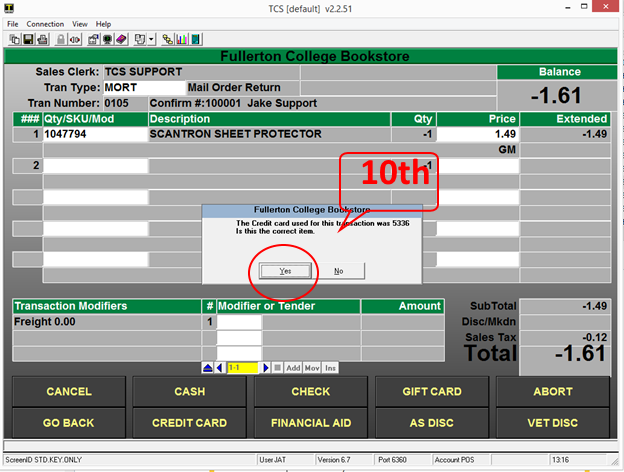
 

  • If the system matches the original transaction you will be prompted to verify the last 4 digits of the original transaction.

*note you can find the last 4 from the email confirmations or by reprinting the original receipt. If you do not have access to that information you may run several sales reports or lookup the transaction under the Mail order Customer Maintenance.
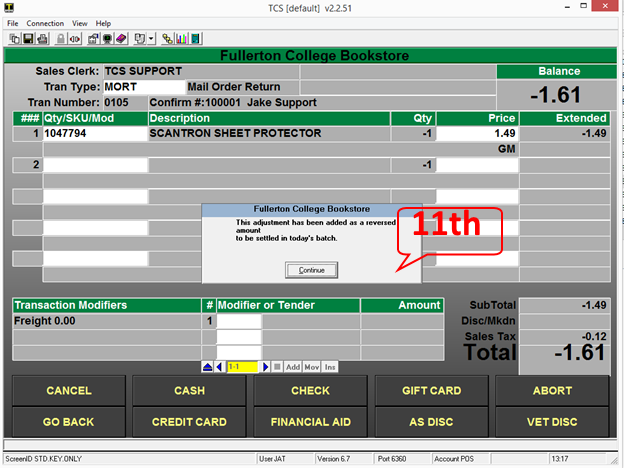
  • If the transaction matches and the tender total does not exceed the original purchase amount you will be displayed a message that the adjustment to the customer’s card has been made and the funds will be set to return to their card.
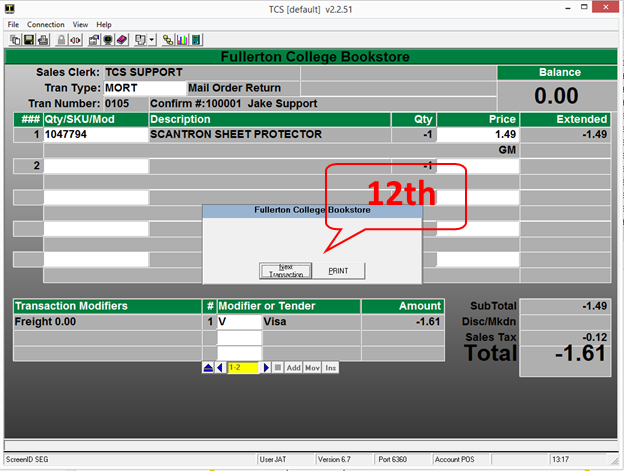
  • The last prompt you will receive once the return has been completed is to move onto the next transaction.
  • The system should print-off a return transactions receipt.

Suspending & Resuming orders from your Web register
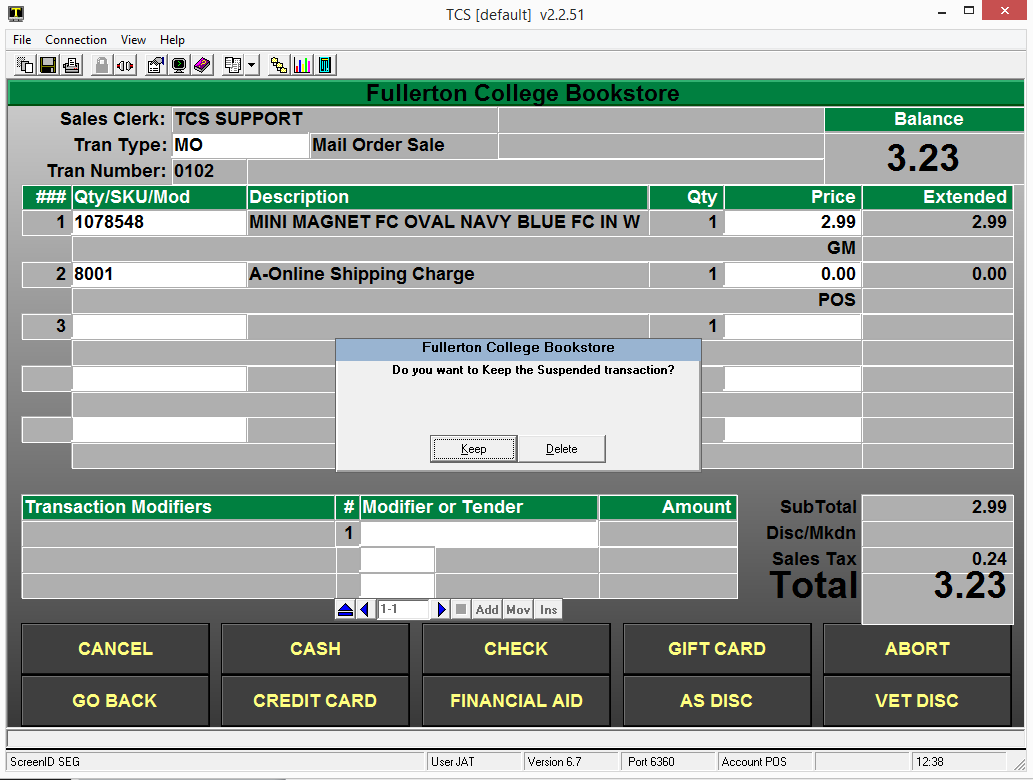
  • Any time that you are in a weborder transactions you can EXIT or ABORT to suspend the transaction or delete the transaction.
  • When you have selected a way to exit out of the web transaction you will be prompted to “Keep” or “Delete” the transaction. When you select the default option to “Keep” the transaction is restored to its original state so you can access the order at another time.
  • You can also select the “Delete” option when exiting your transactions and all of the information will be removed from the system and you will no longer be able to process that order.

*note that if you modify the online web transaction that those modifications will need to be added back as the “Keep” option restores the transaction prior to any of the users changes.

Declined Online Orders
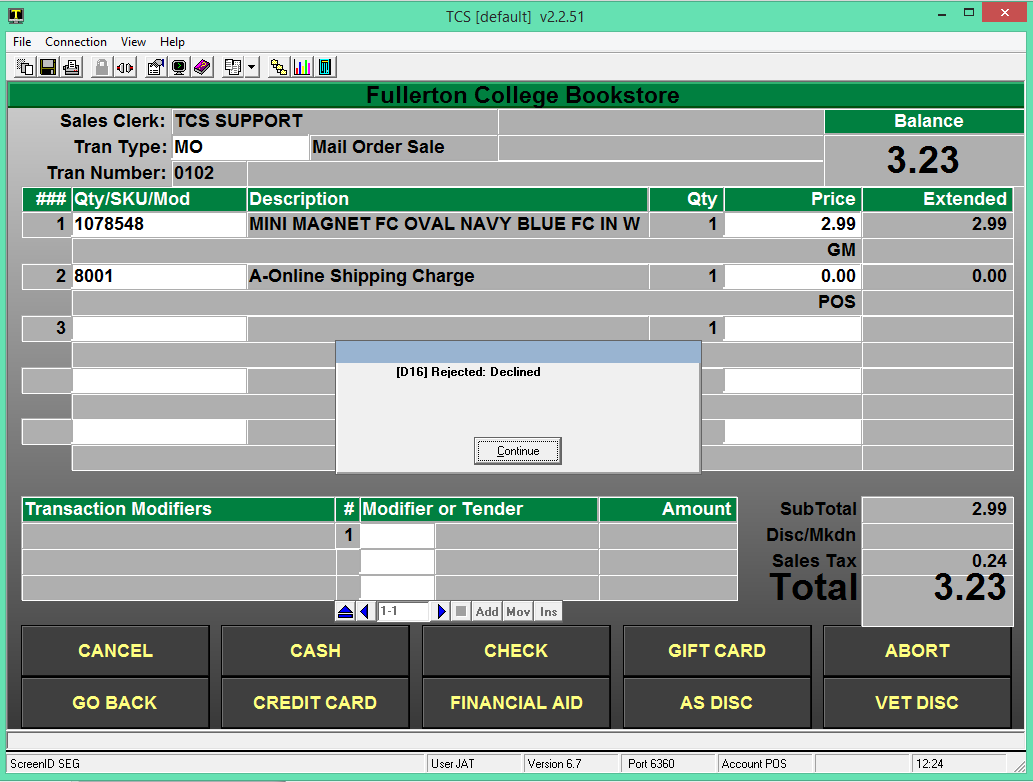
  • When you receive a declined response from the transaction when you try to process a web online order you will need to reach out to the customer to inform them that their card has been declined.
  • You can use the ABORT, EXIT or SUSPEND options to leave the transaction. Make sure that when prompted to “Keep” or “Delete” the transaction that you select the Keep option until the issue has been resolved.

*Please note that credit cards are not charged until the online order has been fulfilled at your web register.

Store processing of Split Tender

The order will come to the store as a suspended transaction, just like a normal CC transaction. The store personnel will be able to run the pick slip reports (POS.26.10 or 13) and pending order reports the same as they do regular web transactions.

Bring up the suspended transaction the same as other web transactions

Since this will be treated as a POS Connect or FA order, you will get prompted to look up the customer the same as your existing POSCONNECT/FA transaction (POS Connect is used in the example).

The Account ID will be brought in from the transaction where the customer entered it on the web site.
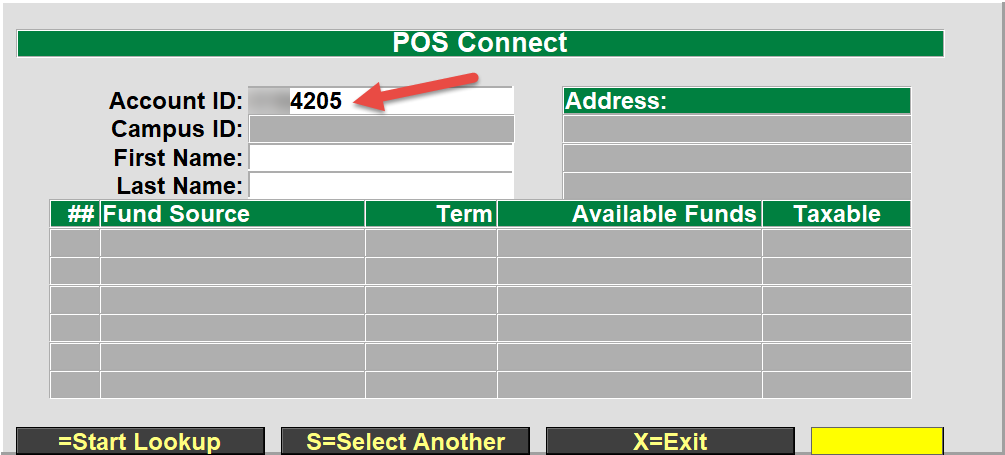
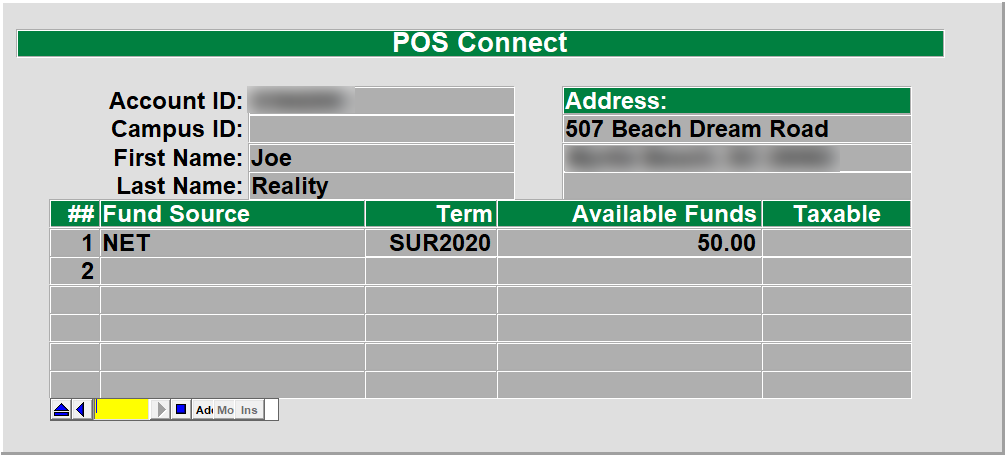
Select the fund source that you wish to use for this transaction
The transaction will load each item and validate the customer has the funds to cover each item that was ordered. If the customer goes over their limit or has purchased something that is not covered by their fund source then a message will display that the SubClass limit has been exceeded or that the limit has been reached. Click on the ‘Yes’ button to add the item to the cart and to proceed, if you select ‘No’ then the item will not be added to the cart.
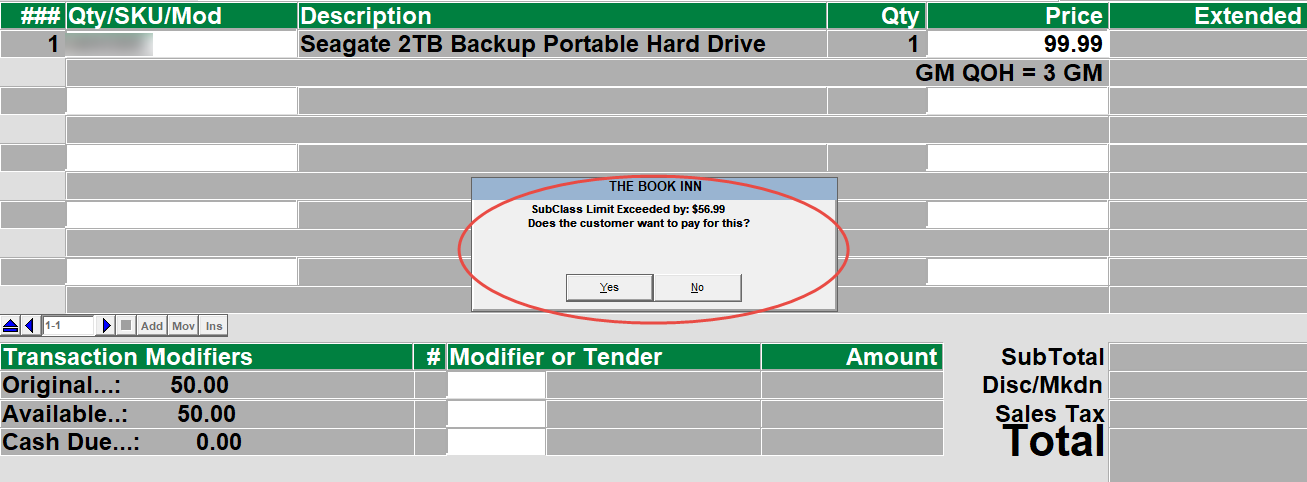
Once all of the items have been added to the transaction, the transaction will show the Total amount and also the Original fund amount, Available funds and the cash due that will be placed on to the credit card when the transaction is finalized.
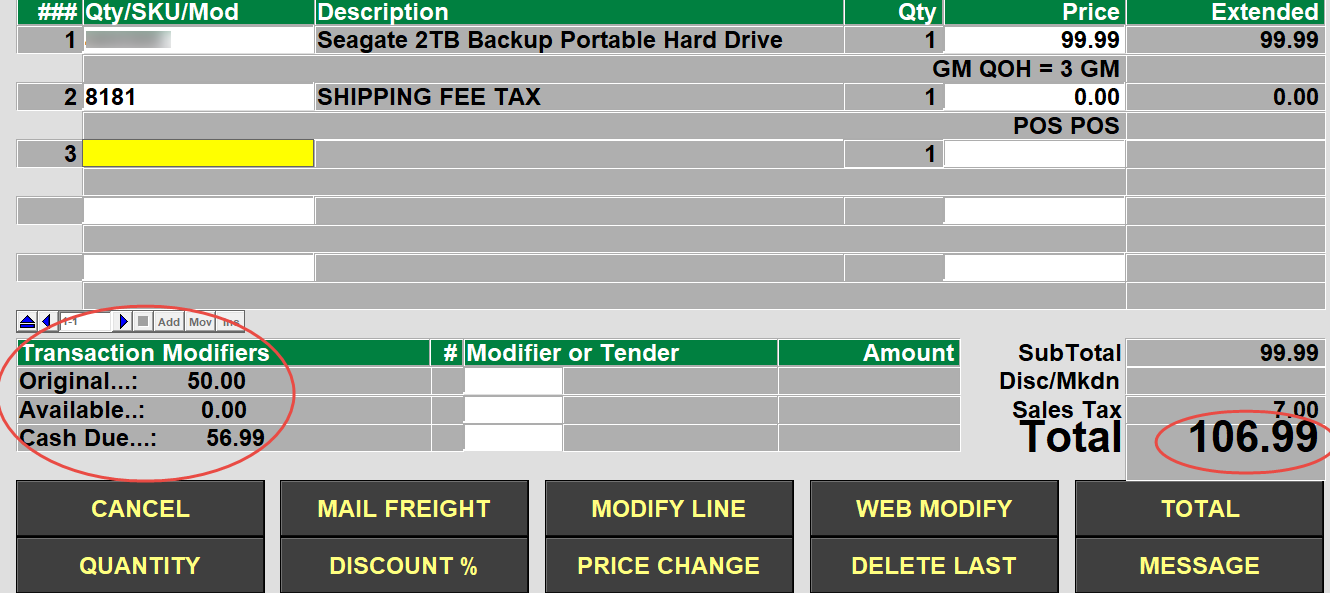
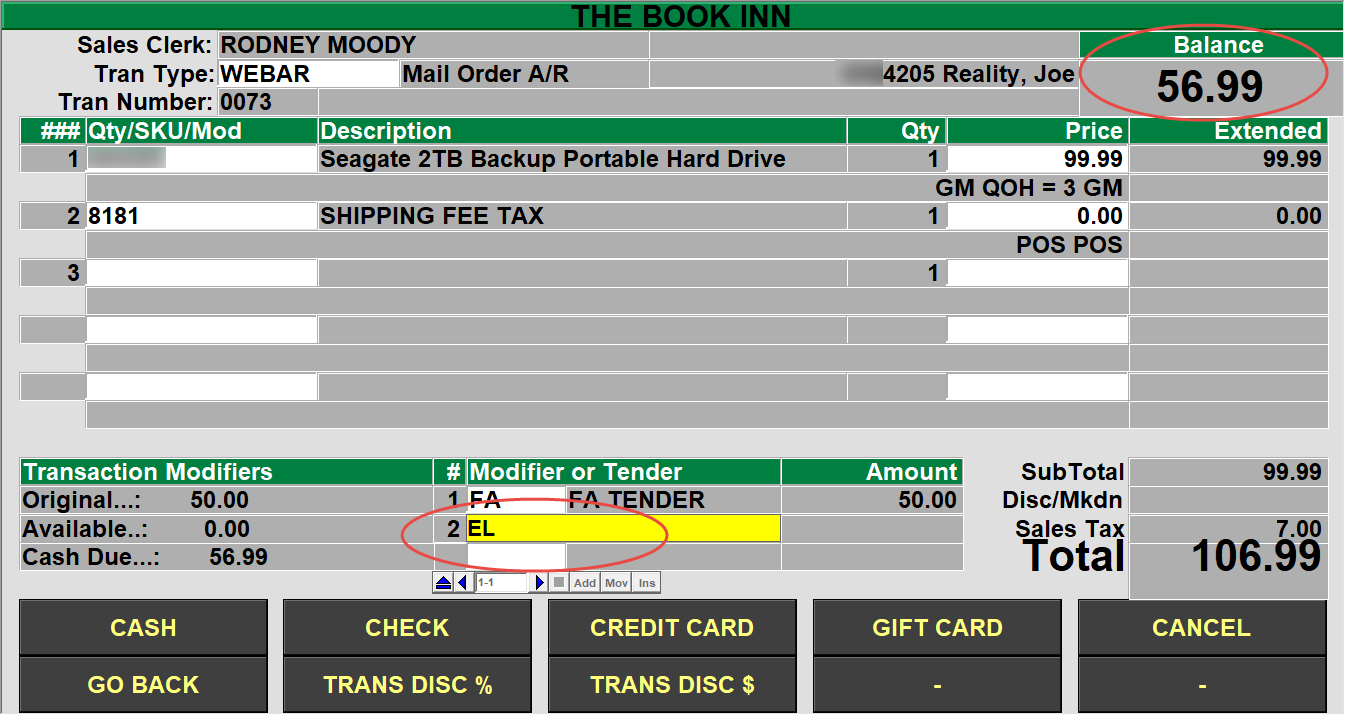
After selecting the ‘TOTAL’ button, the transaction will automatically enter the amount of funds to be used by the FA/POS Connect transaction tender, the cashier will just hit the ‘Enter’ key on the keyboard.

The transaction will then apply the financial aid funds to the customers fund source and report if there were any issues. Once the financial aid amount has been successfully applied then any additional amount will be applied to the credit card that was entered on the website.
Adding a Memo

Use the MEMO modifier to add a memo to a line.  If the memo is not for the current item that was entered/scanned then you can preface the command with the line number you want to add them memo to.  For example: to add a memo to the current line just press the MEMO key. If you want to add a memo to line 2 enter a 2 followed by the MEMO key.  If you don’t have a MEMO key then enter |MEMO (to add a memo to line 2 enter 2|MEMO).

Back Orders, Cancellations

To change the quantity of an item choose the MOModify key.  If you don’t have one you can type |MOM.  You will be prompted for the line number to modify – enter the line number.  You will then be able to: 1) Change the Quantity Shipped, Change the item from New to Used (or Used to New), and specify a Back Order quantity, and you can add a memo to the line.

Override Freight Amount

To change the freight amount choose the ModifyFreight key.  If you don’t have one you can type |MOF.  This will allow you to modify the freight from the list of your freight options, enter a specific amount, or select a specific freight table.

Printing a Picking List

To print a Pick List choose the PickList key.  If you don’t have one then  you can type |PICK.  This will print a pick list to use for gathering the merchandise.  It is best to EXIT the e-Commerce transaction afterwards.

Other Register Functions

Global Inquiry

Press the ‘ITEM INQUIRY’ key to look up an item.

Scan or manually enter in the item in question.

Press enter to exit out of the item.

Press enter to return to the Cash Register screen.

The item inquiry key can be used at any time while in the cash register screen. When you return to the cash register screen, you will return to the point from where you left from. You may use the item inquiry key as many times during a transaction as you wish.

Gift Certificates

Purchasing a Gift Certificate:

  1. Press the ‘Gift Cert Purchase’ key.
  2. In the window that displays, enter in the information you need. (all the fields are optional except the value field – enter in the value of the gift cert) (it is recommended that you fill in the “Purchased By” and “Purchased For” fields)
  3. When you fill in the amount of the gift certificate on the actual gift certificate, you must write down the voucher number on the gift certificate! The voucher number is automatically given to you when you press the ‘Purchase Gift Certificate’ key. The number is located towards the top left hand corner of your screen with the prompt of “Voucher Number:”
  4. After you have filled in all the necessary information for the gift certificate, and only after you have written the amount and voucher number on the gift certificate, press “Enter” to ‘Save’ the gift certificate to the system.
  5. Continue on with your transaction as you would any other transaction.

NOTE:

You may purchase multiple gift certificates per transaction (if they are buying 2 $20.00 gift certificates, you will be processing two different gift certificates in the system and they will have two separate ‘voucher numbers’.

Only sell a gift certificate during a “SALE” transaction since that is what you are doing – you are ‘selling’ an item to them.

Redeeming a Gift Certificate:

  1. After entering in the items the customer is purchasing and you have pressed the total key, press the “Gift Certificate” tender key.
  2. At the prompt “Enter Voucher Number”, enter in the voucher number written on the gift certificate.
  3. Validate the gift certificate through the receipt printer.
  4. Complete the transaction as you normally would.

Line Item Memo

After entering an item to purchase, you can press the “Memo” key to add a free form text message that pertains to that specific item. The text message will print on the receipt.

Suspend

  1. You can suspend any SALE transaction as long as you have not placed a Tender (form of payment) towards the transaction.
    1. Process the Sale transaction as you would any other transaction.
    2. After all items have been entered into the register, press the Suspend key.
      1. The suspend key can be pressed while either in the sales entry screen or in the tender area.
    3. At the prompt Enter the customer’s name, enter the name of the customer for whom you are suspending the transaction for.
      1. Once you enter the customer’s name and press enter, the system will move the transaction to a separate file and you will be returned to the Cash Register screen.
  2. To get a report on your suspended transactions;
    1. From the POS Master Menu, choose the RP option for the Report Menu.
    2. Next choose option number 6 for Miscellaneous Reports, then option number 5 for the Suspended Transaction Report.
  3. You can choose to print the report to your screen (terminal) or to the printer.

Resume

  1. To resume a suspended transaction, press the Resume key when the cursor is at the Tran Type field.
  2. Choose the transaction that you want to resume from the list of transactions.
  3. Complete the transaction as you would any other transaction.

Item Exchange

  1. While in the ‘POSiTrak Sales Entry’ screen, press “Enter” to accept the default tender of “SA” for a sale transaction.
  2. Enter items as you would a normal sale transaction.
  3. To enter a ‘return’ item:
    1. Press the “ITEM EXCHANGE” button
      1. (if you have more than one of the same item being returned, enter in the amount being returned then press the item exchange button — if two items are being returned, press “2” then “ITEM EXCHANGE”)
    2. Enter the item by scanning, manually entering the SKU number, or by description.
  4. When you are through entering in items being sold or returned, press the “TOTAL” key.
  5. Complete the transaction by entering the amount tendered

Store Credit

Issuing a Store Credit

  1. A store credit can be issued any time the balance owed (the total) is a negative balance (whether through a return or exchange). If you have a negative balance after you have pressed the ‘Total” key, press the “Store Credit” key.
  2. A small window will display where you must fill in the name, address, and phone.
  3. All the fields in the window are required fields. It is recommended that you enter their name, their ‘company’ or ‘squadron’ for the address, “WP” (for West Point) for City, ST Zip, and then a phone number (any phone number will do)
  4. Press “Enter” to save the store credit to the system.
  5. Make sure you give the customer the receipt. The receipt will have the voucher number on it, and they must provide the receipt in order to redeem their store credit.

Redeeming a Store Credit

  1. After entering in the items the customer is purchasing and pressing the total key, press the “Redeem Credit” key.
  2. At the prompt “Enter Voucher Number”, enter the voucher number that is on their original receipt.
  3. Complete the transaction as you normally would.

Aborting (Voiding) a Transaction

Press the ‘TRAN ABORT’ key when you want to cancel any transaction.

The Tran Abort key can be used any time during the transaction to cancel it out. A transaction is not completed until a Tender amount and Key have been entered. Once a Tender Key has been pressed you must complete the transaction you are on. You must then use the ‘Post Void’ key to cancel out the transaction.

Special Orders

Overview

Special Orders are used when an item that is not in stock is placed on order by a customer. The order can then be added to another PO going to the same vendor, or created specifically for that customer. When the order arrives, the customer will then be notified to pick up the item. The following document shows how Special Orders work with the TCS Retail software.

Special Orders are used for items not in stock. Three major processes are involved: Placing the Special Order, Receiving the Special Order, and Picking up the Special Order by the customer.

Placing Special Orders

  1. In Cash Register Screen in POS, enter a regular Sale transaction type.
  2. Hit the Special Orders function key you have set up.
  3. Enter the information to go on the Special Order. If a deposit is entered, this amount will be added to the Balance Due.

Special Order Maintenance

There are two ways to get to the Special Order Entry screen (POS-24-1). If you wish to enter a new special order, you must access the screen by selecting the Cash Register option from the POSiTrak Main Menu and then entering “SPO” as the transaction type. For more information on the cash register, see page XYZ. If you are going to modify an existing special order, you can access the screen from the POSiTrak Main Menu by selecting the Special Orders option followed by the Maintenance option.

In the Special Order ID field, enter a period to assign the next available ID number to the new special order. If you are modifying an existing order, enter the ID number assigned to that order, the name of the customer, or enter “??” to see a list of existing orders.

In the Customer Name field, enter the name of the customer who is placing the order. If the customer is representing an organization, enter the name of that organization in the Organization field.

In the Primary Phone field, enter the primary phone number where the customer can be reached.

In the Secondary Phone field, enter any other phone number where the customer might be reached.

In the Address fields, enter the customer’s address.

The Date of Request field is automatically filled in with the current date. If the customer requested the items earlier, you can modify it.

In the Deposit Field, enter any deposit amount that the customer will pay on the items.

You can enter up to three lines of notes in the Call Notes field.

In the SKU field, enter the SKU of the item that is being ordered. The Description field is filled in automatically.

In the QTY field, enter the quantity that the customer wishes to order.

In the Special Instructions field, enter any special instructions on the handling of the item.

If the customer picks up the items, enter the number of items picked up in the Picked Up field. The Date Picked Up field is automatically filled in with the current date, but it can be modified.

Repeat steps 10 through 13 for each item you would like to order.

Press [ENTER] twice to save the order.

If you want to create Pending Orders for the items, enter “Y.” Otherwise, enter “N.”

Optional Step:: For GM or TRADE create a Pending Order. For Text items, add them to a Manual PO.

Finish the Sales transaction.

Print off a copy of the receipt for the customer and a copy for ordering personnel.

Log to the module where the item exists (GM, TRADE or TEXT).

Place the Order. (Cancel if you discover an order is not necessary).

Receiving Special Orders

  1. Enter a receiving log as normal.
  2. If there are any outstanding Special Orders in the master file, a comment will be automatically be added to each line item with special order quantities.
  3. Optional: Print special order tags to tag items with person’s
  4. Optional Step: For GM or TRADE name, phone, address, title, author, special order number, date. You must have a Special Order tag code setup (SPO tag type).
  5. Optional: Place special order tags on items.
  6. Notify customer that item has arrived.

Picking up Special Orders

  1. Customer picks up special order items.
  2. Customer takes items to the cashier.
  3. Do a regular Sale transaction.
  4. For the line items enter the Special Order Pickup Modifier. (To set this up go to Special Order Pickup Modifier.
  5. This will take you into Special Order maintenance. Put in the quantity being picked up.
  6. The program will automatically add these items to the current transaction.
  7. Total the transaction.
  8. At the tender code entry, if a deposit was made on the special order, enter the amount of the deposit. For the tender type use the Special Order tender.
  9. You will be prompted once more for the special order id, enter it.
  10. Use any other tender type to pay for the remaining portion of the sales transaction. When all items are picked up, the special order will be flagged with a “P” status as “Picked up”.


Loyalty Rewards Setup

Our Loyalty Program is created to allow you the ability to track purchases of merchandise in specific inventory classes and then generate a voucher to be used for the purchase of in-store merchandise. You can also specify what type of merchandise can be purchased.

Sample Program

For every 10 general books purchased the customer’s account balance is increased by the average value of the 10 books purchased.

  1. A customer joins the club and is given a club card. This card is their member number and all purchases are accrued to that number. (A card is not required, you can use another identifier such as phone number, student id, state id, etc.) Balances are accrued in the Voucher file.
  2. Each time a qualified book is purchased the number of books purchased is incremented and the total dollar value is incremented. The value is added to the preferred customer account.
  3. When the level of 10 books is reached the average dollar value of the 10 books is calculated and the value is added to the customer’s voucher account.
  4. The customer is now free to use their voucher balance to pay for qualified purchases.

Setup Steps

  1. Create a Loyalty Code
  2. Create a Voucher Code
  3. Create a Tender Code (optional)
  4. Add the customer update program to all of your Sales transaction types that are valid for the rewards (e.g. SA, AR, FA)

Create a Loyalty Code

  1. Select menu path POS-22-26-21
  2. Create a new code. E.g. BC for Book Club.
    1. This code is used in the voucher screen as well.
  3. Set the parameters to meet your criteria:

  • Limit is the level at which an award is given. 10 indicates that when the person buys the 10th item, the award level will be calculated.

Create a Voucher Code

  1. When a customer hits their award level a voucher (using the customer number) is updated.
  2. Select menu path POS-22-25-21
  3. Be sure to use the same code for both Loyalty and Voucher.

Create a Tender Code

  1. Any voucher tender code can be used. If you already have a Gift Certificate tender then you may skip this step.
  2. Select menu path POS-2-4 and add a tender code with these parameters

Modify Sale Transactions

  1. Select menu path POS-2-5
  2. For each transaction type in the SA category
    1. Add PREF.CUST.UPDATE in either:
      1. Ending Subroutine
      2. Wrapup Subroutine
      3. After All Else Sub


Gift Receipt Setup

Setup Steps

  1. Create a Header.
  2. Create a Trailer.
  3. Assign the Header and Trailer to the Gift Receipt control record.
  4. Create a Modifier.
  5. Create a Transaction Type for Reprints.
  6. Assign a Function Key for Gift Receipts.
  7. Create a Header.
  8. Select menu path POS-03-03.
  9. Enter a new Header Code – something like GR for gift receipt.
  10. It is easiest to copy this from your primary receipt header.
  • Modify/create the heading and wording you want to appear on the gift receipt.

Create a Trailer

    1. Select menu path POS-03-04.
    2. Enter a new Trailer Code – something like GR for gift receipt.
      1. It is easiest to copy this from your primary receipt trailer.
    3. Leave the trailer message blank if you put specific terms in the heading.
    4. Be sure to leave the Detail Lines.

Assign Header and Trailer to Gift Receipt Control

Select menu path POS-03-05

Create a Modifier

  1. Select menu path POS-02-02
  2. Enter a new Modifier Code.
    1. It is easiest to copy this from the FEED modifier.
    2. Change the description.
    3. Change the Subroutine to call to POS.PRINT.GIFT.RECEIPT.

Set up a Reprint Gift Receipt Transaction Type

  1. Select menu path POS-02-05
  2. Enter a new Modifier Code.
    1. It is easiest to copy this from the RR (Reprint Receipt) transaction type.
    2. Change the description.
    3. Change the Beginning Subroutine to POS.REPRINT.GIFT.RECEIPT.

Assigning a Function Key

    1. Select menu path POS-03-2
    2. Find a free button that you can use.
    3. Enter |GR (pipe GR – if GR is the modifier you chose.)
    4. You can also set up a key for RGR (this has not pipe in front of it).

Printing a Gift Receipt

There are 4 possible ways to print a Gift Receipt.

1. “Reprint Gift Receipt” Transaction Type RGR.

2. If the Gift Receipt modifier function key is pressed in the Tran Type field then you can print gift receipts for the previous transaction.

3. If the Gift Receipt function key is pressed in the SKU or Tender fields then when the transaction is completed a gift receipt will print.

4. If the End of Sale prompt (defined in General Parameters) has a “<G>= Gift Receipt” prompt the cashier can enter a “G” at the end of the transaction to be prompted for the number of receipts to print. This can be changed in General Parameters. (POS-02-01, S2)

(Possible prompts include <>=transaction complete, <V>=Validate, <R>=Reprint, <G>=Gift receipt).

If the flag is set to prompt for the number of receipts then the following prompt will appear. Entering zero will result in no gift receipt being printed. Pressing the Enter key will cause one receipt to be printed.


Class Specific Exemptions

Scenario: Students at the university are tax exempt for food items but everyone else needs to be charged tax. The cashier does not wish to flag each individual line as tax exempt; this takes time and leaves more room for error. To simplify the transaction the cashier types in a modifier at the beginning of the transaction that will affect all items under a specific class to be sold as tax exempt. This applies only to transactions where the modifier is used.

To accomplish this two things need to be setup. A modifier needs to be created, and the class code needs to be changed so that all items of that class are sold as exempt when the modifier is implemented.

Create the Modifier

The modifier needs to be setup in POS-2-2, since this is a new modifier type in the code you would like to use and select “Add” on the window that pops up and fill in the fields according to the following screenshot. You update additional fields to fit your needs.

This is all that is necessary for the modifier. Please remember the modifier code as it is required when updating the class code.

Update the Class Code

To update the class code, go to POS-22-3-2 and enter the class you would like to update.

After the modifier has been entered and the changes saved all items under that class will ring up as tax exempt when the modifier is used at checkout. It’s recommended that users setup function keys to more easily use the new modifier.


POS Vouchers, Gift Certificate & Gift Card Setup, Issuing and Redemption

Voucher Requirements

There are two things that must be present in order to process a voucher or gift card as well as one optional item.

  • The actual voucher that tells the system what to do.
  • Tender codes that are to be used at the cash register. This includes codes that issue a voucher, or codes that accept a voucher as payment.
  • It is possible, but not necessary, to create a new receipt header or footer specific to vouchers. This enables you to place voucher terms and other information in the hands of the customer.

This guide will cover how to set up a voucher, create the tender codes and how to use them at the cash register.

Creating the Voucher

Vouchers are created in Voucher Parameters, POS-22-25-21.

  • Create a new Voucher Type for your voucher and give it a description. All vouchers should use POS.VOUCHER.ENTRY for their subroutine.
  • You can specify which printer to print the voucher from in the Receipt/Slip Printer field.
  • The header link tells the system which header to print on the voucher.
  • The process ID should be either VC.0 or MERCH
  • O should always be used for default status
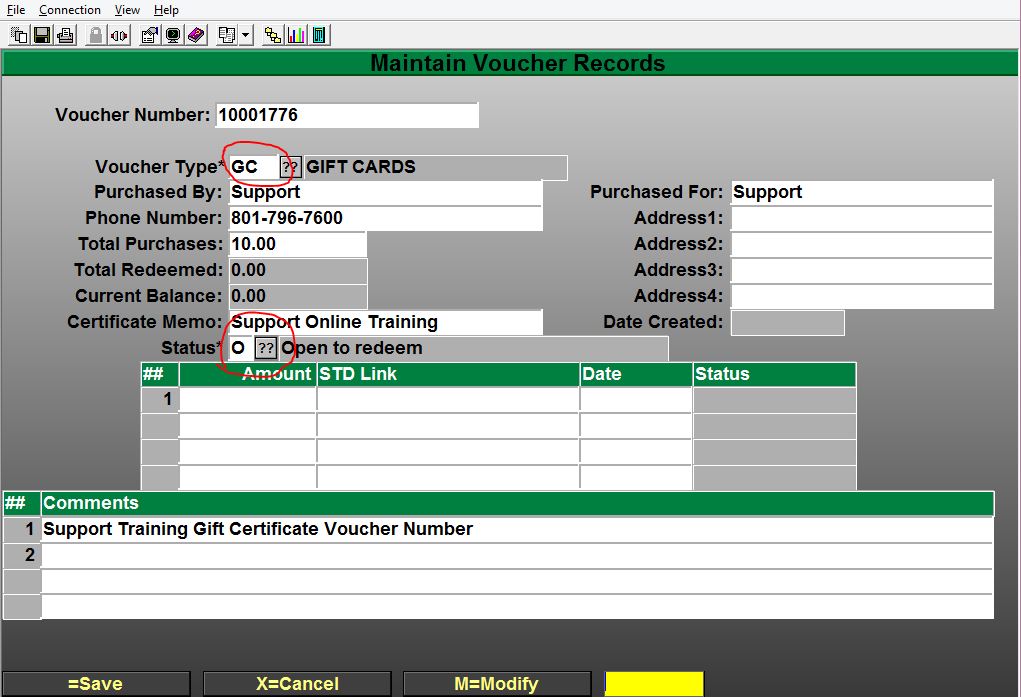
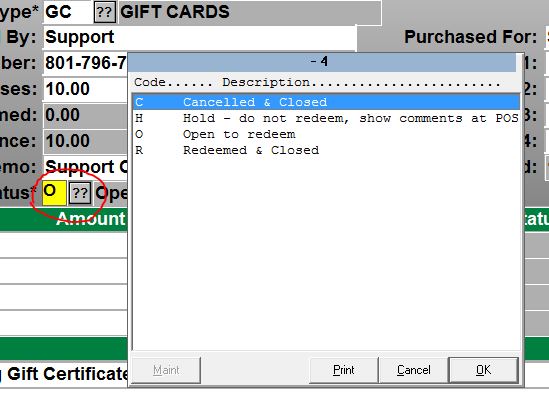
  • You may enter a Default Amount if you would like, most locations will not use this.
  • Redeem Face Value Only requires the customer to either use the entire amount on the voucher or receive another voucher for the remaining balance.

Setup Tender Codes

To process and use a voucher at the register, tender codes need to be created. This is done in POS-02-04.

  • Create a new Tender code and Description to utilize vouchers at the cash register
  • Tender Categories should already be setup on your system. Choose the correct category for this tender code.
  • The remaining fields may be filled out according to your needs. POS.VOUCHER is to be used as the voucher code. Proceed to Screen 2 to set limitations on what cashiers may do with this tender code.

Screen 2 defines the limitations set on how much change a cashier can give to the customer.

Voucher Code is what defines if the tender code will issue a voucher, or accept one as payment.

  • Placing the voucher code into this field tells the system to issue a voucher
  • Leaving this field blank tells the system to accept the voucher as payment

Change Amount is the maximum amount of change allowed for that specified security level. If the cashier does not have the necessary security level a supervisor must approve the transaction.

Now that the voucher and tender code have been created they can be used at the cash register.

Using a Voucher

Issuing in-store credit

This scenario is for a customer returning items for in-store credit.

  • Open the transaction as a return
  • Enter the item being returned
  • Use the tender code created for issuing a gift card
  • Follow the on screen prompts to finalize the transaction

Manually Issuing a Voucher or Gift Certificate/Card

Menu Path: POS-22-25-1

Scan, Swipe or enter your Voucher number that you would like to create or modify.

  • Select the type of Voucher Type that you have already setup and would like to use for the record.
    • You can maintain and modify the Status of the voucher.
    • Update Contact information.
    • View transactions that have used the Voucher.


Rental Setup and Training

Rental Steps

The following steps must be followed before setting up rentals for the first time. There are various videos available on the videos page that cover these steps with direct links to pertinent videos in each section below.

  1. Setup the textbook rental department POS-22-3-1
  2. Setup the Textbook Class POS-22-3-2
  3. Setup Fee Codes POS-22-23
    1. It is recommended to have a different fee code for each type of fee.
      1. Late fee code to use when an item is returned late
      2. Fee code used when an item is rented
      3. Fee code used when an item is charged out un-returned or sold

Setting up rentals: POS-27-21

This is the main parameter screen for setting up your rental program. A video going over these steps can be found here.

  1. Enter your store number.
  2. Enter the Barcode Format you will be using to print serial number barcodes (for serialized Text rentals only).
  3. Enter the Barcode Format you will be using to print serial number barcodes (for serialized GM rentals only).
  4. Grace Period – Set the number of days to wait before late fee is charged
  5. Late Fee Processing – Set the late fee type, ‘D’ = Daily or ‘F’ = Flat (this can be changed at the item level).
  6. Typically, the restrict rentals to DB Flag is set to “Y” – Some stores choose to manage textbook rentals independently from the textbook database, so the option exists to set it to “N”
  7. Purchase Formula – Select the appropriate formula to use to calculate the purchase price when an item is purchased instead of returned.
  8. Rounding – Set your rounding calculation, .01, .05, .10, .25, .50, .75, .00.
  9. Select whether you want your guarantee method to be CC (credit card) , AR (Accounts Receivable), CC/AR to use both methods, NONE if no method of Guarantee is used, or NONE/CC/AR will prompt the cashier to ask for the method to use.
  10. Change New to Used (Serial) – If you are using a serialized rental program, enter a ‘Y’ if a New item is rented then when it is returned to TX inventory do you want the title returned as a ‘Used’ item otherwise enter ‘N’.
  11. Turn off COF prompt – Enter ‘Y’ to prompt for a new card for each transaction, enter ‘N’ if a customer has already rented and you want to always use the CC guarantee that you have from the first rental transaction.
  12. Enter the TX and GM Late Fee codes to use.
  13. Enter the RENTAL Fee Codes to be used for TX items and GM items.
  14. Enter the Fee Codes to use for Rental Purchases
  15. Enter the class codes to used for New and Used rentals
  16. Default Rental Pricing – Enter the default calculation for rental price – This is used when you are creating a new item or when recalculating the rental price. There is a separate field for New and Used.
  17. Setup general due dates to be used on rentals.
  18. These can be overridden when setting up individual rental items.
    • These lines are referred to as P# (P1 for line one, P2 for line two, etc.) when specifying a due date. If I want all TX rentals due by the date specified in line one, I would enter P1 as the due date when setting up an item.
    • If certain items are to be rented for a different period of time (e.g. line 2 or P2) then that can be entered into the Rental Days field in the rental item master maintenance (POS-27-1)

Email Notifications

The Email notifications section displays the last time the notice was sent out and how many emails were sent.

To create/edit the notice select one of the E1/E2/E3 options from the bottom prompt, a screen similar to below will be displayed dependent on the option chosen.

Enter what you would like the email subject line to be in the Email Subject, next enter what you would like the Body of the email message to be. Once completed, on a new line enter =BODY then on a new line enter in what you would like your signature closing to be.

Repeat this for each of the 3 types of notifications.

Setting the Rental Condition Codes: POS-27-22

This screen is where you set up the “Condition Codes” for rental items. Typically, most stores will only use 2 Rental Condition Codes, Good and Fair.

  1. Setup the Rental Condition codes used to describe the condition of the rental item when it is returned.
  2. You can use the existing codes, or create your own code and description for the rental items. For example: Code: G Description: Item is in Good Condition


Creating a Rental item: TX-MF

There are two different methods to renting textbooks, Dynamic and Serialized. Dynamic has the least amount of overhead and maintenance while Serialized has the greater amount of control. Dynamic rentals fulfill the needs of the vast majority of our users and is the recommended method to use. Serialized is available to meet a few special use cases that we have needed to provide a solution for.

Dynamic rentals allow a bookstore to flag an ISBN as a rental item and rent that item without any further effort. A student rents the book, and when it comes time to return the book they simply need to have that same title available to return.

Serialized controls the rental exchange at the item level. An ISBN is flagged as a rental item and unique serial numbers are generated for that ISBN. Barcode labels with that serial number are then attached to a book which then makes that book a unique item. When it is time to return the rental that specific physical copy of the book must be returned.

The drawback is that a serial number must be generated for each copy of the book, printed, and applied. Each serial number needs to be invnetoried as well. If you wish to rent more of that book then you must generate more serial numbers and affix the labels to each individual book. In contrast, dynamic allows for any number of copies to be rented without any addition overhead beyond flagging the book as a rental.

There are more points of interest on Dynamic vs Serialized rentals that aren’t covered above. Any customer considering the use of serialized rentals should contact TCS support to go over the topic further.

For Dynamic rentals. A video covering these steps can be found here.

The best way to create a dynamic rental is through the TX-MF menu. It’s possible to create one in POS-27-1 but it is much more common to create a dynamic rental from the MF record.

  1. Go to TX-MF and enter the ISBN that you would like to rent.
  2. Select the R for rental option at the bottom of the screen
    1. The system will then populatethe Mast SKU, Module and SKU/ISBN fields
    2. These fields are not automatically generated if creating the rental in POS-27-1
  3. Enter the New and Used replacement price, this is the price used in the replacement calculation if the title is not returned.
    1. This defaults to the full price of the item
  4. Enter a “D” for Dynamic rentals in the Dynamic or Serialized field
  5. Maximum to Rent: this is used to limit the quantity of titles for rental
  6. Late Fee Processing – You can override the late fee processing option that was set in POS.27.21 General Parameters.
  7. Enter the New and Used prices for the rental
    1. The system will automatically generate the prices based off of the percentage set in the Rental General Parameters in POS-27-21
    2. Different prices can be set for a different number of rental days or rental periods
  8. Select the number of days to rent the item at this price point.
    1. Typically either P1 or P2. Selecting the ?? button will allow you to select which rental period from the Rental General Parameters in POS-27-21. These will appear as P1, P2, etc. based on the line position of that price in the Rental Period table.
      1. Enter your store number at the store prompt and then select the appropriate rental period
    2. You can also enter P1, P2 etc. to reference the dates entered in the table located in POS-27-21 or you can enter the number of days you wish to rent the item.
  9. Enter the late fee. This fee will be applied daily and when the book is returned, the POS module will calculate this fee against the number of days past due.
    • You may enter as many entries with differing amounts as you would like. i.e. a P1 period entry which costs $20 and a $1.50 late fee, then a 30 day rental which costs $30 with a $2 late fee, etc.
  10. Save the new record.

For Serialized Rentals:

  1. Enter a ‘.’ for a new record. The system will generate a 6 digit number which is the master SKU for the rental item. (The ISBN will get used if you have selected the ‘Rental’ option while in the TX MF screen. This will be discussed later in the manual). If a 6-digit number is not generated then contact TCS support.
  2. Enter the module in which the item resides, GM or TX.
  3. Lookup/Enter the ISBN or SKU of the item you would like to rent.
  4. Enter the New and Used replacement price, this is the price used in the replacement calculation if the title is not returned.
  5. Enter an “S” for Serialized rentals.
  6. Enter the number of days the rental is good for. You can also enter P1, P2 etc. to reference the dates entered in the table located in POS-27-21 or you can enter the number of days you wish to rent the item.
  7. Enter the late fee. This is applied daily, when returning the book the POS module will calculate this fee against the number of days past due.
    • You may enter as many entries with differing amounts as you would like. i.e. a P1 period entry which costs $20 and a $1.50 late fee, then a 30 day rental which costs $30 with a $2 late fee.
  8. Choose C to Create serial #’s.
    1. Enter the number of serial numbers to be generated. If you are going to rent 10 of this textbook, enter 10. Each serial number is unique followed by a check digit. The total number of digits will be 12.
    2. Print tags, Y/N. If Y is entered, then tags will be printed in the format specified in POS-27-21.
    3. If you don’t want to print the serial numbers here you can also print them on the Rental Detail Screen (POS-27-2).
    4. Choose which store to remove the quantity from. The QOH for this store will be reduced by the number of serial numbers generated. Later when creating want lists you will enter how many of the rental items you expect to have on hand for rush.
    5. Enter the New/Used status of the books. This is so we know whether to reduce your new QOH or your used QOH. When you hit enter it will bring up the cost of the book. If you want to enter a new cost you can always change the cost. The cost shown here is used in calculating your rental profits or rental revenue. Be sure the cost is correct.

When you select and view a master SKU which you previously created, the right of the screen shows the statistics related to this particular rental item, including how many serial numbers have been generated for this master SKU and the number of items sold, rented, retired, and the items currently available.


Serial Number Maintenance: POS-27-2

This screen is for viewing information on a specific rental item, referenced by serial number.

  1. All the serial numbers generated in POS-27-1 can be seen here.
  2. You can enter “//” or “??” to select a particular serial number.
  3. The screen displays all the details on this serial number like author, title, status, rental revenue, details of the customer who rented the item, rented date and due date etc.
  4. You can also view customer details who rented this item from this screen.
  5. Enter M and it will take you to the LU (LookUp) field on the far right.
  6. Enter Y in the LU field to view the details of a transaction with a specific customer. Once done press enter a couple of times and it will take you back to the Rent Detail screen.
  7. If you want to print new tags for this specific rental item, enter ‘P’.
  8. You can also view the Status of the item on this screen. The Status can be “ I – IN, O – OUT, S- Sold, R-Rented’
  9. The status changes automatically when you Rent, Sell, Return or Retire an item.


Creating a rental from the Textbook Module

Look up a title as usual, select the R=Rental from the list of prompts and the system will jump you to the Rental Item Master screen and have most of the information entered for you.

Mass update of Replacement Price and Rental Price

POS.27.24.21 – Update Rental Prices

  1. Enter your Primary store
  2. Enter a secondary store if you have multiple stores
  3. Enter a ‘Y’ if you wish to update the Rental Prices using the rental percentages set in POS.27.21, If you enter an ‘N’ then the next 3 fields will be skipped.
  4. Enter the Periods that you wish to update,
    1. You can enter P1 (or any other P# option) if you only wish to update the rental price for the titles that have P1.
    2. Enter a line number, such as 1, if you wish to only update line 1 for each rental title master.
    3. Enter ‘All’ to update the rental price for all of each title’s rental line options.
  5. Enter ‘Y’ to only update the new rental price if there is an increase, ‘N’ will update the price if it goes in either direction.
  6. Enter ‘Y’ to only update the used rental price if there is an increase, ‘N’ will update the price if it goes in either direction.
  7. Enter a ‘Y’ if you wish to update the ‘Replacement Prices’. This is used when the TX New/Used prices have increased. You should run after you have seen a lot of price increases, Price increases in TX do not update the rental prices. If you enter ‘N’ the next 2 items will be skipped.
  8. If you only wish to update New replacement prices if there is an increase then enter ‘Y’, otherwise enter an ‘N’ and it will update for increases and decreases.
  9. If you only wish to update Used replacement prices if there is an increase then enter ‘Y’, otherwise enter an ‘N’ and it will update for increases and decreases.

Expected Rental Returns

These screens are used to set the expected rental return quantity. This needs to be set AFTER the items are rented or after rush, probably just before you start the Wantlist process for the upcoming semester.

Auto Calculate Rental Inventory

From menu TX-2-30-1, here you will mass update all the ISBN’s expected rentals with a percentage of the rented quantity as the expected rental return quantity.

Enter Store#, Term to update, Beginning/Ending rental Due Date, and then the Percentage of the rental quantity to set as expected return.

This process will update the rental inventory quantity on the want list. It will include rentals that have not been returned and are due during the date range entered. Any manually entered quantities will be overwritten.

Rental Inventory Entry

From menu TX-2-30-2, here you can update the expected rental return quantity for any single item. This is useful when you mass update titles with a percentage, but you have a title that does not fit that percentage amount. If you manually enter a quantity and then run the auto calculate process, the manually entered quantity will be replaced so you should enter these quantities after running the auto calculate process.

Enter the Store#, Term to update, ISBN and then enter in the Estimated Qty.

Rental Inventory Logic explained

Serial
  1. Removes QOH when the serial numbers are created.
  2. When item is rented QOH is not affected.
  3. When dropped off QOH is not affected.
Dynamic
  1. When item is rented QOH is decreased.
  2. When items is dropped off QOH is increased.
OTB (Serial)

1. You MUST enter the number of units you expect to have dropped off.  This only has to be done once, but may be more frequently.

OTB (Dynamic)

1. You MUST enter the number of units you expect to have dropped off.  This must be repeated whenever beginning inventory is recalculated and probably before publisher orders are submitted.


Renting an item from the register:

For Dynamic rentals. A video covering these steps can be found here.

  1. Scan the item.
  2. The system will bring up a small window showing the rental price and purchase price, and ask whether the customer wants to rent or buy the item
  3. The first time you select a rental, the customer information screen will appear. If it is a new customer, you can enter an N to create a new customer record. If it is an existing customer, enter the name or account number and select the appropriate customer.
  4. Enter all the required fields in the customer information screen. Once you are done, hit enter and it will bring you the card or account details screen.
  5. Enter the appropriate information for the payment guarantee method you have chosen.
    1. Note: A credit card expiration date must be greater than the due date + 30 days
      • For example. If a rental is due back on 7/1/22 the card must have an expiration date on or after 8/1/22
  6. At this point, you can complete the transaction, or continue to enter additional items for this sale.
    1. You will only see the customer screen once per transaction.
  7. Once you are done, total the transaction and enter the tender type.
  8. Once the tender is processed you are done with the transaction.
  9. If you want to cancel the transaction select the ‘EXIT’ or “ABORT” key.
  10. Rental transactions may be Postvoided or returned if necessary. Do not do a return for a drop off.
  11. Dynamic also sees the pricing and period window that is displayed on the next screen capture.

For Serialized rentals:

  1. Scan the serial number and press enter.
  2. The register will bring up a small window with rental price, rental days and due date which you created before in POS-27-1 (setting up rentals)
  3. Select the option for number of days you wish to rent the item and press “OK”. This option only appears if the item has multiple rental periods.
  4. Now you get the customer information screen. If it is a new customer, you can enter an N to create a new customer record. If it is an existing customer, enter the name or account number and select the appropriate customer.
  5. Enter all the required fields in the customer information screen. Once you are done, hit enter and it will bring you the card or account details screen.
  6. Enter the appropriate information for the payment guarantee method you have chosen.
    1. Note: A credit card expiration date must be greater than the due date + 30 days
      • For example. If a rental is due back on 7/1/22 the card must have an expiration date on or after 8/1/22
  7. At this point, you can complete the transaction, or continue to enter additional items for this sale.
    1. You will only see the customer screen once per transaction.
  8. Once you are done, total the transaction and enter the tender type.
  9. Once the tender is processed you are done with the transaction.
  10. If you want to cancel the transaction select the ‘EXIT’ or “ABORT” key.
  11. Rental transactions may be Postvoided or returned if necessary. Do not do a return for a drop off.
  12. Serialized do not see the “This book is available to rent” message shown on the prior screen. (With
    1. Dynamic the ISBN barcode is scanned, with Serialized the serial number barcode is scanned.)

Dropping Off a Rental Item:

Dynamic Rental Drop off at the Register:

  1. Press your DropOff key or type |DDROP and press enter. It will take you to the Dynamic Rental Drop off screen. (If a key is not on your keyboard, contact support to help set one up)
  2. Enter the customer name or account number and select the correct customer.
  3. Scan the SKU of the item. If the SKU matches the SKU displayed on the drop off screen it will then display a list of the condition codes available for returning the book.
  4. Chose the appropriate code and press enter.
  5. The system will prompt for another SKU to return. Press Enter or “OK” if no more items are being returned.
  6. Select “P” to post the return and the system will take you back to the transaction screen.
  7. If the item is past due then the number of days past due and the late fee are automatically calculated and displayed on the transaction screen.
  8. You can complete the transaction for any late fees or you can make adjustments, ring up additional items, etc. before tendering.
  9. Once the drop off transaction is complete, the item is automatically returned to inventory.

Serialized Rental Drop off at the Register:

  1. Start a regular Sale transaction (this is not a Return unless you are turning all amounts paid for the rental)
  2. Press the DropOff key/button or type |DROP and press enter. It will take you to the Serialized Rental Drop off screen. (If a key is not on your keyboard, contact support to help set one up)
  3. Scan the serial number.
  4. Scan the SKU of the item if the bar code is visible. Otherwise manually enter the SKU. If the SKU matches the SKU assigned to the serial number entered it displays the message as SKU matched. Then enter the return date.
  5. Enter the condition code of the book.
  6. Hit enter a couple of times and it will take you back to the transaction screen.
  7. If the item is past due then the number of days past due and the late fee are automatically calculated and displayed in the transaction screen.
  8. You can then add any additional books, adjust late fees as necessary as well as ring up additional items, etc. all in the same transaction.
  9. Tender out the transaction to complete the drop off
  10. Once the drop off transaction is complete, the Status for the item on the POS-27-2 (Rent Detail) screen is changed to ‘I’ and the return date and return condition of the book is also displayed.
  11. You can do multiple drop offs in the same transaction as well as sell other merchandise.

Returning a Rental Item

In some instances, a customer may wish to return a rented item within your grace period. This process will work like other returns, and allow you to reverse any charges or refund any cash payments.

Returning a Dynamic Rental Item

  1. Select the appropriate return transaction at the register.
  2. Scan the SKU or ISBN of the item – then confirm that the item was rented.
  3. Select the appropriate customer for the return – the system will return you to the register screen
  4. Complete the return transaction as normal.

Returning a Serialized Rental Item

  1. Select the appropriate return transaction at the register
  2. Scan the Serial Number of the item – it will process like any other return transaction.


Charge a Non-Returned Rental (Dynamic)

This process is done when the item is rented but not returned. This process will charge the customer’s guarantee method with any late fees plus the replacement price. (If a key is not on your keyboard, contact support to help set one up)

  1. Start a regular sale transaction.
  2. Press your Purchase key or enter |PURCH and press enter.
    1. Some customers may have this as |PURCHASE
  3. Enter the customer account number or search by their name by typing a ; and then their first, last or entire name
  4. Enter the ISBN of the book to be purchased.
    1. If the customer has additional dynamic rentals that need to be purchased then those ISBN numbers can be entered at this time.
    2. After all ISBN items have been entered press enter and then a ‘P’ to post the items on the register screen.
  5. The register will show the customer information and any late fees.
  6. Make sure the amount is correct.
  7. Press the Total key.
  8. If the customer is not present then enter COF (Card On File) as the tender and press enter.
  9. You will now see the customer details, make sure it is the right customer before proceeding.
  10. Press enter and it will automatically process the credit card or the customer account with the amount shown.
  11. After the transaction is completed the status will be updated to ‘P’ (Purchased) in the rent detail screen.
  12. If the customer is present and has decided to purchase the book then proceed with normal tender operations.

Charge a Non-Returned Rental (Serial)

  1. Start a Sale transaction
  2. Press your Purchase key or enter |PURCH and press enter.
    1. Some customers may have this as |PURCHASE
  3. Enter the serial number for serialized rentals
  4. The register will show the customer information and any late fees.
  5. Make sure the amount is correct.
  6. Press the Total key.
  7. If the customer is not present then enter COF (Card On File) as the tender and press enter.
  8. You will now see the customer details, make sure it is the right customer before proceeding.
  9. Press enter and it will automatically process the credit card or the customer account with the amount shown.
  10. After the transaction is completed the status will be updated to ‘P’ (Purchased) in the rent detail screen.
  11. If the customer is present and has decided to purchase the book then proceed with normal tender operations.


Converting Sale item to a Serialized Rental Item (RSI)

  1. Press your Convert Item key or type |RSI and press enter it will take you to the Master Maintenance Screen.
  2. Enter ‘.’ to generate a new Rental SKU.
  3. Scan the SKU/ISBN of the sale item.
  4. If the item exists in another Master SKU the system will indicate what Master SKU(s).
  5. If the item is part of a Dynamic Master SKU then you will not be able to create a new SKU.
  6. If there is no master, continue creating the new master SKU for this item as described above.
  7. Create a single serial number.
  8. Note the number that was created.
  9. You can now enter that number on the POS screen and rent the item.

Converting Serialized Rental Item(s) to Sale Item(s): POS-27-5

  1. Enter the master SKU for the rental item.
  2. Enter the range of serial numbers you wish to convert.
  3. Enter N for new books or U for used books.
  4. Enter the appropriate store number.
  5. Pick the appropriate option to complete the process.
  6. The number of items removed from inventory will be displayed.
  7. Press enter to exit the process.

Note: This can be done at the register for an individual item using the following procedure if necessary, although it is not recommended

  1. Scan the serial number of the rental item.
  2. Enter the customer and guarantee information as illustrated above. This information will not be used when the rental item is converted to a sale item, but must be entered to return to the register screen.
  3. Enter |SRI
  4. This will bring a window with NEW, USED and Replacement Price of the item.
  5. Select the price.
  6. The rental transaction will be reversed and the appropriate ISBN entered on the screen.
  7. Now you will be able to sell the item.
  8. After the transaction is completed the status of this item will be ‘S’ (Sold) in your Rent Detail Screen.


Setting Email Subject and Body: POS-27-21
A video covering these and other back office steps can be found here.

  1. You will find three options for setting up emails on the rental parameters screen

E1-Pre Notice (Emails Due), E2- Past Due (Emails past due), E3- Purchase (Email that Guarantee

Method was Charged)

  1. Choose option E1 for sending emails for rental items coming due.
  2. Enter the Subject which you wanted to appear on the Email.

For example Email Subject : TCS Rental Return Notice

  1. Enter the text you want to send in the Email.
  2. Once you are done with the text enter the command =BODY in a new line.
  3. You can also have text after the Body which appears at the end of your Email.

For Example: Thanks for your business with TCS.

  1. When you have finished with the email, press enter on a blank line to finish and return to the Parameters screen. Press enter to save your changes.
  2. TCS rental Software will automatically attach the Rental Serial number, Item title, Author, Cost, due date, Replacement price, and late fee charge when sending the emails.

The procedure is the same for the other options E2 and E3.


Sending Emails: POS-27-23

  1. As discussed before, the emails can be sent to customers with items coming due, with items past due and where their guarantee method has been charged.
  2. Select 1 to send emails for items coming due.
  3. Enter the store number, date and run the process
  4. The emails are automatically sent to the customers whose items are due by the date.
  5. The same procedure is followed for emails past due and emails charged card.

Reports: POS-27-25

For all the reports enter the store number, date if required and run the report.

  1. Report for the rental items which are due by a specific date POS-27-25-1
  2. Reports for rental Items which are past due by a specific date POS-27-25-2
  3. Reports for rental items whose Guarantee Method is charged POS-27-25-3
  4. Reports for the Master List of rental items POS-27-25-4
  5. Reports for Daily Rentals POS-27-25-5
  6. Reports for Daily Returns POS-27-25-6
  7. Reports for rental items which are currently in store or whose Status is ‘I’ POS-27-25-21
  8. Report for rental items which are sold for Serialized Rentals POS-27-25-22
  9. Report for rental items which are sold for Dynamic Rentals POS-27-25-23
  10. Report for rental items which are retired. POS-27-25-24
  11. Report for rental inventory POS-27-25-25
  12. Report for Daily Dropoffs POS-27-25-26
  13. Report for Daily Rentals and Returns POS-27-25-27


Setting up Item Retirement: POS-27-4

  1. When you think the item is no longer rentable or is in a very bad condition then you need to use the Item Retirement screen.
  2. Enter the serial number of the item to be retired.
  3. Enter the retirement date. You can use ‘0’ for today’s date.
  4. Enter the retirement reason.
  5. Save the screen and once you are done then it will automatically change the Status of this item as ‘R’ which means the item is retired and you cannot rent the item.
  6. This is helpful in keeping track of your rentable quantity.


Register Reconciliation

  • Register Reconciliation
    1. After you have CLOSEd the register(s) (ran the Z tape) and have brought the drawer with all the Cash, Checks, Credit Card Charges, AR Charges, Gift Certificates, Return Receipts and whatever other items back to the office, print the Tender/Register Summary
    2. Count your drawer down to your pre-determined drawer amount.
    3. Count all your cash and compare to the Tender/Register Summary report.
    4. Count and run a tape on all your checks and compare against the Tender/Register Summary report.
      1. Include Travelers Checks as checks.
    5. Count and run a tape on all your credit card charges and compare against the Tender/Register Summary report.
      1. You will need to add the various credit cards (Mastercard, Visa, Discover…) together from the Tender/Register Summary report to get the total of all credit card charges
    6. Count and run a tape on all your AR charges and compare against the Tender/Register Summary report.
    7. Count any other items (if any – Gift Certificates, CPN…) and compare against the Tender/Register Summary report.
    8. Add all your counts to determine if you are long or short for that drawer.
  • Reconcile against Spreadsheet
    1. From the Tender/Register Summary report, use the TOTAL column when getting numbers for the Departments.
      1. Remember to add together for the TEXT category:
        • NEW TEXTBOOKS
        • USED TEXTBOOKS
        • TRADEBOOKS
        • OPTIONAL TEXTBOOKS
      2. If there are any FIX or ERROR lines, decide what departments they belong to
        • Once you assign these items a class, they will be grouped into the correct departments.
      3. From the spreadsheet:
        1. CHGS = ACCOUNTS RECEIVABLE
        2. DISC = TRANS DISCS/MKDNS
  • REF = RETURNS
    • Remember to include tax
  1. TAX = SALES TAX
  2. DEPARTMENTS = DEPARTMENTS
    • Remember to add together the departments that you need to on the Tender/Register Summary
  3. CASH ON HAND = TOTAL (of Tenders) less ACCOUNTS RECEIVABLE
  • SHORT = cash short, LONG = cash long
  1. The TTL line on the spreadsheet should match the amount of the REF line.


End of Day Procedures

End of Day Procedures

These are procedures that need to be performed at each register.

  1. As you complete the transactions needed at any one of the registers and are ready to close the register, press the X-REPORT key. The X-REPORT will give you all the same information as the Z report, only it will not zero out any totals.
  2. If you are satisfied with the result of the X-report, or are ready to close the register, press the CLOSE key. The CLOSE is the Z-report and will zero out all the totals for that individual register.
  3. Collect all the cash, coin, credit card, checks, and any other form of tender that was taken on that register.

These are procedures to be completed after all registers have been CLOSED. (This can be performed at the computer that you normally do your Back Office work at.)

  1. Close-out your credit cards. (Self hosted customers only)
    1. From the POS Master Menu, choose option 5 for Credit Cards & Communications.
    2. Choose option 2 for Close Batch / Data Capture / Post Auth
    3. Type in the protocol that you use to process credit cards in the Communications Link ID field.
      1. This field may already default to the protocol that you already use. If it does, just press Enter.
    4. Click Continue as the box that contains the process warning is displayed.
    5. Click on option 1 to Capture all open batches for all merchant Ids.
    6. Click on Yes to continue.
    7. The batch will be processed and closed, and you should see a GB (Good Batch) or Accepted, or something similar to let you know that the batch has been closed. If you receive a different message, try steps a-f again to see if the batch will close. If the batch still does not close, call the credit card company (call the number that you would use for voice authorizations).
  2. Print a Tender Summary report to reconcile your registers.
    1. From the POS Master Menu, choose the RP option for the Report Menu.
    2. Choose option 2 for Tender Reports.
    3. Choose option 21 for Tender / Register Summary.
    4. Enter your store number (1) unless it has already defaulted to your store number.
    5. Enter the Beginning Date of the date you want to report on.
      1. Normally, this date would be the current date, or the date that you are closing for.
      2. If you wanted to report on any previous date, or a date range, enter the beginning date that you want to report on.
    6. Enter the Ending Date of the date you want to report on.
      1. Normally, this date would be the current date, or the date that you are closing for.
      2. If you wanted to report on any previous date, or a date range, enter the ending date that you want to report on.
    7. Unless you want to report on a specific register, leave the Register field blank.
      1. By leaving the field blank, all registers will be reported on, and separate reports will be printed for each register.
      2. If you wanted to report on a specific register, enter the three digit register number.
    8. Enter N for the Summarize Registers field.
      1. Entering a Y will combine all the registers together into a single report and will not produce separate reports for each of the individual registers.
    9. Choose the Y option to Run the Procedure.
    10. Make sure you choose the printer option to print the report to the printer.
    11. Choose the appropriate printer to print to.
      1. This will normally be your main system printer. If you use another printer, choose that printer.
    12. Reconcile your registers.
  3. Perform the nightly Backup.
    1. From the POS Master Menu, choose option 23 for End of Day Functions.
    2. Next choose option 28 for Nightly Resize & Backup.
    3. The Tape Device # should be 3.
    4. The Start Time should be blank.
    5. The Run in Background, Resize Files, and Process History fields should all be N unless otherwise instructed.
    6. Choose the S option to Start.
    7. At the prompt “Is the correct tape in the tape drive”, choose Yes.
    8. When the backup is completed, the screen will return to asking for your User Code and Password.